Kit: Testors 1/48 F-5A Freedom Fighter
Kit:521
Price: $7.50 MSRP
Media: Injected Plastic
Decals: Two version: one the prototype, another in SEA
The F-5 was the US's attempt at building a lightweight, easy to maintain fighter to sell to allies. It was basically a single seat variation on the T-38 Talon with uprated engines and the addition of 2 20mm cannon. It not only sold well as the A version but was upgraded to the E and finally to the G which became the F-20. The F-20 was so good that the State Department limited it sales to only very friendly nations and thus killed the project as those guys were able to buy the more powerful and capable F-15 and F-16. Back to the F-5A. This sold well to many NATO countries including Norway, Holland, Spain, Turkey, and the subject of this conversion, Canada who built them at the factories of Canadair as the CF-116.
The Testor's kit itself is very long in the tooth, like most of its in-house kits, being little more than a reboxing and re-decaling of the old Hawk kit. Testor's has all the old Hawk molds and has made quite a bit of money out of them. The kit is made of very thick grey styrene. It includes basically no interior other than a seat (not even close to the real one) and a pilot to sit in it. It does have an opening canopy to gaze longingly into this lack of detail. The undercarriage is basic and crude. There are four underwing pylons with tanks/bombs and wing tip Sidewinder rails with Sidewinder shapes. The decals are excellent Scalemaster decals. This kit is made for a stand and that is where it ended up. Through Arrow Graphics of Canada, I got a lovely decal sheet of the 1989 display bird of 419 squadron and a set of resin tip tanks. Most of the building involved painting and masking. The actual gluing of parts was not that difficult and the sordid details can be found below.
The completed kit looks lovely on its stand of cherry as long as you don't look too close. I would recommend this kit for kids as the parts are big and the results are pleasing enough for the tyro. If you must have a decent F-5A, you could cannibalize a few bits off this kit (like the intakes) to fit onto the Monogram F-5E as this would seem the best way to go. Where you can get an F-5A instrument panel is beyond me, but the end result should be pleasing.
Testors # 521 1/48 F-5A
1 Dec '96
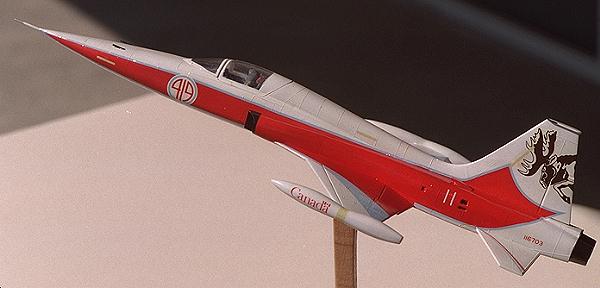
I bought this kit in preparation of doing an F-5 in a special scheme. This scheme is the red and white display aircraft from 419 Squadron from the 1989 show season. In addition, I purchased the decal sheet for this scheme and the corresponding wingtip fuel tanks from Arrow Graphics. It is my intention to make this a stand model. This is because the kit is very basic and it makes applying the decal sheet much easier. Assembly has been very easy as there are few parts. The biggest hurdle has been the attachment of the wingtip tanks and I fear I may have botched that a bit as my tanks are not aligned perfectly with the fuselage. In order to install them, I drilled holes in them and the wingtips and inserted small sections of paper clip to get a sturdy mating surface. Once this was done, the puttying began in earnest. Most of this was around the gaps left by the gear doors and the wing tip areas. A pilot was scrounged form the spares box, suitably painted and stuck in the quite barren interior. Fortunately, the pilot fills the space nicely.
The canopy was masked with tape and several coats of white were applied to all parts. This was all done by the end of March '96. Then the kit languished with several others until a couple of days ago, when I finally got back into building. Yesterday and today I have been painting the red sections of the aircraft as portrayed on the decal sheet. I used Testors Model Master Chrysler engine red as recommended by the instructions and while I did have a problem with a bit of overspray and leakage, the paint looks good and will dry for a few days before I continue and start to apply decals.
7 Dec '96
No additional work as I like to let paint dry about a week.
14 Dec '96
I have started applying the decals and so far the fit is very good.
21 Dec 96
Still applying decals. I apply one a day to ensure proper drying before attaching the next one. All the big ones are on and the paint is a pretty good, but not perfect match for the decals. The decals are just a tiny bit darker than the paint.
28 Dec 96
No additional work. Still have a number of small decals to apply.
4 Jan '97
I've been slowly applying those small decals. This is turning into a very low priority kit. Odd, since it is probably no more than a couple of hours away from completion.
11 Jan '97
Well the puppy is finally finished. I did add on all the rest of the decals, touched up the various screwups in masking for the red paint and gloss-coated the kit. As usual when I do these fancy paint schemes, I have botched up several areas and have some areas of nice red overspray that refuse to go away when I try to overpaint it in white. Oh well, it looks very nice from a couple of feet away. What else?? I assembled the base that I have had sitting around for about four years that I made out of cherry and gloss coated it as well. I then found the center of gravity of the F-5 and drilled a small hole in it for acceptance of the small bit of paperclip that was inserted. It is a tight fit so I did not glue it. I then drilled another hole in the top of the pylon and inserted the aircraft. Presto! a nice stand model to add to the collection. If there is a next time for this kit, I will know where not to screw up again. It was fun and I would recommend this type of kit to all of you. Now, what to build next!