| KIT #: | S 004 |
| PRICE: | $ 22.00 MSRP |
| DECALS: | Three options |
| REVIEWER: | Scott Van Aken |
| NOTES: |
| HISTORY |
 German Type XXIII submarines were designed to operate
in the shallows of the North Sea, Black Sea and Mediterranean Sea where larger
Type XXI Elektro boats were at risk in World War II. They were so small they
could carry only two torpedoes, which had to be loaded externally.
German Type XXIII submarines were designed to operate
in the shallows of the North Sea, Black Sea and Mediterranean Sea where larger
Type XXI Elektro boats were at risk in World War II. They were so small they
could carry only two torpedoes, which had to be loaded externally.
The first Type XXIII, U-2321, was launched from Deutsche Werft in Hamburg on April 17, 1944. It was one of six XXIIIs that went on operational patrol around the British Isles in early 1945. Forty-eight others followed from Deutsche Werft and 13 from Germaniawerft of Kiel. U-4712 was the last one launched, on April 19, 1945.
The first patrol of a Type XXIII began late in the war when U-2324 put to sea on January 29, 1945. U-2336 under the command of Kapitänleutnant Klusmeier sank the last ships lost in the war, on May 7, when he torpedoed two British freighters inside the Firth of Forth.
None of the six operational Type XXIIIs -- U-2321, U-2322, U-2324, U-2326, U-2329 and U-2336 -- were sunk by the Allies but they sank or damaged five ships for a total of 14,601 tons.
Seven Type XXIIIs were lost to various causes.
 r aircraft killed 12 crewmen and sank the boat
east-northeast of Frederika on May 4, 1945, before she ever went on combat
patrol.
r aircraft killed 12 crewmen and sank the boat
east-northeast of Frederika on May 4, 1945, before she ever went on combat
patrol. In early May 1945, 31 XXIIIs were scuttled by their crews. Twenty surrendered to the Allies and were sunk in Operation Deadlight. Only three -- U-2326 (later British submarine N-35), U-2353 (later British submarine N-37), and U-4706 (later Norwegian submarine Knerten) -- survived the war, Some near completion were transferred to the Soviet Navy as part of war reparations. In 1956, two boats, U-2365 and U-2367 were raised and became the first submarines of the new Federal German Navy.
| THE KIT |
Seems as if the Type XXIII is a popular subject with Special Hobbies coming out with a 1/72 version; at a rather hefty price, I might add. If you don't want to shell out all the bucks, then this 1/144 version would seem to be a better prospect. The Type XXIII was very much in the mold of a modern submarine that was faster under water than atop it and despite its size, was able to get around rather well.
 The ICM kit is about as simple a sub as one can get.
The molding on the kit parts is really very nicely done. I didn't find any
unwanted ejector pin marks or sink areas on the white plastic. Only a teeny bit
of flash on one screw blade. There is a single sprue which consists of the hull
halves with the conning tower incorporated into them. The rest of the bits are
for the screw, rudder, diving planes fore and aft and the various antennas and
periscope and snorkel. Some of the very fine upper deck bits are molded into the
hull half and are bound to be trashed during construction. With only about 25
parts, construction should be a piece of cake.
The ICM kit is about as simple a sub as one can get.
The molding on the kit parts is really very nicely done. I didn't find any
unwanted ejector pin marks or sink areas on the white plastic. Only a teeny bit
of flash on one screw blade. There is a single sprue which consists of the hull
halves with the conning tower incorporated into them. The rest of the bits are
for the screw, rudder, diving planes fore and aft and the various antennas and
periscope and snorkel. Some of the very fine upper deck bits are molded into the
hull half and are bound to be trashed during construction. With only about 25
parts, construction should be a piece of cake.
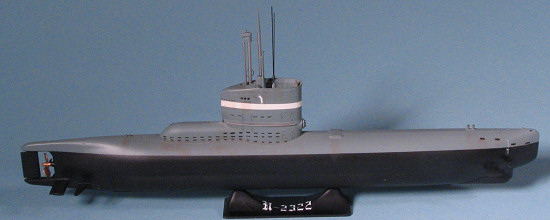
The instructions are on a single piece of paper with the write-up in Russian and English. A single exploded view is all that is needed for construction and on that same page is a painting diagram. Basic Black and Medium Grey for the sub. A small sheet accompanies the kit with three flags and markings for the conning tower. U-2322 in April of 1945, H-31 of the Soviet Navy in 1947, and S-170 of the Federal German Navy in 1957. The decals are a bit off register and matte with somewhat large clear carrier. No swastika in the center of the WWII Naval Ensign so that will have to be hand painted or come from another source.
| CONSTRUCTION |
 As I've probably mentioned a few times
before, if a kit has only a few parts, it doesn't mean it will be easy or a
quick build. This kit has very few parts, but that is the norm for submarines. I
started with the hull on this one, gluing the halves together and trapping both
the rudder and the inside of the conning tower between the halves. The conning
tower interior did not want to fit very well and almost seemed to be a bit too
wide as even after clamping it, there were gaps in it after the glue dried.
As I've probably mentioned a few times
before, if a kit has only a few parts, it doesn't mean it will be easy or a
quick build. This kit has very few parts, but that is the norm for submarines. I
started with the hull on this one, gluing the halves together and trapping both
the rudder and the inside of the conning tower between the halves. The conning
tower interior did not want to fit very well and almost seemed to be a bit too
wide as even after clamping it, there were gaps in it after the glue dried.
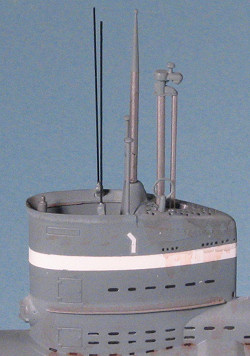
This meant some filler and in the process of filling and sanding, I removed what is probably ladder detail on the front of the conning tower. I also lost some of the small deck details as well. Why companies mold these things where they are sure to be knocked off is beyond me. I'd much rather have this stuff as a later add-on, and I'm sure so would most of you.
After a couple of sessions of filler and sanding and drilling out lost drainage hole detail in the conning tower, I added the fore and aft dive planes. These fit fairly well though I did have to drill out or clean out the attachment holes. At this stage, before any more detail was added, I decided to paint it.
| COLORS & MARKINGS |
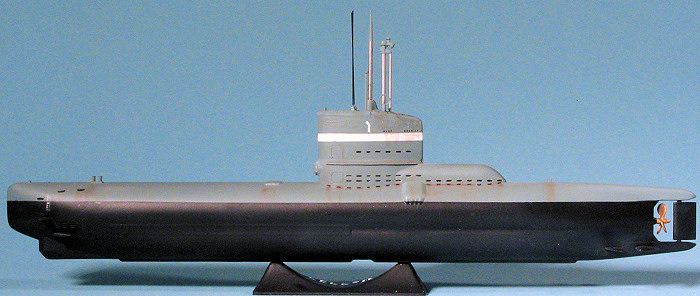
All of them are light grey over black. The
grey that is mentioned in the painting guide turns out to be FS 35237, a
blue-grey. I used Model Master enamels thinned with
 lacquer thinner for all the
colors. I first painted the upper surface grey and then masked it and painted
the black. When I was happy with the demarcation line, I masked over this line
and then masked the conning tower for the white stripe. This was painted on and
after the masking removed, I also masked over the white stripe to do touch-up of
overspray.
lacquer thinner for all the
colors. I first painted the upper surface grey and then masked it and painted
the black. When I was happy with the demarcation line, I masked over this line
and then masked the conning tower for the white stripe. This was painted on and
after the masking removed, I also masked over the white stripe to do touch-up of
overspray.
At this time, the snorkel, periscope and DF antenna shafts were painted stainless steel using Alclad II. The tips were later painted blue-grey in preparation for installation. I should also mention that the display stand that is provided is a huge help when painting as it provides a place to put the kit while the paint dries. I also brush painted the prop with Brass from Testors small enamel bottles. It really looks more like Copper to me than Brass, but that is what the bottle said.
| CONSTRUCTION CONTINUES |
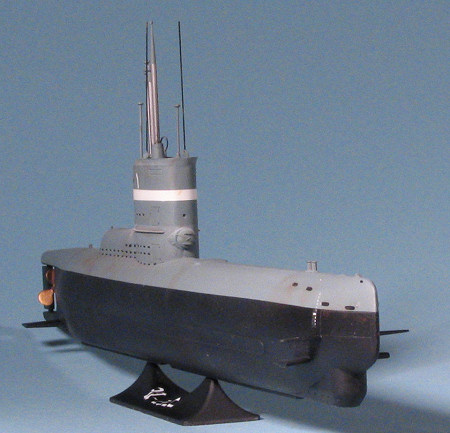
The very fine parts all succumbed to breakage, most of them when trying to remove them from the sprue attachments. As a result, I glued on only the mounts for the two inside antennas. I later drilled out these mounts after they'd been painted and inserted replacement antennas. I did the same for the two that were mounted just aft of them. I do appreciate these finely molded parts being included, but have to say that they are so very easily damaged.
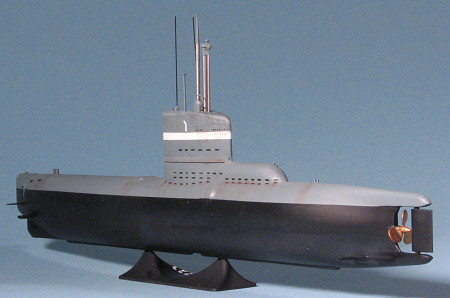
 Having chosen the Kriegsmarine version
(by painting the white stripe on the conning tower), I put on the decals.
These consist of little more than the Plimsoll line at the bow and a 'bent I'
under the conning tower. There is a flag, but I'm not sure just how to mount
that one, especially as it is missing the swastika. The decals went on without
any trouble and I applied some Solvaset to them to get them to snuggle down.
After they dried, they silvered like a big dog. I then applied more Solvaset
and then some Vllejo acrylic clear gloss paint. This helped quite a bit and I
was able to eliminate most of the silvering. Then an overall coat of clear
matte was applied.
Having chosen the Kriegsmarine version
(by painting the white stripe on the conning tower), I put on the decals.
These consist of little more than the Plimsoll line at the bow and a 'bent I'
under the conning tower. There is a flag, but I'm not sure just how to mount
that one, especially as it is missing the swastika. The decals went on without
any trouble and I applied some Solvaset to them to get them to snuggle down.
After they dried, they silvered like a big dog. I then applied more Solvaset
and then some Vllejo acrylic clear gloss paint. This helped quite a bit and I
was able to eliminate most of the silvering. Then an overall coat of clear
matte was applied.
I highlighted all the various vents with a Rapidoliner pen and applied another coat of clear matte. When it came time to replace the various antenna, for the rear ones with the little plate-shaped tops I used straight pins cut to length. The main antennas were replaced with .0125 brass wire.
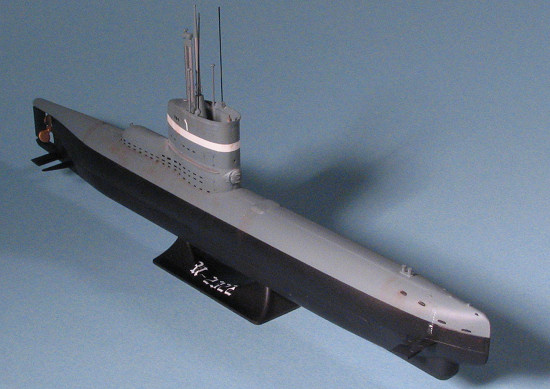
I then painted the bottom of the conning tower interior with matte black and ran a wash over the few bits there. The main antennas were painted matte black as well and the two pins with the light grey. Then the periscope, DF antenna and the snorkel were attached, These are designed to move up and down, but the periscope is a very loose fit so it was glued in place. The snorkel and DF antenna needed to have the holes in the bottom of the conning tower floor opened up as they were too small. I tacked them into place once they were installed. I'm sure that most of the time, and especially when underwater, that the majority of the things sticking up from the conning tower were retracted to where little showed. I didn't attach a flag as I wasn't exactly sure how to do it and the flag decal was off register. The base was painted matte black and the U-1223 decal attached.
The last construction step was to glue the sub to the stand. I then used a bit of Rustall to add some rust, but didn't put on much at all. Right or wrong, I figured that with as little use as these got, perhaps they wouldn't rust much. I do know that when I was in the Navy, rust was not allowed to happen and corrosion control was a major undertaking. There were always deck apes over the side with grinders and paint.
| CONCLUSIONS |
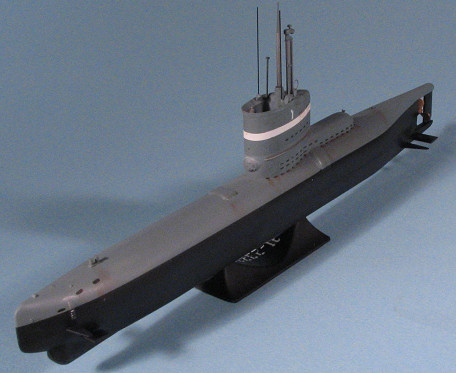
 This really is a nice model. Not very complex and
produces a fine looking specimen when it is done. I did find the very fine parts
a bit too fine and easily broken, but replacing them isn't that difficult. If
you like subs and don't have a huge amount of display space, then this one is
for you. For those interested, total construction time, at a rather relaxed
pace, was about 2 weeks.
This really is a nice model. Not very complex and
produces a fine looking specimen when it is done. I did find the very fine parts
a bit too fine and easily broken, but replacing them isn't that difficult. If
you like subs and don't have a huge amount of display space, then this one is
for you. For those interested, total construction time, at a rather relaxed
pace, was about 2 weeks.
June 2006
#1419 in a series
If you would like your product reviewed fairly and fairly quickly, please contact the editor or see other details in the Note to Contributors.