Iron Shipwrights US Army Large Tug (type LT)
| KIT # |
|
| PRICE: | $35 |
| DECALS: | none |
| REVIEW & | |
| NOTES: | Resin kit |
| HISTORY |
This is where I run into a bit of a problem. I have almost no information onthis ship. The best I could do was to go through Fahey's "Ships andAircraft of the US Fleet" which is in several volumes running from 1939 tothe early 1960s. In the 1946 'Victory Edition' there is some mention of thesetugs. Originally built for the Navy as ocean-going tugs, at least one wastransferred to the Army.
Unknown to many, the US Army had a rather substantial fleet of ships, most ofwhich were auxiliaries and large troop transports. On a personal note, when myfather, who was in the USAF, moved us from England to the US, we traveled on anarmy transport ship, the USS General Rose.
| THE KIT |
 This is my first experience withresin ship kits, so I was not sure what to expect. After having built afew resin aircraft, it looks like it would be a nice change. It comes packagedin an very sturdy box with the main casting wrapped in bubble wrap and nestledin plastic peanuts. This kit should be safe from even the clumsiest handlingwhile in the mails.
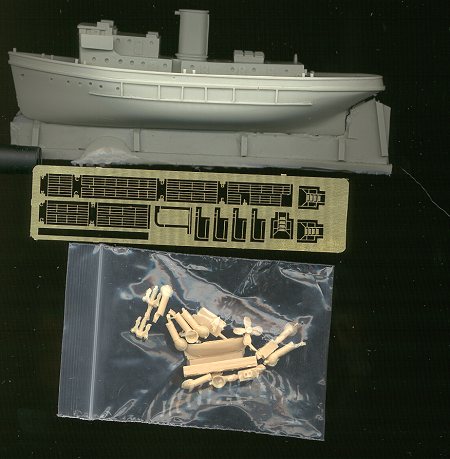
First of all, the casting is really superb. The major part of the tug iscomplete and very solid indeed. There are a few pinholes on the bottom of thehull as well as one or two in other locations, but nothing that cannot easily befixed.
As you can see, it is a full-hulled boat, measuring about 5 1/2 inches frombow to stern. The builder will either have to cut off the bottom of the hull fora waterline kit or find some other way of displaying it.
Included in the kit are two sections of brass rod (not shown) for the mast aswell as an excellent fret of etched brass for the davits, ladders and railings.A brass rudder is also included on the fret. Each of the items on the fret islabeled on the fret so there should be no confusion as to which part is which!
In another bag contains anchors, intakes, the propeller, lifeboat, andanother rudder, in case you don't like the brass one. These parts are also inresin, but a different type from the hull.
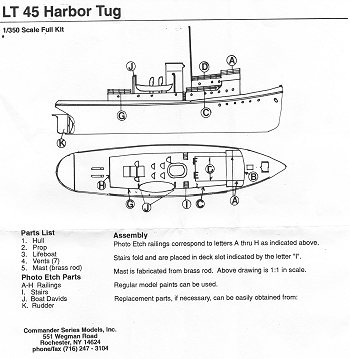 The assembly sheet is simplicityitself. A simple two view drawing of the tug shows the location of all theparts. There are holes drilled in the body of the boat where things like intakesand masts should fit so any drilling by the builder is basically not needed.
A great feature of all of Iron Shipwrights' kits is their policy onreplacement parts. Basically, if you need them, for any reason, they will supplythem free of charge. In my conversations with them, I was repeatedly told thattheir goal is to make the purchase and construction of their kits the mostpositive and pleasurable as possible. Too bad not all companies follow thatcreed!
If there was anything that I would like to see included, it would be a smalldecal sheet, painting guide and references. Especially for those of us who areship stupid!
| CONSTRUCTION |
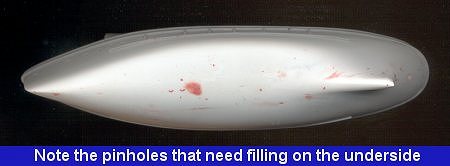 Thefirst thing I did was to cut away the rather large resin plug on the bottom ofthe ship. This was really simple to do and took about a minute as the attachmentpoint is quite thin. Next, the bottom of the hull was sanded as smooth as Icould get it using various grits of wet and dry sandpaper. As it typical ofresin kits, this sanding revealed a number of pinholes. Using my favorite thinfiller (Bondo filler), several applications were made to the hull bottom, eachfollowed by sanding. Filler should be done in very thin coats to allow for quickdrying so that there are not surprises (such as the filler contracting after thepaint has been applied). As you can see from the image, there really was not asmuch of a problem as I have encountered with other resin kits.
 Once that was accomplished, it wason to the other resin bits. These are not as well made as the hull. In fact,other than the lifeboat, they require some extra work to clean up. I noticedthat the ventilators had holes for them drilled in the decks. However theseholes are too small for the ventilators to fit into. What I did was to drill thebottom of each ventilator and then install a small section of paper clip (seeimages). The paper clip is about the same diameter as the placement holes in thedeck, so this will help to align them once they are installed. The ventilatorsrequired several coats of filler and many cleanups. I still don't know how toremove the roughness on the inside, so maybe someone can give me some guidanceon that area.
At this same time, the channel for the anchor was opened up and a section ofchain was purchased to fit through it. Then it was time for the first paintingapplication to the hull.
| PAINTING & BEYOND |
 When inquiries were made as to the color of this boat, I was told that it waseither Army OD or Navy grey. Well, all the modern ships I have been on werepainted in a medium grey color, so that is what I chose. Polly Scale has aboutthree ship colors in its repertoire, so I used Haze Grey 5 N. If this isn't theright color, some of you ship experts be sure to tell me about it. It sprayed onquite well and several coats were required to get all the nooks and crannies.For the deck, I brushed on a very dark grey to represent the non-skid surface.On real ships this material is too coarse for spraying and is applied with largerollers. The lower hull was painted with Tamiya Hull Red. It looks a bit dark tome, but that is probably because I don't have a real ship to compare it to.
The ventilators were painted the light grey color and painted separately fromthe rest of the hull. It was then that I hit on an idea to smooth out theinteriors of the ventilators. I filled the inside with several layers of whiteglue. As the glue dried, it shrank and filled in most of the depressions. Not aperfect solution, but they do look a lot better.
These were then glued to the holes in the hull with superglue. They werepointed in various directions as on the real ships, rarely were they lined up.
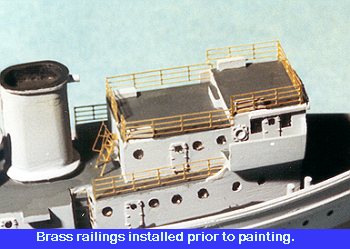 Next it was on to the etched brass bits. First the two side ladders wereinstalled. I don't have a clue as to which way is the right way on these, so Iput them both in the same way. Next were the various bits of railing. They arenumbered as to what piece goes where in relation to the instructions. I startedwith the railings on the aft section. These fit just fine with very littleproblems.
The rest of the railings are not a simple cut and fit like the aft sectionswere. Sections C and D need to be trimmed to fit as they are too long andsection C has a bit of a curve on the forward part. The rest of the sectionswere not the proper size either. Section A was too short and sections B, E, andF were too long. Fortunately, you get an extra section H that can be used toproperly fit things in place. By carefully choosing which bits go where, one canfill in all the spaces. This means cutting sections out of H for a few places.Unfortunately, there was no way that I could get a long enough complete piecefor section B so it isn't the nice curved shape that is shown in the drawing,but a section that goes straight across.
Since I had an extra ladder and no visible way for people to get on top ofthe pilot house, I placed that ladder in between sections E and F. Not sure ifit is right, but it looks just fine. After all the sections were installed, theywere brush painted with the same grey as the rest of the upper hull. Thesteps on the ladders were painted the same dark grey as the rest of theweatherdeck to simulate non-skid.
Since I had gotten superglue on the hull, I removed the glue and repaintedthe areas that I had messed up. Once that was taken care of, some of the finalbits were added. Starting on the bottom the propeller was glued in place.Actually this prop is too big and there is no way that it would ever be able toturn, especially when one attaches the rudder. I used the resin rudder ratherthan the etched brass one; more because it looked sturdier. After minimalcleanup of the rudder, it fit very well. When the rudder is installed it is veryobvious that a smaller prop needs to be found!
 With those items added, the next area to be worked on was the mast and thelifeboat. There are four lifeboat davits supplied in photo etch. Only two ofthem are needed. They are rather fragile looking, but they do work. Holes weredrilled in the deck for them and they were superglued into place. The lifeboatwas then painted the same Haze Grey as most of the rest of the boat and thenglued to the davits. It is actually a pretty strong assembly, though I wouldn'tgive it to a 5-year old to play with.
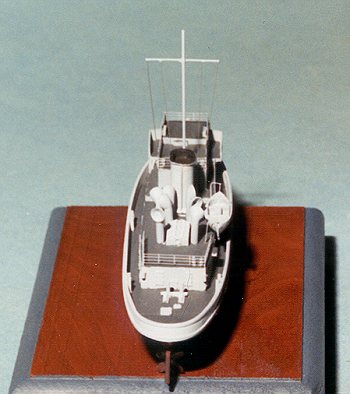
Into a hole drilled into the main deck just aft of the pilot house, wasinserted the mast. This was trimmed slightly and filed flat on the top. A crossbrace made from the smaller section of brass rod was superglued into place. Thewhole assembly was then painted Haze Grey. Final steps were the addition of theanchor and chain. The two resin anchors are not very well done and do need to bereplaced with better ones. A small section of chain was then inserted into theanchor slot and run around the windlass in the front. I am clueless on how thiswhole thing is supposed to look, but here in the middle of the US; who is toknow!
A section of black striping decal was used at the waterline, though I hadproblems getting it to conform to the curves near the stern. Guess the stripeshould have been painted on. The portholes were painted blackusing a Rapidograph to add some relief and the boat was then carefullydrybrushed with a lighter grey. I would have liked to have added a boat numberand all, but have no idea what would be put on the bow and stern. I'm equallysure that there should be flags fore and aft as well, however this is anotherarea I have no information.
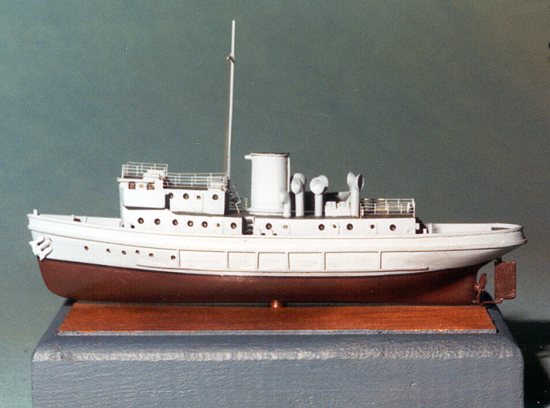
 I had a complete boat, and really, it looked pretty nice as well. Now,how to mount it?? I could just leave it as is, but that doesn't look too nice,so I got one of the many pieces of carved wood that I made years ago foraircraft bases. I think this one is cherry as it looks very nice indeed. From my stash of tubing, I found a nice short pieceof copper tubing. Using a set of drill twists as well as those with my powerdrill, a hole was drilled in the bottom of the tug as well as in the center ofthe base. When using these drills, I went from small sizes to the larger sizesin steps of about 1/64th of an inch in order not to overstress or crackanything. The final size of the tubing was 3/16. The tubing was pressed into thebase and then the base coated several times with Future floorwax to bring outthe grain. The outside of the base was painted dark blue while the centersection was left in natural wood. Then theboat was placed over the wood base and pressed into it. The fit was very good,in fact no cement was used at all.
Now that I had the boat on a nice base, the final steps of rigging it wereaccomplished using stretched sprue. I can only hope that it was rigged OK,though it does look nice. Naturally, during this stage, I knocked off oneof the ship railings and the elves that live in my carpet have secreted it awayto their hidey hole. A set of railings in on order to repair this.
| CONCLUSIONS |
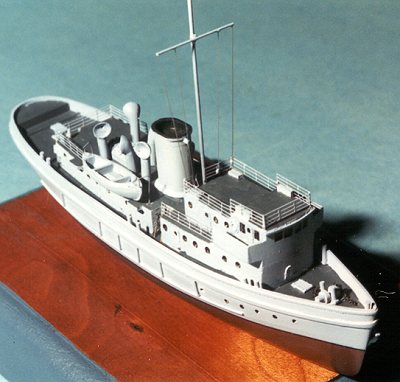
Overall, I am quite pleased with the result. It took me longerthan I would have thought, but since it was basically the first time I had trieda nautical floaty thing in such a long time, it turned out well. This kit was nomore difficult than many resin kits I have built and actually easier than most.The etched brass worked quite well and is sturdier than it first looked.
Were I to make any changes to this kit it would be in the areaof info on the subject. I'd also improve the smaller resin bits, put inpainting and rigging instructions, and give some info on where to finddecals or dry transfer lettering for this boat.
None of the above items detracted from the overall enjoyment ofbuilding this neat little boat. Now that it is finished, I look forward to doingmore of these subjects.
| REFERENCES |
I don't know of any. Info in this area is appreciated.
My thanks to the fine folks at Iron Shipwrights for providing the review sample.