
Hasegawa 1/72 Sv-262Ba Draken III
| KIT #: | 65835 |
| PRICE: | 3600 yen SRP |
| DECALS: | Two options |
| REVIEWER: | Scott Van Aken |
| NOTES: | 2017 release |
| HISTORY |
Macross Δ (マクロスΔ Makurosu Deruta?, lit. "Macross Delta") is a science fiction anime television series that aired on Tokyo MX in Japan from April 3, 2016 to September 25, 2016. The fourth television series set in the Macross universe, it is directed by Kenji Yasuda (Arata: The Legend, Noein) and written by Toshizo Nemoto (Log Horizon, Tokyo Majin) with Shōji Kawamori being the chief director and mechanical designer, while Chisato Mita handling the original character design. Kawamori is also credited as the original creator along Studio Nue.
 Macross Delta is set in the
year 2067, 8 years after the events of Macross
Frontier in a remote part of the Milky Way Galaxy
called the Brisingr Globular Cluster (ブリージンガル球状星団
Burījingaru Kyūjō Seidan),
which is plagued by the Var Syndrome (ヴァールシンドローム
Vāru Shindorōmu),
a mysterious phenomenon which turns people berserk without any apparent cause. A
team of talented idols, the Walküre,
uses the power of their songs to calm down the infected by the Var Syndrome,
assisted by the Delta Flight, a team of experienced Valkyrie pilots, while
facing the interference from the Aerial Knights of the Windermere Kingdom, which
found a way to exploit the infection on their favor as part of their plan to
resume war against the New United Government (新統合政府
Shin Tōgō-seifu)
for control of the Cluster.
Macross Delta is set in the
year 2067, 8 years after the events of Macross
Frontier in a remote part of the Milky Way Galaxy
called the Brisingr Globular Cluster (ブリージンガル球状星団
Burījingaru Kyūjō Seidan),
which is plagued by the Var Syndrome (ヴァールシンドローム
Vāru Shindorōmu),
a mysterious phenomenon which turns people berserk without any apparent cause. A
team of talented idols, the Walküre,
uses the power of their songs to calm down the infected by the Var Syndrome,
assisted by the Delta Flight, a team of experienced Valkyrie pilots, while
facing the interference from the Aerial Knights of the Windermere Kingdom, which
found a way to exploit the infection on their favor as part of their plan to
resume war against the New United Government (新統合政府
Shin Tōgō-seifu)
for control of the Cluster.
| THE KIT |
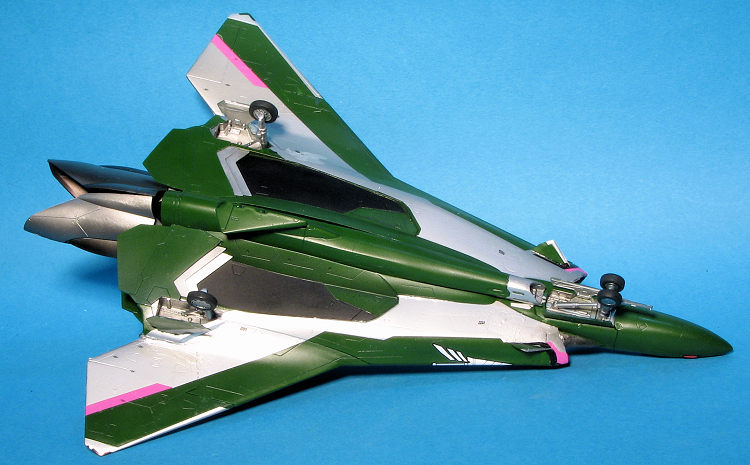
This is based on last year's initial release of the Sv-262Hs.Apparently it is one of many iterations of the Macross universe. I have Bill Wagner, the current IPMS Gateway president to thank for getting interested in Macross. This kit was purchased to help beef up a train shipment from Japan. I am rather surprised at the size of the thing as it comes in Hasegawa's thicker standard boxes. It is also molded in dark green, apparently to help with painting.
Like the s-f/fantasy/anime kits that are produced in Japan,
this one has an extensive decal sheet that takes care of just about any need to
actually paint the kit if you are happy with the color of the plastic.
 Otherwise, there is some paint mixing in your future if you use the recommended
Gunze paints. This shade is a mix of 60% Bright
Blue, 20% yellow, 10% gloss black, and a touch of gloss white. The end result of
this will be an interesting dark green. I'm sure one can find a car paint that
will be the same. While on the subject of markings, the decal sheet is quite
large and the silver on it is really quite well done. I could not imagine
masking to paint those areas.
Otherwise, there is some paint mixing in your future if you use the recommended
Gunze paints. This shade is a mix of 60% Bright
Blue, 20% yellow, 10% gloss black, and a touch of gloss white. The end result of
this will be an interesting dark green. I'm sure one can find a car paint that
will be the same. While on the subject of markings, the decal sheet is quite
large and the silver on it is really quite well done. I could not imagine
masking to paint those areas.
Molding on the kit is superlative. There are a lot of parts, some of them rather small, but then this is not a snap kit. The cockpit section has a nicely done seat and one will actually have to do a bit of surgery to some of the seat parts. This will all fit into the lower fuselage along with the intakes (which are four parts per side) and a couple of exhaust tailpipe constructs. These latter pieces will hold the lone polycaps so that when one installs the tailplanes they can be moved. There is a huge sprue of poly-bits, but you only use a couple of them. The other polycaps fit into the lower fuselage.
 There are a considerable number of vent/intakes that fit atop
the upper rear fuselage. There are two options for these and I've not a clue
what they might represent, but they do need to be attached in a specific order
and decaled prior to assembly. After this the nose cone assembly is built. No
indication of any weight is provided so perhaps it is not needed.
There are a considerable number of vent/intakes that fit atop
the upper rear fuselage. There are two options for these and I've not a clue
what they might represent, but they do need to be attached in a specific order
and decaled prior to assembly. After this the nose cone assembly is built. No
indication of any weight is provided so perhaps it is not needed.
Next the various wings, and fins are assembled and decaled. This all tells me that one needs to paint this as one goes along. The kit comes with a pilot figure and you can model this gear up. If you choose the gear down option, those are provided and very nicely detailed as well. For the underside there is what appears to be a huge weapon of some sort. Perhaps a rail gun or a particle cannon. This has its own stabilizing fin, which would be folded for modeling the vehicle on its gear. This fits into that poly-cap you installed in the fuselage and has an interchangeable piece so it can be shown either extended or retracted into the shallow weapon's bay. Of course, you can also do an open or closed canopy. The kit comes with one of Hasegawa's very cool and complex looking articulated display stands.
| CONSTRUCTION |
Having just watched the Macross Delta series on disc, I thought it would be a neat idea to build this one. I'd had the kit for about a year and it looked like it would be a good project. Little did I realize at the start just what I was in for. I realize that sounds rather melodramatic, but there is a reason that will make itself clear as we go along.
 I started this like any other airplane kit and that was by
going over the instructions a couple of times. Especially important as I build
very few s/f kits. I saw right away that I'd need to do a lot of prepainting so
I got to it. This included the interior, exhaust bits, intake trunking and a
number of other bits. One will use quite a few metallic colors on this one so it
is a good idea to have several shades on hand. For the metallics, I used Alclad
II. There are some polycaps that need installed so take care during these parts
of the build. No real need to clean up seams on the exhaust piping as you won't
see these once all is assembled.
I started this like any other airplane kit and that was by
going over the instructions a couple of times. Especially important as I build
very few s/f kits. I saw right away that I'd need to do a lot of prepainting so
I got to it. This included the interior, exhaust bits, intake trunking and a
number of other bits. One will use quite a few metallic colors on this one so it
is a good idea to have several shades on hand. For the metallics, I used Alclad
II. There are some polycaps that need installed so take care during these parts
of the build. No real need to clean up seams on the exhaust piping as you won't
see these once all is assembled.
I also decided to prepaint the major fuselage and wing parts as you have to apply decals to some prior to attaching them. Now I am lazy and did not want to mix the darkish green shade as recommended so I used a dark emerald green from the Tamiya paint line. Should I do another, I'd choose RLM 70 black green as I think it is a closer green.
The actual fit of the parts is very good and none of the parts gave me any issues in this regard. You will have to fill some seams so be prepared to repaint. There are also large areas on the upper and lower fuselage that get a matte black so you'll be doing masking as well. The little chevrons prior to the rear of the fuselage were also painted, though decals are provided if you so wish. Trust me, paint them. There is no need to install the large exhaust petals at this time as they will just get in the way. Paint them and put them aside.
 Once the fuselage is together, you work on the separate nose
section. This has some inserts that can be a bit fussy to fit. . No nose weight
is required. Once this is attached, you have some fairings behind the cockpit to
attach. One has guns and the other does not, your choice. The next step is to
build the inner and outer wing sections. There are decals for the joining faces
of these parts, but you don't need to add them as they will be covered later on.
Fit of these to each other and the fuselage is quite positive, but there is a
bit of wiggle room so be sure they are lined up properly. This is followed by
the fin and some inserts.
Once the fuselage is together, you work on the separate nose
section. This has some inserts that can be a bit fussy to fit. . No nose weight
is required. Once this is attached, you have some fairings behind the cockpit to
attach. One has guns and the other does not, your choice. The next step is to
build the inner and outer wing sections. There are decals for the joining faces
of these parts, but you don't need to add them as they will be covered later on.
Fit of these to each other and the fuselage is quite positive, but there is a
bit of wiggle room so be sure they are lined up properly. This is followed by
the fin and some inserts.
The underside has a large cannon. This is a separate assembly that has a small fin on it that is folded on the ground and extended in flight. Since there is an in-flight option, there is a separate attachment piece for the top of it that allows it to be shown lowered. While no display stand is provided for this options (you can buy it separately), there is a special attachment included in the kit just for this kit. Since my model will be on its wheels, I chose the folded fin option. The landing gear is well formed and fits very well. Gear doors, not so much as I knocked off the nose gear doors several times during handling.
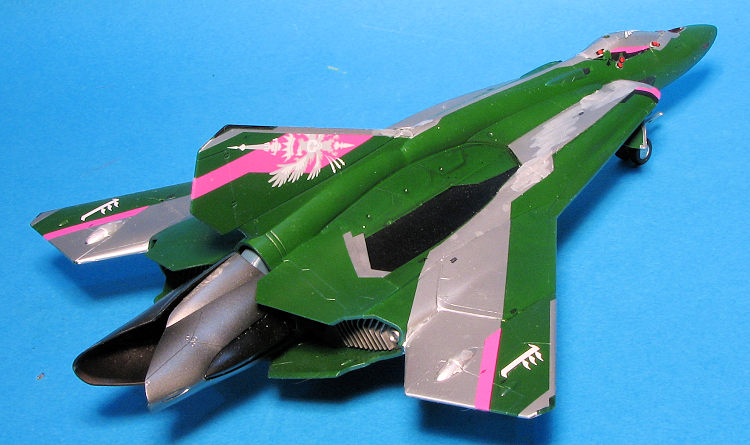
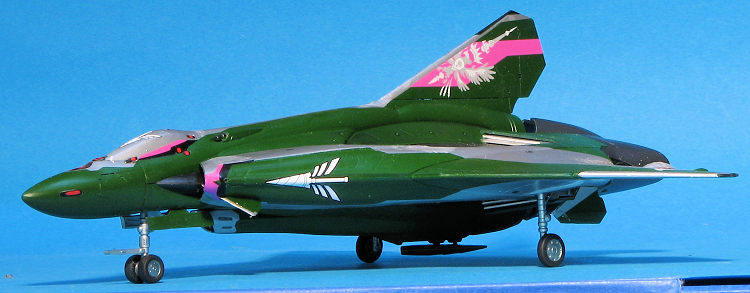
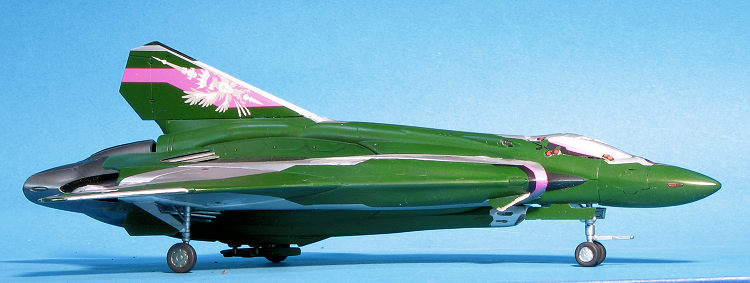
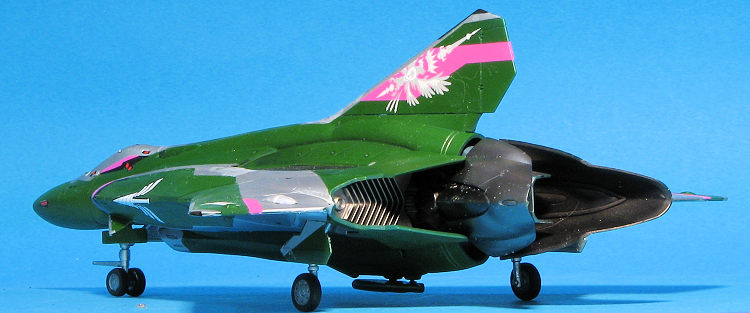
| COLORS & MARKINGS |
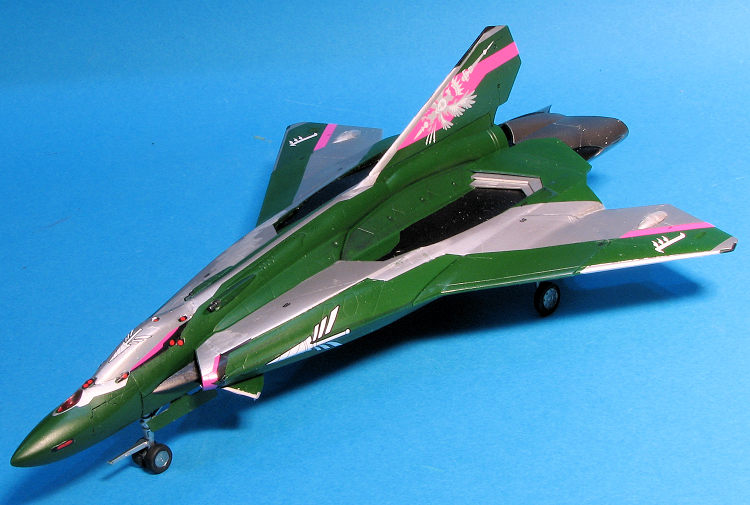 nearly impossible to get to conform to
surfaces without looking like a mess. It is the application of decals that
made this a 5 week project instead of a 2-3 week one. The design of these
decals is such that you can easily paint all the silver bits. To cover all
the screw-ups, I brushed on Vallejo's aluminum, which is a great match, but
you can tell where it was done.
nearly impossible to get to conform to
surfaces without looking like a mess. It is the application of decals that
made this a 5 week project instead of a 2-3 week one. The design of these
decals is such that you can easily paint all the silver bits. To cover all
the screw-ups, I brushed on Vallejo's aluminum, which is a great match, but
you can tell where it was done. | CONCLUSIONS |
I should start this by saying that my experience was colored quite a bit by the situation with the decals. I knew that metallic decals required some extra care, but was not prepared for the extent of the mess they caused. I have a similar craft to this that has gold markings that cannot be painted on and it gives me pause. Aside from the markings, it is a well engineered kit that should be fairly easily built by anyone with experience. Needless to say, this is one of those 3-6 footers.
| REFERENCES |
https://en.wikipedia.org/wiki/Macross_Delta
30 March 2018 Copyright ModelingMadness.com. All rights
reserved. If you would like your product reviewed fairly and fairly quickly, please
contact
the editor or see other details in the
Note to
Contributors. Back to the Main Page
Back to the Review
Index Page
Back to the Previews Index Page