BanDai 1/72 Sanka B
| KIT #: | 0156537 |
| PRICE: | 2500 yen when it was released |
| DECALS: | Two options |
| REVIEWER: | Scott Van Aken |
| NOTES: | Two complete kits with stands. 2008 release |
| HISTORY |
The Sky Crawlers (スカイ・クロラ Sukai Kurora) is a 2008 Japanese anime film, directed by Mamoru Oshii. It is an adaptation of Hiroshi Mori's novel of the same name. It was released across Japanese theatres by Warner Bros. Japan on August 2, 2008.Animated by Production I.G, the film was written by Chihiro Itō, featuring character designs by Tetsuya Nishio and music by Kenji Kawai. The 3D CG animation for the movie was produced by the Polygon Pictures studio, who also produced the 3D CG for Oshii's previous film Ghost in the Shell 2: Innocence.
 The Sky Crawlers is set in an alternative history timeline where although the
world is at peace, in order to ease the tension of a populace accustomed to war
and aggression, private corporations contract fighter pilots to engage in actual
combat operations against each other. The film introduces a mystery involving
characters called Kildren (キルドレ Kirudore?,
"kill-dolls") - humanoids genetically engineered in a way that enables
them to live
eternally in adolescence.
The Sky Crawlers is set in an alternative history timeline where although the
world is at peace, in order to ease the tension of a populace accustomed to war
and aggression, private corporations contract fighter pilots to engage in actual
combat operations against each other. The film introduces a mystery involving
characters called Kildren (キルドレ Kirudore?,
"kill-dolls") - humanoids genetically engineered in a way that enables
them to live
eternally in adolescence.
For those who want to see a movie that is superbly done and has both a lot of action and will make you think, I highly recommend picking this up or watching it on the various streaming anime sites. Here is a link to the opening of the film from You Tube.
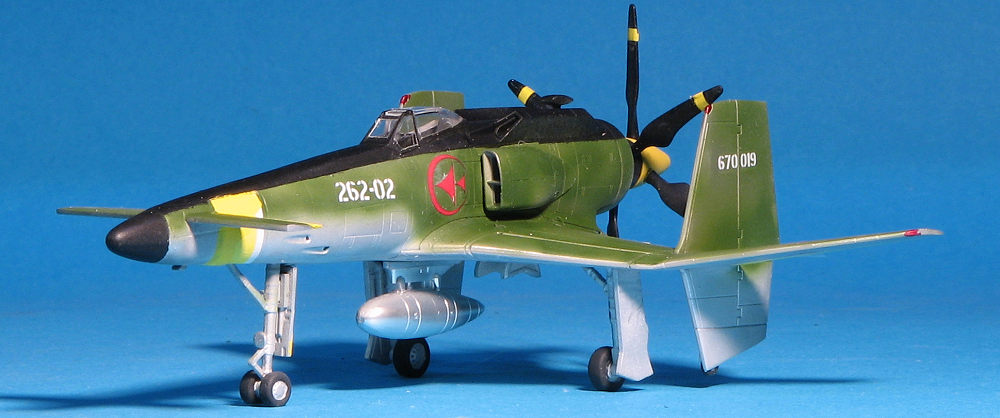
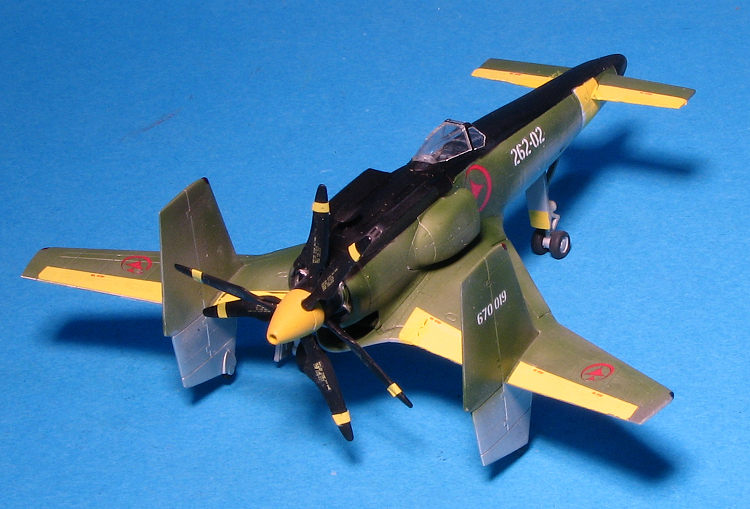
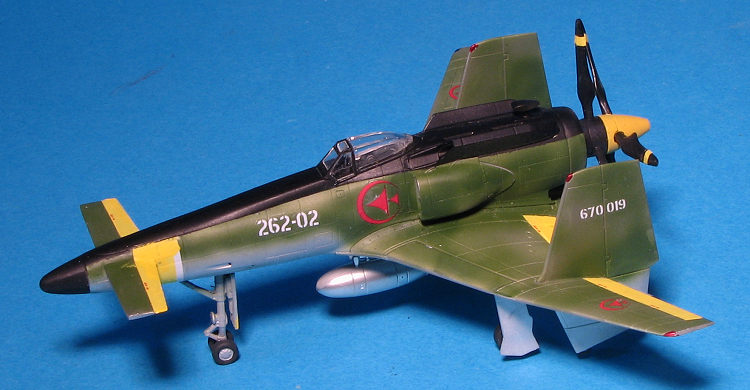
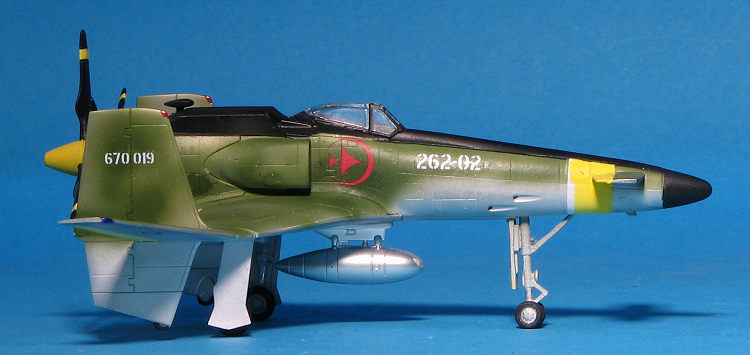
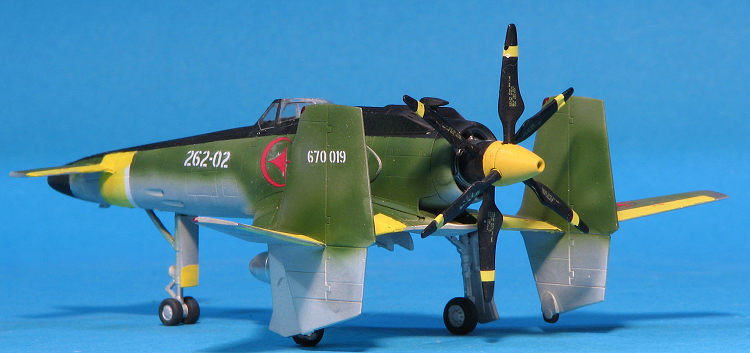
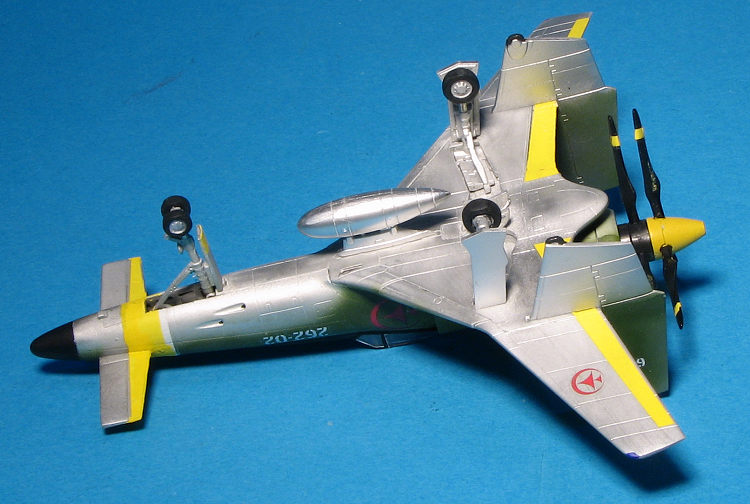
All of the aircraft look like very modern WWII types that are vaguely based on planes with which many may be familiar. There are at least eight identified aircraft types in the film. Two have been kitted. This one is the Sanka Mk.B, the standard single seat fighter of the Rostock Iron Works. It is quite reminiscent of the Kyushu J7W Shinden.
| THE KIT |
A
couple of years ago, I stumbled across The Sky Crawlers movie and immediately started
looking for kits. It is not unusual for Japanese model makers to produce kits
based on subjects seen in popular anime films and television series. I was able
to find this one from several sources, mostly in Japan for over $100.00.
Too rich for me. The other kit from this series, the Skyly J.2 is even more
expensive. Recently I had the
 opportunity to get this one for considerably
less, though still twice the cover price and snagged it. This kit was also made
in 1/48 and recent searches found one for $279.00 (!).
opportunity to get this one for considerably
less, though still twice the cover price and snagged it. This kit was also made
in 1/48 and recent searches found one for $279.00 (!).
This is a double kit and obviously meant for the home market as everything is in Japanese. The kits have very large mounting holes and so perhaps it is as much a snap kit as it is anything else. Surface engraving is excellent, and while each kit has a cockpit, it is really designed to have the pilot in it. There is no instrument panel or sidewall detail; just a floor, seat and stick.
No nose weight is indicated and the kit will need quite a bit, though there is not really much space in which to place it. The aircraft has contra-rotating props and a gear assembly is built up for this prior to closing the fuselage halves. The kit has a single semi-lower wing with the lower outer wing molded with the upper wing pieces. There are also separate leading edges for the inner wing.
The upper forward fuselage is a separate piece as are the
upper fuselage intakes. Canards and fins are a single piece and simply slot in
place. A neat option is clear discs so you can model the engine operating
 when in the flying mode. There is an insert for the lower fuselage for a
display stand. Landing gear can either be built up and installed or you can do
an in flight option with closed doors. In addition to the pilot figure, the base
commander and her dog are included as figures.
when in the flying mode. There is an insert for the lower fuselage for a
display stand. Landing gear can either be built up and installed or you can do
an in flight option with closed doors. In addition to the pilot figure, the base
commander and her dog are included as figures.
Instructions are entirely in Japanese, but not difficult to follow. However, it does become an issue when it comes to paints as all colors are apparently generic and a lot of mixing is required. I suggest watching the movie a bunch of times to get the shades you want. All the yellow bits save the prop spinner are provided as decals. These are nicely printed and offer markings for the two main male characters.
| CONSTRUCTION |
 The kit could almost be considered a snap fit, however, to get the best fit,
glue is needed to properly lubricate some of the parts into place and to
keep them there. It is important to actually follow the instructions on this
one to be sure you don't miss something as there are bits that are trapped
in place that you would normally add a bit later. The landing flaps are such
a case.
The kit could almost be considered a snap fit, however, to get the best fit,
glue is needed to properly lubricate some of the parts into place and to
keep them there. It is important to actually follow the instructions on this
one to be sure you don't miss something as there are bits that are trapped
in place that you would normally add a bit later. The landing flaps are such
a case.  This is followed by the various cooling scoops and the aft engine cowling.
If doing the plane in flight, Bandai provides a pair of clear discs to
simulate the spinning props and offers a guide on how to paint these. The
prop assembly is somewhat complex and you need to ensure you have things
properly aligned or the parts won't fit. This can be left off until after
painting as it press fits into place. Canopy and fins fit quite well as do
the nose canards.
This is followed by the various cooling scoops and the aft engine cowling.
If doing the plane in flight, Bandai provides a pair of clear discs to
simulate the spinning props and offers a guide on how to paint these. The
prop assembly is somewhat complex and you need to ensure you have things
properly aligned or the parts won't fit. This can be left off until after
painting as it press fits into place. Canopy and fins fit quite well as do
the nose canards. | COLORS & MARKINGS |
 were on, I misted on FS 34102 as I had
some already mixed. This gave a somewhat spotty finish to the upper surface
that looked sort of like the movie plane. I then started masking as the nose
and the upper fuselage is black. Do yourself a favor and pull off the side
intakes as it makes masking the upper black so much easier.
were on, I misted on FS 34102 as I had
some already mixed. This gave a somewhat spotty finish to the upper surface
that looked sort of like the movie plane. I then started masking as the nose
and the upper fuselage is black. Do yourself a favor and pull off the side
intakes as it makes masking the upper black so much easier. | CONCLUSIONS |
Despite the issue with the decals, this is a pretty nice kit. All the contact points are quite positive and the actual building went like a breeze. It is something a bit different from the norm and the contra-rotating prop actually works!
| REFERENCES |
https://en.wikipedia.org/wiki/The_Sky_Crawlers_(film)
16 February 2018 Copyright ModelingMadness.com. All rights reserved. If you would like your product reviewed fairly and fairly quickly, please contact the editor or see other details in the
Note to
Contributors.