| KIT: | Revell Perry Rhodan Space Jet 'Glador' |
| KIT # | 4852 |
| PRICE: | $13.00 |
| DECALS: | one set for the 'Glador' |
| REVIEW & | |
| NOTES: |
|

| HISTORY |
Way back when (like the late 1960s), I got hooked on theadventures of Perry Rhodan. I entered the series around book number #25 andfinally was unable to find any more around the 70th adventure. They were funreading and the books were cheap. Unfortunately, I forgot almost all of what itwas all about, eventually giving away all the paperbacks about three years ago,certain that I would never read them again.
Just the other day, I was in my favorite hobby shop, CRM Hobbiesin St. Louis http://www.crmhobbies.com (there's your plug, Chris!!) and Inoticed he got in some of these kits. Well I am always interested in coollooking sci-fi models and this one fits right into that category. The price wasright, too, so I whisked it away.
| THE KIT |
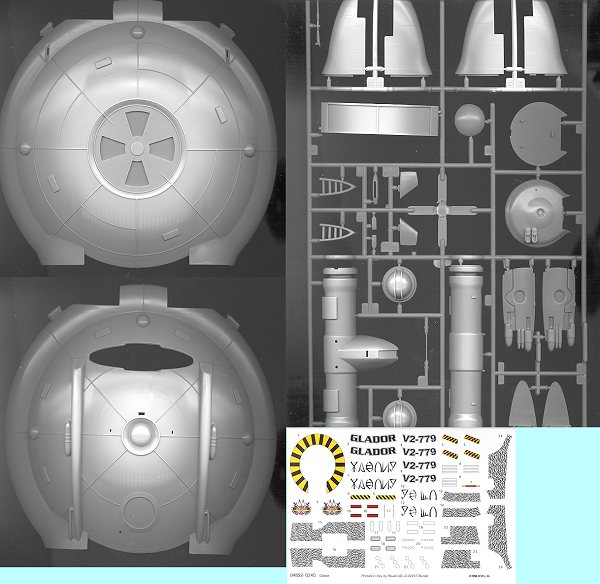
 Feverishlyopening up the box (and it is one of those miserable ones that opens at eitherend, not giving you anything to build you model in), I was confronted by asingle sprue containing 25 parts in its own bag. Also in its own bag, was thehull top and bottom. No clear bits, but a very nice decals sheet that is matteand has the yellow printed slightly off register. If there ever was a weekendkit, this is it. Actually, the dedicated kid would have this together and'flying' in about a day!
The quality of the parts is good with relatively crispdetailing. Most of the detailing is of the raised panel line variety, a ratherodd thing to find in a new kit, but then looking at the market this is aimed at,most buyers wouldn't care. Were this to be an enthusiasts kit, there wouldeasily be twice or three times the parts, however, much of the detailing ismolded on to parts rather than having the bits glued on.
There is no flash at all and only a few sink marks or ejectorpins. Test fitting of a few of the parts shows that most are a bit sloppy andfiller will be needed on most joins; nothing that a dedicated builder wouldn'tbe able to do. If there is one thing they needed to add to this kit, it is adisplay stand of some sort as there are no landing gear. This means you need tobuild a stand, hang it from the ceiling or just let it rest on the hull bottom.
The instruction sheet is typical Revell of Germany. Printed onnewspaper quality paper it has the usual parts breakdown, warnings, briefhistory, paint guide, decal guide and 11 step construction sequence.
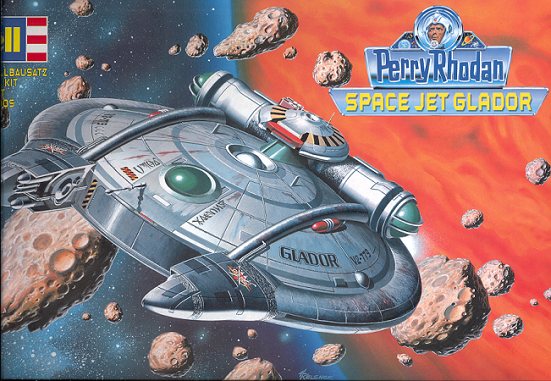
The painting is not going to be a simple job as there arenumerous bits and pieces on the hull that need to be different colors. Choosing colorswill be a problem for those outside of Europe as the callouts are for paintnumbers I don't recognize, so I believe they are probably Humbrol. No FS numbershere, just good old 'fiery-red' and 'mossy green' as well as a couple of 'grey'.You really need to use the box art when it comes to figuring out variousshades.
Revell of Germany decals have always gotten mixed reviews.Sometimes they work just fine and other times they are terrible. I hope thesework fine as aftermarket replacements are not going to be available.
| CONSTRUCTION |
For me, constructions starts with building up as many subassemblies as possible.With this kit there are basically five of them; the main saucer, the two front protuberances,the upper cylinder and a smaller saucer shaped assembly. Fit of all of
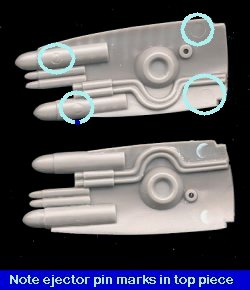
 One of the reasons that you need to fill all thegaps and smooth things out is that when other parts are put over them, the gapsare VERY noticeable. There are also a few parts with ejector pin markings onthem. Typical of this are the inserts that fit over the part shown above. Forsome odd reason, they were molded with the detail side where they were ejectedfrom the mold. Had they been molded the other way around, the pin marks wouldhave been completely hidden! As you can see, there are four of them on eachpiece that need cleaned up.
Other areas that need somework are the edges of the saucer with some sink marks and the caps on the uppertubular housing. These parts should be aligned with the direction of flight, butthe keys prevent that. I cut away on the keyways to allow me to align the capsproperly. The caps themselves are a bit oversize and when they are installed,they need filled and then some hefty sanding to get them to blend in with thesurrounding area.
| PAINT & DECALS |
| CONSTRUCTION CONTINUES |
| CONCLUSIONS |
| REFERENCES |
Review copy courtesy of me and my wallet! If you would like yourproduct reviewed fairly and quickly by a site that has over 800 visits a day,please contact me or see other details inthe Note toContributors.