 December 26 1998
Hypersonic Drone a.k.a. Merlin 1/72 Meteor Mk8
December 26 1998
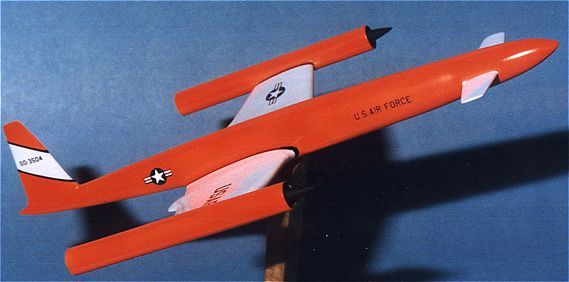
Our club had a contest that required one to use a Merlin kit. One could do anything to the kit as long as 50% of the kit was used. My decision was to use the Meteor F.8 kit to build a futuristic aircraft. The idea came from a book I have celebrating the 50th anniversary of flight back in1953. On the last page of the book was an artists rendition of a hypersonic interceptor of the future (like 1970). It was clean looking and appeared to be a powered by two wingtip-mounted ramjets. So, I used it as a basis for my kit.
Well if you have ever built a Merlin kit, you know that they are not the easiest to build. The parts are very thick and fit is questionable. You definitely use your modeling skills with one of these!. Iused the fuselage, wings and part of the horizontal stabilizer from the kit. The rest came from the spares box, sheet styrene and Evergreen tubing.
 The fuselage of the kit is in four parts. Those were glued together and the
first of the filling began. Once that was semi-OK, I then looked around
for something to use for the nose and to lengthen the fuselage. I found a SAAF Buccaneer slipper tank from the Airfix 1/48 kit to use for the
nose and wrapped a sheet of styrene around it to mate to the fuselage of the
Meteor. For the tail, I hacked off a portion of the Meteor horizontal stab and
glued it to the stub of the Merlin kit. Much, much, much, filler and
sanding later, the fuselage was relatively smooth. The wings were just the
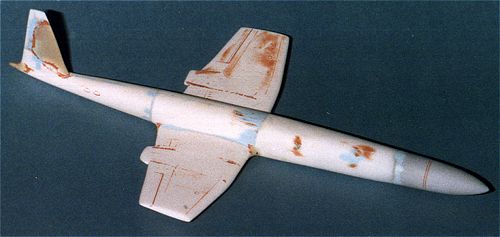
kit wings minus the engine pods.
The fuselage of the kit is in four parts. Those were glued together and the
first of the filling began. Once that was semi-OK, I then looked around
for something to use for the nose and to lengthen the fuselage. I found a SAAF Buccaneer slipper tank from the Airfix 1/48 kit to use for the
nose and wrapped a sheet of styrene around it to mate to the fuselage of the
Meteor. For the tail, I hacked off a portion of the Meteor horizontal stab and
glued it to the stub of the Merlin kit. Much, much, much, filler and
sanding later, the fuselage was relatively smooth. The wings were just the
kit wings minus the engine pods. 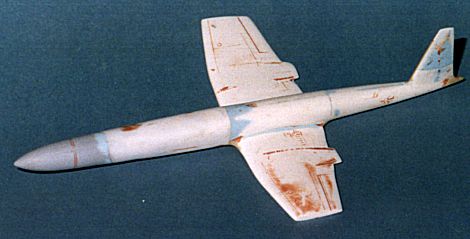 All
the engraved detail and various lumps, bumps and imperfections were filled and/or sanded. I tried to get a nice airfoil section by
trimming down the trailing edge.
All
the engraved detail and various lumps, bumps and imperfections were filled and/or sanded. I tried to get a nice airfoil section by
trimming down the trailing edge.
The real poser was the wingtip engines. I had originally thought
to use brass tubing, but was having difficulty finding just the right size. Then there was the problem of attaching them to the wingtip. This
was all solved by the use of Evergreen tubing. Frankly, I will probably
never use brass tubing again for large items. It was perfect. Since
ramjets are pretty much a dead end for propulsion (at least now), this aircraft
needed proper turbojets. Like the SR-71 ! That meant intake cones.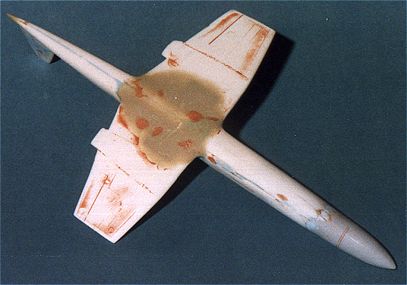 These
were developed by getting some Heller Mirage IIIE skinny fuel tanks, chopping
off the ends, and attaching them to circles that fit inside the tubing. The tubing was fit to the wingtips by slicing into them with a dremel, sliding them on the wingtip, aligning them and then fairing them in.
These
were developed by getting some Heller Mirage IIIE skinny fuel tanks, chopping
off the ends, and attaching them to circles that fit inside the tubing. The tubing was fit to the wingtips by slicing into them with a dremel, sliding them on the wingtip, aligning them and then fairing them in.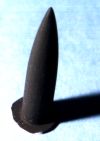
Something was still missing. Yes, the
fore planes These were scavenged from the wings of a Huma Me-209 v3. They were filled
and sanded, ready to install. I installed them by drilling a hole in the
root of each and inserting a bit of paperclip. Then holes were drilled in the nose area to accept them. The kit was ready for primer
and painting.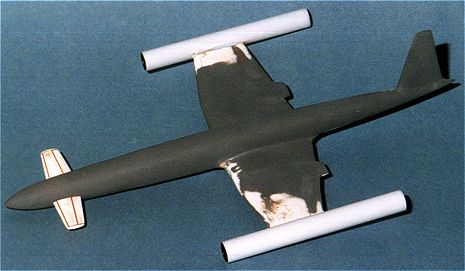
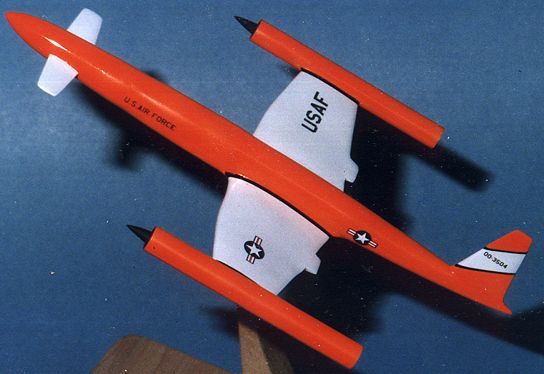
After primer (and more filling and sanding), the entire airframe was painted gloss white as in the 1953 image. It looked very blah! It needed some color. Thinking back to a trip to Tyndall AFB and a tour of the drone facilities, I decided that this would be a hypersonic drone. Drones are always very colorful. What better color than Day-Glo! Humbrol gloss Blaze was the paint of choice. Unlike other day-glo paints, this covered very well and was not the pain it could have been. It is more of an orange than a red and is really bright in the sunlight. The wings themselves and a section of tail were kept white. Decals were used at the wing roots and tips to set off the different colors. Decals came from the spares box and various Scalemaster sheets. It was then plunked on a stand. Overall, a rather interesting diversion from the norm. While it did not win the contest, it looks great and is a big change from the usual Tamiya/Hasegawa/Italeri.......kits that I normally build.
Copyright ModelingMadness.com. All rights reserved.