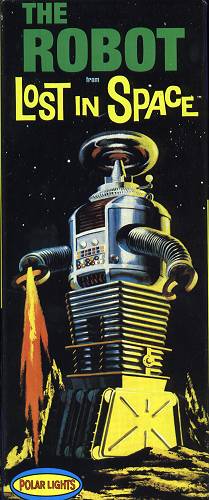
Kit: Polar Lights 'Lost in Space' Robot 
Scale: ??
Kit Number 3030
Price: $17.95
Media: Injected ABS Plastic
Decals: N/A
Date of Review: 12 October 1998
Review and Photos by: Scott Van Aken
"DANGER, DANGER, WILL ROBINSON!"
Probably one of the better known quotes from Sci-FiTV that ranks up there with "Beam me up, Scotty" and "You have entered...theTwilight Zone". With the release of the movie "Lost in Space", thedemand for the original series kits has escalated. The only kit producedfor mass markets was the old Aurora kit of the robot and, thanks to PolarLights, we now have it back.
The first thing you notice as you try to open the box,is that this box is strong enough to have a truck run over it without damagingthe contents. It is easily 1/8" thick cardboard. The next thingyou notice is the smell. Whew!! This kit is molded in ABS plastic insteadof the usual styrene and the odor takes a bit of getting used to. Oncethe box is open, it is time to look at the kit. Shipping had managedto remove most of the items from the sprues, and close inspection shows thatthe molds were really in need of cleanup. While undoubtedly some wasdone, there were many areas where instead of crisp corners and crevices,there were blobs. In addition, there was some serious mold matchmisalignment, especially on the robots tracks. Other evidences of pittingon the molds were rough surfaces and some tiny sections were missing andthe inevitable blobs of plastic filled the holes. In case you hadn'tfigured it out yet, this is NOT a kit for the beginner or faint ofheart.
 Sincethis is ABS, regular tube glue doesn't work. However, Weld-On #3, my adhesiveof choice, works just fine as does most 'hot' glues like Tenax-7R. The kitcan be built in subassemblies as frankly the instructions are the old Auroraones and basically is just an exploded diagram.
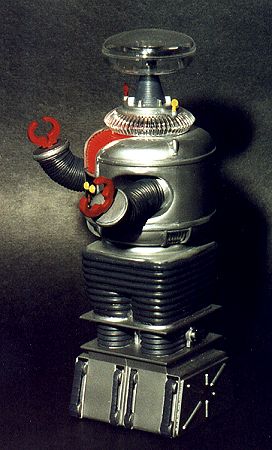
When building the subassemblies, I took a lot of timefilling and filing. This was especially needed on the accordion armsand the body where there are lots of convolutions and seams that need work.Patience and a good set of files will win the day. In addition, I brushedWeld-On glue over the seams to soften and blend in the plastic. Itworked remarkably well. Painting them was done using various Metallizer colorsfor the ends and my home-brew tire color for all the accordion features onnot only the arms, but legs as well.
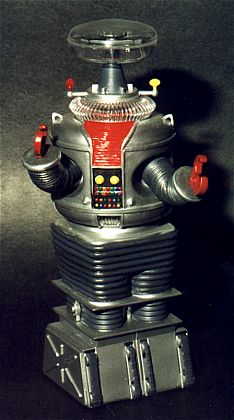
Once that was completed, it was time to start paintingand putting the bits and pieces together. First of all of the kit belowthe very top was painted Testors Metallizer aluminum. Then the flexiblejoints were painted with my secret tire color. Once dry these were washedwith black. Then the clear bits were installed in the lower torso and whendry the upper 'voice' area that lights up when the robot is talking was painted Day-Glo. When dry it was backed up with white and then installed inthe torso. The arms were then installed in various positions. The nextparts to be built up were the 'head' area. These bits needed a lot of cleanup and were painted various metal colors. The upper bubble was cemented withElmer's glue as was the 'collar' area that is clear as well. There are twosensors off on arms that are provided as round bits. These need to be madeinto oval parts, one horizontal and one vertical. Then one was paintedred and the other yellow. The 'claws' were painted Post Office Red.
The most glaring error on the kit is the tracks. Thekit ones stick out way too far. This was fixed by sanding off the backsto have them fit closer to the body. The treads, which were horriblymisaligned, were sanded off completely and replaced with Evergreen strips.These were then sanded down a bit and paintedrubber.
Final assembly was detail painting of the torso aswell as painting and installing the power pack and leg joints. The kit comeswith a nice base, but I decided not to use it.
The end result is a very nice representation of theoriginal LIS robot. While not a contest winner by any means, it reallyis a great conversation piece and looks good on the shelf. Not recommendedfor beginning modelers.