| KIT #: | 7815 |
| PRICE: | $22.958 |
| DECALS: | One option |
| REVIEWER: | Scott Van Aken |
| NOTES: | 2013 reissue. Last released in 1983 |
| HISTORY |
 The United States Army's
Nike Ajax
was the world's first operational surface to air missile (SAM), entering service
in 1954. Nike Ajax was designed to attack conventional bomber aircraft flying at
high subsonic speeds and altitudes above 50,000 feet (15 km). Ajax was initially
deployed in the US to provide defense against Soviet bomber attacks, and was
later deployed overseas to protect US bases, as well as being sold to various
allied forces. Some examples remained in use until the 1970s. Ajax was given the
identifiers SAM-A-7
(Surface-to-air, Army, design 7), and then
MIM-3 (Mobile Interceptor
Missile, design 3) in 1962.
The United States Army's
Nike Ajax
was the world's first operational surface to air missile (SAM), entering service
in 1954. Nike Ajax was designed to attack conventional bomber aircraft flying at
high subsonic speeds and altitudes above 50,000 feet (15 km). Ajax was initially
deployed in the US to provide defense against Soviet bomber attacks, and was
later deployed overseas to protect US bases, as well as being sold to various
allied forces. Some examples remained in use until the 1970s. Ajax was given the
identifiers SAM-A-7
(Surface-to-air, Army, design 7), and then
MIM-3 (Mobile Interceptor
Missile, design 3) in 1962.
Technological development during the 1950s quickly rendered the Ajax obsolete. It was unable to defend against more capable bombers or multiple targets in formation, and had relatively short range. Even while Ajax was being deployed, these concerns led to the contracts for the greatly improved MIM-14 Nike Hercules, which began deployment in 1959. As Hercules developed, the threat moved from bombers to ICBMs, and the LIM-49 Nike Zeus anti-ballistic missile project started to address these. All of the Nike projects were led by Bell Labs, due to their early work in radar guidance systems during World War II.
Part of the Nike Ajax development program designed a new solid fuel rocket motor used for the missile's booster. This had originally been designed for the US Navy's missiles, and was enlarged for the Nike efforts. The rocket was so useful that it found numerous applications outside the military world as the Ajax missiles were decommissioned in the 1960s. Many sounding rockets used the booster as their first or second stage, and many of those used "Nike" in their name
| THE KIT |
This kit was initially released in the late 1950s. Renwal was always well known for producing what were considered quality
kits that were a notch above the rest and looking at these parts, I have to say
that they did an excellent job of molding the kit. The parts do have some flash
and are typical of the
 time when ejector pin marks were not a big deal, but
nothing major.
time when ejector pin marks were not a big deal, but
nothing major.
I was particularly surprised at how nicely the three figures are molded. Unlike the box art, they are not running for shelter. There is a soldier on guard duty, one with his hands on his hips and another kneeling down as if working on something.
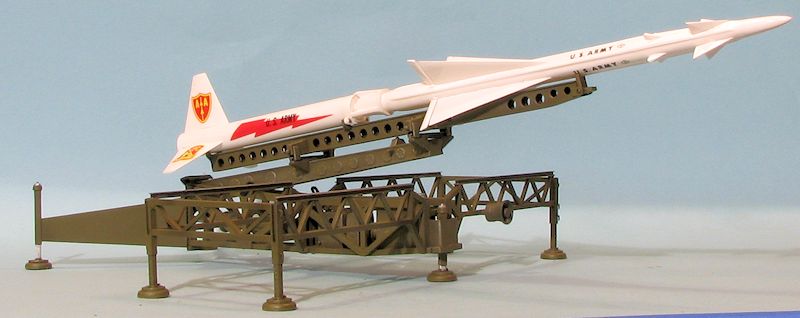
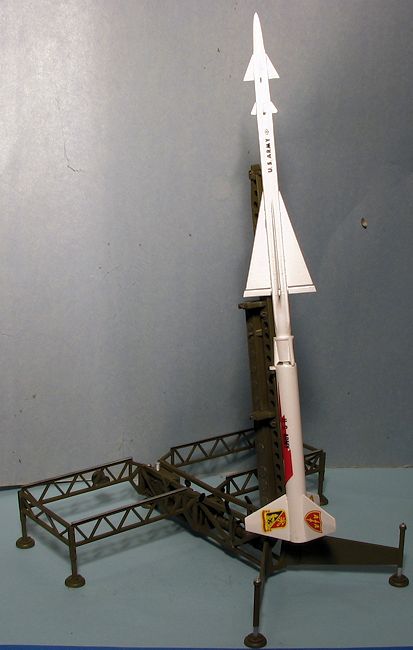
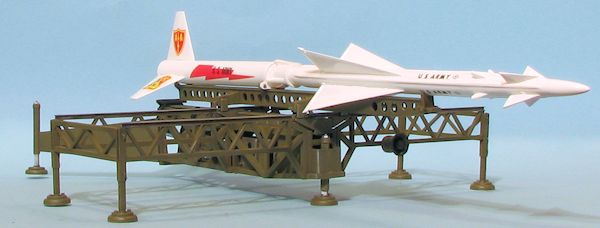
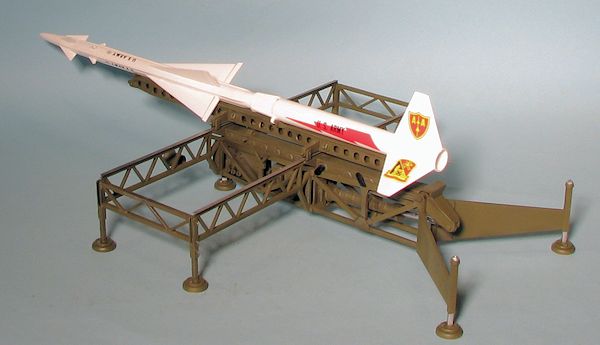
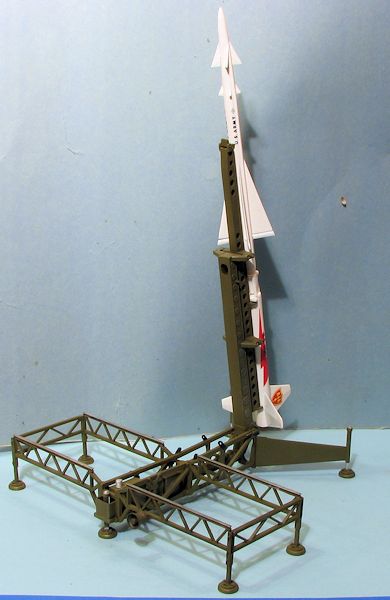
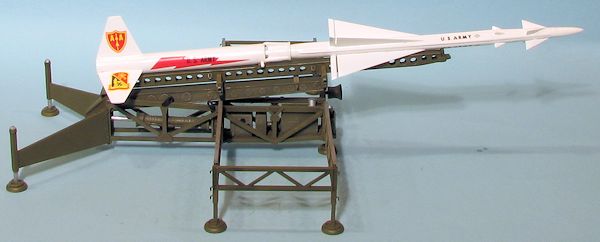
The missile itself is molded in white and typically, a few parts had departed the sprues. The nose fins and main rudders are supposed to be able to be moved, which will make taking care of the inevitable seam a lot easire. Like the real missile, it is divided into a booster section and forward missile.
The rest of the kit is for the launch framework. This will end up being somewhat large and like was expected, the launch rail itself can be raised or lowered via a plastic piston.
 Instructions
are pretty t
Instructions
are pretty t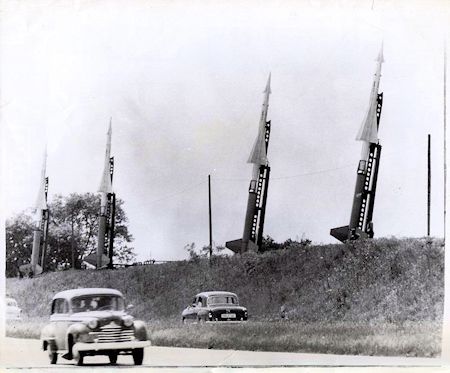 ypical
of modern Revell USA instructions with a list of generic colors, a full parts
list (but no diagram) and painting information provided throughout the build
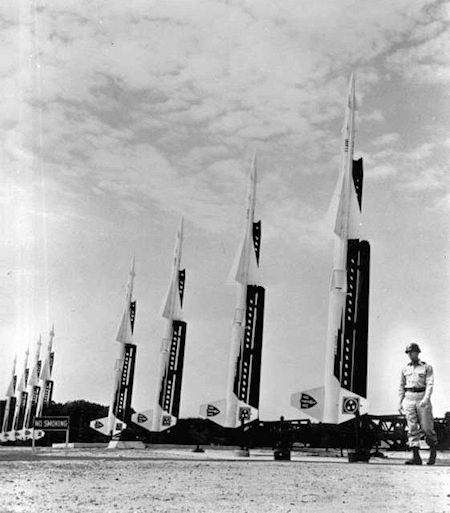
sequence. For years I thought that the markings for this kit, which are pretty
gaudy, were something that was made up. However, I found a photo of all
white missiles with the large badges and the lightning bolt
on them. Whether this was a publicity photo one time deal or not, it did exist.
I also discovered that there were other coloring options for the missile, from
overall olive drab to a white warhead section and olive drab booster and other
variations. It seems that many operational missiles simply had a 'last three'
serial spray painted on the fin and booster body. So you don't have to do the
kit markings, but for the overall OD version, you'll have to find some white
'U.S. Army' markings for the warhead section.
ypical
of modern Revell USA instructions with a list of generic colors, a full parts
list (but no diagram) and painting information provided throughout the build
sequence. For years I thought that the markings for this kit, which are pretty
gaudy, were something that was made up. However, I found a photo of all
white missiles with the large badges and the lightning bolt
on them. Whether this was a publicity photo one time deal or not, it did exist.
I also discovered that there were other coloring options for the missile, from
overall olive drab to a white warhead section and olive drab booster and other
variations. It seems that many operational missiles simply had a 'last three'
serial spray painted on the fin and booster body. So you don't have to do the
kit markings, but for the overall OD version, you'll have to find some white
'U.S. Army' markings for the warhead section.
| CONSTRUCTION |
Quite a bit of the work of building this kit was cleaning up the parts. There was quite a lot of mold seams to take care of in the girder framework and an equally large number of ejector marks. The vast majority of these ejector marks are shallow enough so that you can sand them away and that is what I did. This work easily took up over half the build time.
 I decided to build the launch stand and the missile simultaneously. I built
up the booster section first after drilling out the holes in the exhaust
section. You need to install the large fins before installing this piece as it
helps lock them in place. I should also mention that filler was needed on every
join and that included the two missile body sections.
I decided to build the launch stand and the missile simultaneously. I built
up the booster section first after drilling out the holes in the exhaust
section. You need to install the large fins before installing this piece as it
helps lock them in place. I should also mention that filler was needed on every
join and that included the two missile body sections.
Meanwhile, I started assembling the launch rails. These have large flat areas that will require several applications of filler to smooth them out. While it might frustrate some, this is normal stuff for these old kits. Of course, when we were kids building these, we did not concern ourselves with totally flat surfaces and the folks who molded the kits realized that.
Back at the upper missile section, I discovered that two of the smallest fine, what the instructions call antennas were missing. I assembled the section best I could and left these off. Fortunately, you can build the missile almost completely without these. I should caution builders to be sure to clean up the parts that go inside the missile body if you want the foreplanes and the rudders to move. I had to drill the mounting holes out as they were partially filled with plastic.
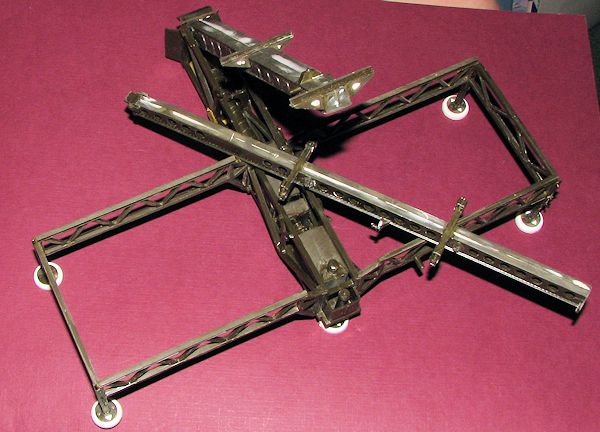 Back at the launcher. I attached the elevating piston assembly to the rail.
When going to assemble the power unit that fits under it, I discovered that I
was missing another part, the elevating piston hinge that fit in between the
power unit halves. So I went through the kit to see if anything else was gone.
Just the three bits so I got on the Revell web site and ordered them. While
waiting, I continued to build up the launch section. This included the bar onto
which the missile will fit. These have crossmembers which have sink marks on
each and every piece so needed filler. This was then built up and set aside. I
also built up the outrigger frames and got everything ready for when the missing
bits showed up.
Back at the launcher. I attached the elevating piston assembly to the rail.
When going to assemble the power unit that fits under it, I discovered that I
was missing another part, the elevating piston hinge that fit in between the
power unit halves. So I went through the kit to see if anything else was gone.
Just the three bits so I got on the Revell web site and ordered them. While
waiting, I continued to build up the launch section. This included the bar onto
which the missile will fit. These have crossmembers which have sink marks on
each and every piece so needed filler. This was then built up and set aside. I
also built up the outrigger frames and got everything ready for when the missing
bits showed up.
About 3-4 weeks later, a box came from Revell with the missing bits. These were attached to the missile and that completed that assembly. The piston hinge was trapped between the power unit halves and that piece got its heavy sanding to take care of seams and such.
The rest of the pieces that I'd already built up simply fell into place. The power unit was trapped between the launch frames, as was the elevating rail. I then glued the piston into the cap at the end of the piston hinge and while the elevating rail was in the down position, glued all the various attachment points for the frames.
When that was dry, I simply slid the launch rail over the two crossmembers on the elevating rail, took care of any small seams I could and then headed for the paint shop.
| COLORS & MARKINGS |
 I decided to go ahead and built it as it was meant to be built. As the gaudy
all-white missile bodies were something that existed, I did not feel badly about
doing this and it is appropriate for an old kit like this. The entire launch
rail system was painted olive drab using Model Master enamels. Detail bits were
picked out as per the instructions.
I decided to go ahead and built it as it was meant to be built. As the gaudy
all-white missile bodies were something that existed, I did not feel badly about
doing this and it is appropriate for an old kit like this. The entire launch
rail system was painted olive drab using Model Master enamels. Detail bits were
picked out as per the instructions.
The missile itself was painted with Tamiya extra fine primer and simply given a gloss coat with Future, which is a gloss clear acrylic. I then started applying the kit decals. These went on with no fuss and just to be sure, I hit them with Mr Mark Softer, which is a rather strong setting solution. No problems.
There was actually very little left to do once the decals were on. I did the usual touch up painting where I got sloppy, did some dry brushing and then slid the launch rail into place. The upper and lower missile sections were then cemented together and pushed into place on the launch rail. Finally, the rear braces were attached and the klaxon was glued on. Since I don't do small figures well, the kit was done.
| CONCLUSIONS |
Back when this was first released, I did not have a
chance to build it and during the second release in the mid-1980s (as part of
Revell's grossly overpriced 'History Makers' series), it sold out so quickly
that I missed it so I was quite pleased with the latest release. I should add
that my kit was
 missing a
couple of small parts, but an e-mail to Revell through their web site got the
missing bits to me in about three weeks of my initial inquiry. I am quite
surprised at how large the finished model turned out to be and will have a bit
of difficulty finding a place to display it. It should not look too out of place
with 1/35 kits though it is a larger scale. In the meantime, I have several of
Revell's other missile kits and may well delve into one of those in the near
future. If you have a liking for this sort of thing, I would recommend that you
snag this kit while it is still available.
missing a
couple of small parts, but an e-mail to Revell through their web site got the
missing bits to me in about three weeks of my initial inquiry. I am quite
surprised at how large the finished model turned out to be and will have a bit
of difficulty finding a place to display it. It should not look too out of place
with 1/35 kits though it is a larger scale. In the meantime, I have several of
Revell's other missile kits and may well delve into one of those in the near
future. If you have a liking for this sort of thing, I would recommend that you
snag this kit while it is still available.
| REFERENCES |
http://en.wikipedia.org/wiki/Nike_Ajax
August 2013
Thanks to me for picking this one up so you can travel back to the late '50s.
If you would like your product reviewed fairly and fairly quickly, please contact the editor or see other details in the Note to Contributors.