HR Models 1/72 Tatra O.A.72 vz30 Armored Car
| KIT #: | 72517 |
| PRICE: | Not yet listed at http://hobbyshop.cz |
| DECALS: | Four options |
| REVIEWER: | Scott Van Aken |
| NOTES: | Resin with etched brass |
| HISTORY |
Tatra (named after the Tatra mountains) is a vehicle manufacturer in Kopřivnice, Czech Republic. The company was founded in 1850 as a wagon and carriage manufacturer, and produced the first motor car in central Europe in 1897, the Präsident. One source  claims that Tatra is the third oldest [car maker] in the world after Daimler Mercedes-Benz and Peugeot. Production of Tatra cars ceased in 1999 but the company still produces a successful range of primarily all-wheel-drive 4x4, 6x6, 8x8 10x10 and 12x12 trucks.
In 1934, fifty one OA vz 30 light armored cars based on the off-road T-72 chassis were delivered to the Czeoslovakian Army. Development started in 1929 and used an air-cooled 1910cc four cylinder engine. Armament was two BREN machine guns. It was used in 1938/39 against German and Hungarian separatists and in the Carpathian Ukraine against Hungarian troops. During WWII these vehicles served with Romania, Slovakia and the German Protectorate of Bohemia-Morovia. They were also utilized in Jugoslavia and Poland.
| THE KIT |
This is a fairly nicely done resin kit. Typical of the kits I've seen of armored cars in this scale, the body and part of the chassis are molded as a single block of resin. I did find a few glitches here and there, mostly in terms of some air holes in the tread of a tire or two and some small bits of resin on the body. Nothing difficult to fix and the quality is certainly quite good on the rest of the parts. The front fenders are nicely thin and well molded along with the other parts found on the wafer that is included for small bits. 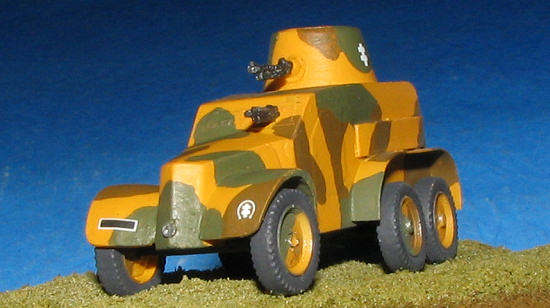 Some of them had broken free during shipping as there is considerable room inside the oversized box. However, none had been damaged during the trip.
The folks at HR Model have included a nice photo etch fret to handle some of the other detail parts. Rear fenders are in photo etch and a form is provided in resin for you to wrap your brass bits around to get the proper shape. Don't forget to anneal these to make bending easier. Also included are hatches, suspension detail, tow hooks and some other small bits, including a shovel and pick.
The instructions are a folded piece of paper with English on one side and Czech on the other. The Czech side has 6 construction drawings. One is an exploded view (of sorts) and the others are for placement of some of the detail bits. The drawings are fairly well done, and while not as professional as you may see elsewhere, do provide all the needed information. There are markings for four vehicles. One Czech, one Slovak, one Rumanian, and one German as used in Jugoslavia against partisan fighters. The Czech and Slovak vehicles are the most colorful in terms of camouflage as the Rumanian one is in Grey and the German in Panzer Yellow. The drawing for the multi-color camo scheme is small and somewhat indistinct. I've not found much of anything on the internet about this vehicle. The small decal sheet is printed by MPD and should work quite well.
| CONSTRUCTION |
First step was to remove the large resin pour stub from the back. When that was sawn off, the area was sanded as smooth and flat as I could make it. I'll confess that I've always had trouble not getting a high spot in the middle of these things or having the edges 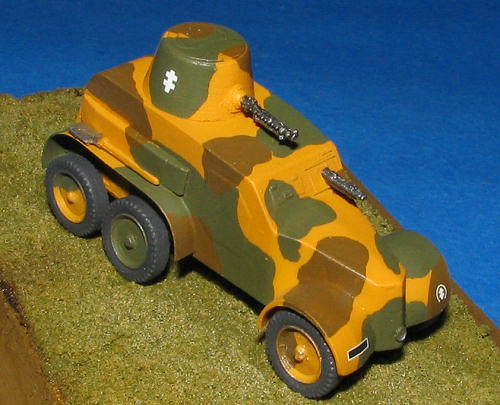 a bit too rounded. This one was no exception. I then cleaned up the major bits: turret, rear suspension, wheels, front suspension bits.
Then I started attaching stuff. I started with the rear door and front visor covers, which were in brass. There is also what appears to be a central headlight that was also attached. Then the rear valence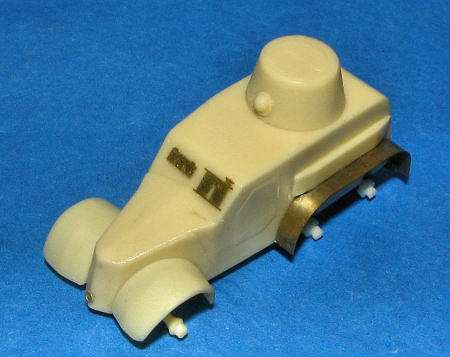 piece. This is actually wider than the rear of the vehicle, but I attached it anyway as it provided some additional support for the brass fenders. These parts were first annealed to make them more pliable, then bent around a curve tool, than formed to the resin guide that is provided. These were then glued in place as best I could and the teeny rear tow hooks were glued in. The resin forward fenders were cleaned up and glued on. There are a pair of etched rear spring bits, but no clear guide as to just how these fit. I had a 50/50 chance of putting them on right and probably blew it.
The above was about all I could really glean from the instructions. There are a lot more resin parts than will be used in building this kit, but unfortunately, there is no indication of what parts are to be used where. There are four headlight looking things, but no indication of what gets used. Same with a single nicely molded leaf spring a pair of front axle bits (which are too wide), and a few other pieces, including a forward section of gun, a full machine gun and two axles of different lengths. There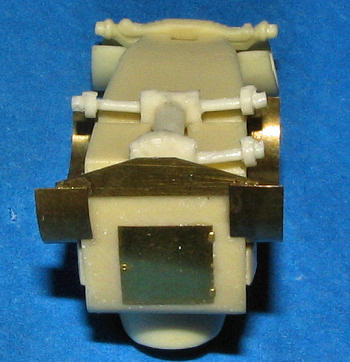 is also a resin shovel to complement the etched one and the etched pick. No indication on where these go either.
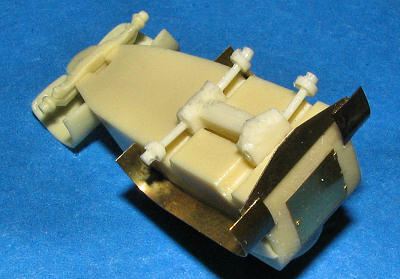
To say that the instructions are not adequate would be about right. I have to suppose that HR Models expects all to have the four references given, but in the real world, most modelers do not have these available. I also found it odd that the rear axles would be angled down. This caused one of them to break and I seriously considered replacing them with tubing.
Back at the front suspension, I used the pieces there to cobble something up. It ended up being too wide so the stub ends were cut off and one of the two axles provided was glued in place as a substitute. It isn't right but at least the front wheels won't stick outside the front fenders. I glued on the stubby barrel to the front gun cover and cut the full machine gun barrel assembly. This was then butt glued to the front of the turret and that cemented in place. There is a small guard made of etched brass that goes atop the body, but I was unable to keep from mangling it due to the thinness of the piece. I used one of the headlight looking things as a tail light and glued it on the back of a fender. The resin shovel was cemented to the top of the opposite fender. I still don't know if this had actual headlights or not as the box are and drawings are of no help. I drilled out the back of the wheels as the attachment points had little depth.
| COLORS & MARKINGS |
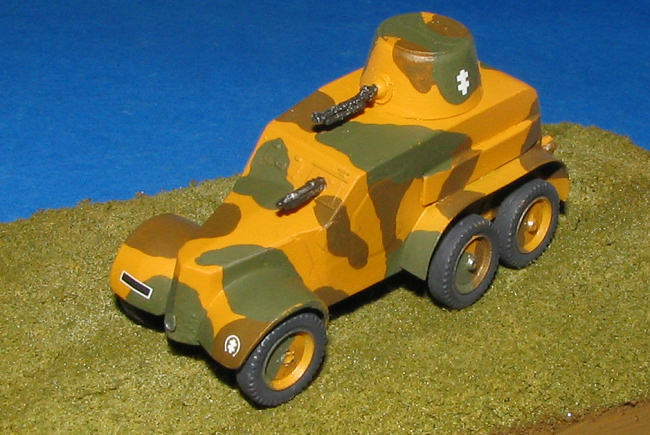
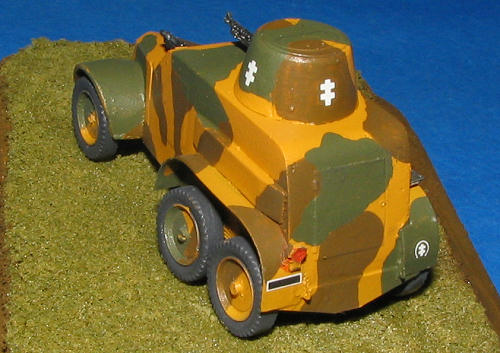
With most everything together, it was time to choose a camouflage scheme. I could wimp out and do the all green Romanian version or the all grey German version. Figuring that this would be a brush painted model, I went for the multi-camouflage version and started hu nting for some ocher paint. This would be sprayed on to give good coverage prior to putting on the other colors. Now I didn't have any 'ochre' per se, but I did have several shades of Badger Freak Flex acrylics and the one marked 'Nicotine Yellow' seemed to be the one to use. This was sprayed on the wheels and the rest of the car. When dry, I brush painted on the green and then the brown, both from the Vallejo line of acrylics. I knew that this wasn't going to be a contest winner, but did want it to look nice. Besides, I'd had a lot of non-modeling things happen and was falling way behind getting stuff done.
Once the main colors were on, I painted the headlight (which is probably the place you put the starter crank) and the tail light. Then I cleaned up the axles so that the wheels would fit. Those were left off for the moment. I then put a coat or two of gloss clear on the model and when dry, applied the decals. I used the Slovakian markings as I didn't want a bare vehicle. The decals are by MPD so are opaque and went on without a hitch. The decal placement instructions are not well done. They tell you the decal numbers but don't show which goes where, only a 'D' with a line going to a spot on the drawing. I took some more of those great educated guesses and then when dry, matte coated everything.
| FINAL CONSTRUCTION |
 The final bits were not much to write home about. Basically gluing on the wheels. Several tires had large air pockets in the tread so I made sure those were on the bottom. I also painted the gun barrels with Gunmetal and painted the spade with Steel. For the kit, that was it.
Of course, these kits have to have a base, especially one as tiny as this. For 1/72 scale, it is about a third the size of the BTR-152 I featured last week. It almost disappears on a 4 x 2 wooden base. This base was one of those 2 for a buck ones from Hobby Lobby. I doused it with Future and liberally sprinkled on the fake grass. Then sprayed it with more Future to help hold things in place. It was taking a LONG time to dry so I popped it in the microwave for 3 minutes. Too long as I soon smelled burning wood and the resin in the pine base started oozing out! House smelled like 'eau du forest fire' for quite a while! However, the Future encrusted fake grass had dried. Before baking it, I did run the wheels of the vehicle through the wet mess to create some tracks. The outer part of the base was then painted with Vallejo English Uniform Green (as opposed to Welsh Uniform Green I guess) so you wouldn't see scorch marks, the car was placed in it, and that was it.
| CONCLUSIONS |
The end result is an interesting kit of something that few others will attempt to kit. The kit is not difficult to build and the quality of the provided parts is pretty good as resin kits go. I will say that it is quite small with the finished model measuring a bit over two inches in length (about 5.5 cm). It isn't super detailed and to make it a contest winner will take quite a bit of work. However, this is one that even a beginner should be able to do without too much trouble.
There is a need for improvement.
I think that HR Models needs to really take another look at their instructions as they are some of the least helpful ones I've ever used. There needs to be clear instructions on what parts are to be used from those provided and exactly where everything goes. The paint and decal guide needs to be more than a somewhat uniform grey mass with vague lines. This is something that can be easily cured. Bill-yuns and bill-yuns of kits (well maybe thousands and thousands), have legible and useful instructions and there is no reason why HR Models can't have them as well.
September 2006
#1429 in a series
Copyright ModelingMadness.com. All rights reserved.
My Thanks to http://hobbyshop.cz for the review sample. Get yours on-line at the link to the left.
If you would like your product reviewed fairly and fairly quickly, please contact the editor or see other details in the