Italeri 1/72 Country House with Porch
| KIT #: | 6075 |
| PRICE: | $19.00 MSRP |
| DECALS: | None |
| REVIEWER: | Scott Van Aken |
| NOTES: | Trust the Realtor R |
| BACKGROUND |
Please visit the preview to see what comes in the box.
Now you are probably wondering just what on earth I'm doing building a structure kit. I sort of thought the same thing as I began putting glue to the various parts. It isn't as if I have a real need for something like this, but there are times when one's curiosity gets the best of things and this is what happened this time. Besides, none of the current projects on the bench were going to be finished in time and this one looked like a pretty normal build.
| CONSTRUCTION |
 Construction is about as uncomplicated as you can get. There are not a ton of parts, but all of them do need to have seams sanded away as well as removal of the sprue attachment points. There are no sprues with the kit, just a rather battered zip-bag of parts. By having all the bits in one bag (and the big parts are heavy), it was inevitable that there would be broken attachment lugs on the smaller bits.
First step was to get the main parts of the house together. This means slotting the walls together and installing the floor. If you don't have clamps, get some as you'll need them to hold this thing together. All the joins were liberally slathered with liquid cement to get a really good join. I also placed the structure on a flat surface to be sure that all the walls were properly mated and not all out of kilter. There are some considerable seams along the corners and they could stand some filler, but I chose not to do that as it would have extended the build. Fortunately, should I ever decide to use this in a diorama, they could be filled later.
With all the walls and the floor in place, the roof was assembled. This has two outer braces and be sure that the little 'L' angles face outboard as it will fit better that way. The two major roof sections were then glued on as was the peak. This later part is actually a bit too narrow for the opening it has to fit. You can fill some of the gaps with your glue. I had to clamp this piece down as well as it was bowed.
| PAINTING |
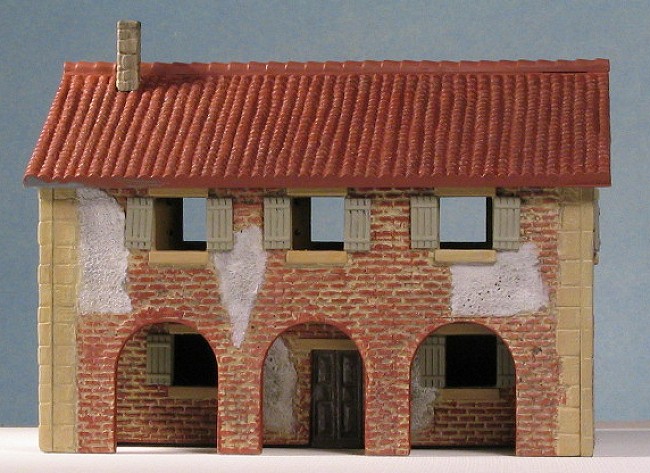
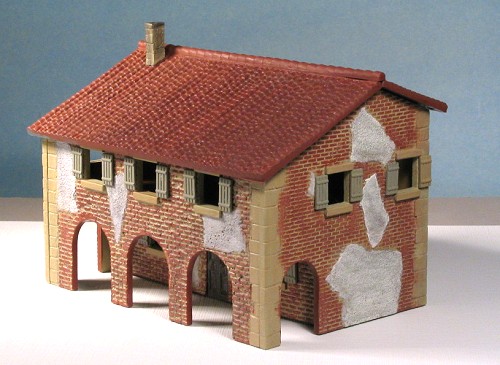
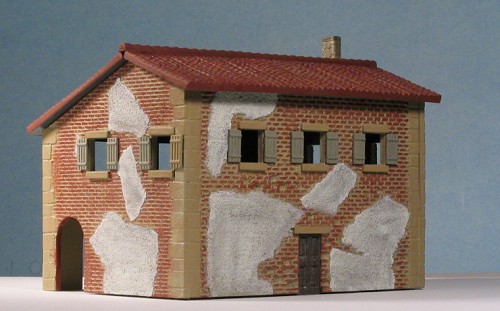
A structure is very much like a figure in that most of the work is going to be put into painting. The kit would have you build this as a generally sand colored structure with a tan roof, wood shutters, and dark grey corner stones. The box art shows something that looks like it is shades of grey with weeds. I didn't really follow any of that. Well, almost didn't follow it.
 I did paint the overall house with a sandy sort of shade. The roof was painted with a reddish-brown shade. Inside, I painted the floor an auburn shade and the inside walls were painted panzer yellow. These interior colors were just sort of slopped on to give the impression that they were some shade other than grey plastic. Those wanting to add detail to the interior rooms will have to do a marathon hole filling session as each window has 8 of them surrounding it.
Once the sand color was dry, I dry brushed the exterior with a brick red shade. I should mention that for all the colors except the panzer yellow (which was Humbrol), I used Floquil railroad colors.
Then, I glued on all the upper and lower window sections and painted them and the wall edge stones with a color called 'foundation'. When dry, the zillion shutters were glued in place and painted with 'aged concrete'. Then the doors were glued in place and painted roof brown.
In the meantime, I had put a wash on the roof to sort of break up the monotone. The chimney was glued in an appropriate spot and basically sits astride some roof tiles. There is no dedicated flat spot for the chimney, though a more dedicated modeler will probably make one.
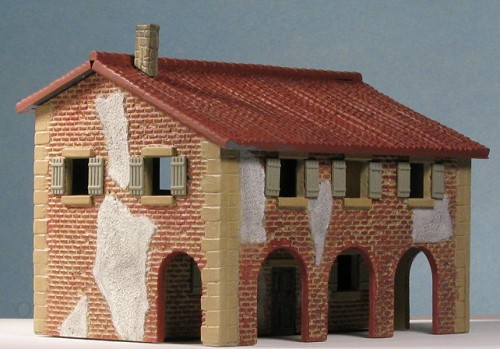 With all that done, I then painted the patches on the wall with Vallejo ivory. I just sort of figured that any house in the warm climes would have been given a coat of plaster and then painted a light color, like an off-white. Seems this house has seen some action with large chunks of plaster knocked off as well as bullet holes in the sides. Once the ivory had dried, I broke out the pastels for the chimney stains and to dirty up the ivory bits. I then plunked the roof on it and that was it.
| CONCLUSIONS |
From what I can figure out, this is supposed to be something from the Napoleonic era and used for wargamers. However, with the increasing popularity of 1/72 armor, it would fit well into a diorama for any time up until the 1950s or so, and perhaps even later. I found it a pleasant diversion from the usual and I'm sure that you will as well. It is simple enough a build for even the most raw beginner. Those who like to paint will like it as there is a lot to do. Others will find it useful for a cornerstone of their next diorama.
September 2005
#1380 in a series
Copyright ModelingMadness.com. All rights reserved.
If you would like your product reviewed fairly and fairly quickly, please contact the editor or see other details in the Note to Contributors.