
ESCI 1/72 SdKfz.11
| KIT #: | 8015 |
| PRICE: | $Won in a raffle |
| DECALS: | None |
| REVIEWER: | Scott Van Aken |
| NOTES: | Probably reboxed by Revell or Italeri |
| HISTORY |
Development was started in 1934 on a half-tracked vehicle with a 3-ton towing capacity for "the towing of trailers and the carrying 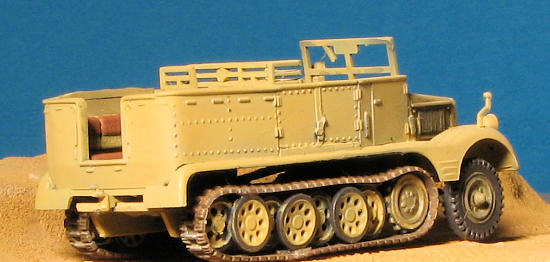 of special bodies." The actual production vehicle was the HL kl 6 produced by Hanamog, Adler, Auto-Union and Skoda from 1938 to 1944. Designated le Zgkw 3t SdKfz 11, a total of 25,000 of these 3-ton chassis were produced with 16,000 being used as the basis for the m Schutzenpanzerwagen (medium armored personal carrier) SdKfz 251.
The SdKfz 11 was powered by a Maybach NL38 TUKR or HL42 TUKRM 6-cylinder engine having a top speed of 53 kph for a 250 km range. The standard version was mainly used to tow light artillery weapons such as the 37 mm and the 105 mm along with ammunition. A very rare specially designed multi-door version was produced for engineer battalions. All versions saw heavy use on all fronts. Often this vehicle was called upon to pull more than its design load, a job it generally performed with minimal problems.
By 1944 only the le.Zgkw. 3t mit Holzpritsche (light tractor 3 ton with wood plank bed) model was being produced.
| THE KIT |
t has been known by small scale armor builders that probably one of the best companies in the early years was ESCI. They produced interesting subjects and had very nice detailing. As such, they commanded very high prices for the size of the kits after ESCI went out of business. ERTL bought the company, but did not release many of the kits that they had acquired; and almost none of it was 1/72 armor. Even today, it is Italeri who is reissuing many of the older ESCI kits. This is bad news for the collector but good for the builder as the prices of these new reissues is high, but not as outrageous as those when the kits were rare.
 The date on this box is 1983, which sounds about right as this was one of the earlier releases, judging by the part number. It has two sprues of OD plastic and two light grey vinyl tracks. The molding on the parts is really first rate. Moldings are crisply done with sharp edges. There is a touch of flash on one part, and a few depressed areas in some of the thicker bits, but these should be invisible when the kit is complete. Ejector pin marks are everywhere. The vast majority will be on pieces that will be covered when done, but some are right atop detail and will be quite difficult to repair. However, this was not considered a 'problem' in the early 1980s and we often find things like this on even the best kits of the time. There are no clear bits, though the modeler can easily use a piece of clear acetate for the windscreen.
Instructions are four construction steps with the parts clearly numbered. A parts guide is offered to make finding the bits easy. Color info is provided though I could find nothing in the kit that indicated what letter represented what color. I can only assume that there was an additional slip of paper that gave that information. It disappeared along with the decal sheet. This kit was won in a raffle at a show. The real problem with some raffle kits is that often the vendors give their junk to the raffle folks. I've gotten kits that were started, kits that were missing major assemblies, and kits that are missing decals or instructions from raffles. It sort of take the fun out of having won something when that happens. No decals were included (typical for some raffle kits) and from reading the instructions, there were four options. No painting and camo guide either, though the kit does include a pair of sitting figures that do not fit in the seats.
| CONSTRUCTION |
I went into this one with the plans of it being a pretty quick build. I'd built a few ESCI 1/72 armor kits in the past and expected this one to be similar. In truth, the only real bummer involving the kit is that there are a bunch of ejector pin marks and some flash to have to deal with. Typical of kits of the time so not really that big a deal. It did add a couple of hours to things as I had to be sure all the parts were cleaned up prior to doing anything with them.
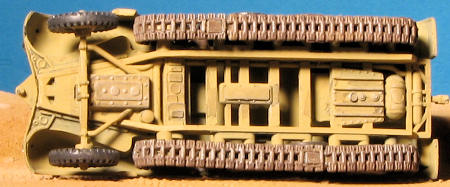
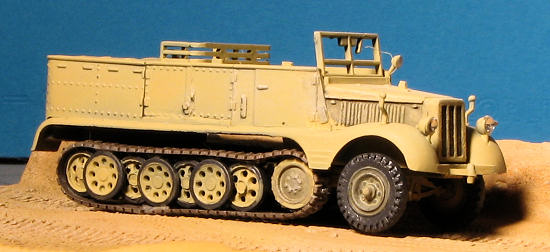 In this case, I built up the chassis and the body during the same time. Work a bit on the chassis, then move to the body while the chassis bits dried. The biggest fit issue on the chassis was getting all the road wheels properly aligned. I failed miserably on this one, and had to open up attachment holes as well.
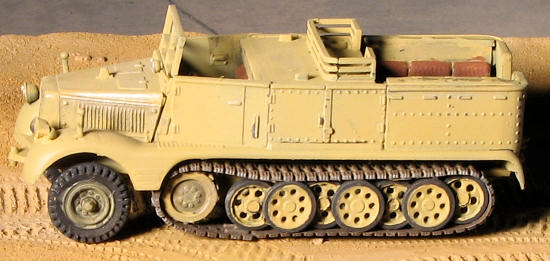
For the body, there are various panels that need to be built up. On each side, not counting the hood section, there are five pieces that need to fit into each other. Inside this are the seat pieces as well as a three piece compartment, atop which is a five piece basket section. Fit is not up to modern standards, but with some fiddling around, you can get a pretty good fit. The hood assembly includes the instrument cluster and the steering wheel. The front suspension section actually fits well and is well braced to keep it from being to sloppy. Most of the attachment holes are circular and many of the tabs are rectangular so there are gaps. I found that attaching the head lights and side markers to the fenders was easier if done before gluing on the hood assembly. The windscreen (no clear bits were supplied) snaps into place easily, but flops around a lot. I temporarily fit on the canvas top (which I did not use), to align the windscreen while the glue dried.
At this time, I painted.
| COLORS & MARKINGS |
 I first gave everything a spray of flat black as that is apparently the 'in' thing to do nowadays. Then I used Humbrol #94 and sprayed everything. Next step was to paint the road wheels, which I did using my normal Floquil Weathered Black. The vinyl tracks were also painted with Humbrol #94 as a primer before using Track Color (an acrylic). It actually sticks fairly well without any flaking off later when assembling. But I'm getting a bit ahead of myself. The seats were painted with Vallejo Saddle Brown to add some interest. I then used a black acrylic and gave things a bit of a wash.
| FINAL CONSTRUCTION |
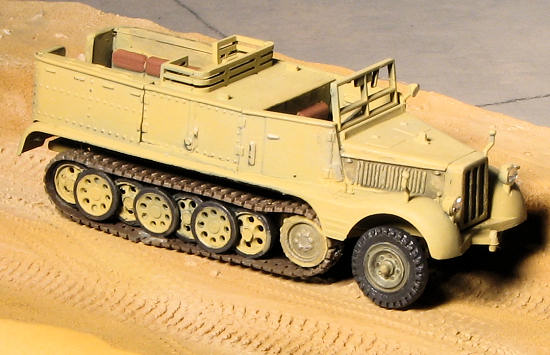 This consisted of bringing all the bits together. First, I glued on the tracks. Probably got them backwards, but they are both facing the same direction. They are large enough that I could complete the ring then slide them on the sprocket without any trauma. I then super glued them to the road wheels. Several times the paint pulled off the track, but it was simply glued back into place. Next I glued the hood assembly to the upper bodywork. Then the chassis was cemented to the body and the wheels glued on. A thin, black wash was applied with some drybrushing in white and silver, which didn't seem to do much. A bit of touchup was done with the sand and some more matte clear. Though I should have black-out covers over the lights, I didn't have any and wanted something more to be seen than sink areas so I installed a pair of #29 MV Lenses.
I also used one of Masterpiece Models' very nice cast display bases that are specifically for 1/72 armor pieces. This one was given an initial coat of Buff acrylic (origin unknown) with several other mists of white or desert tan and some dry brushing with white and other 'stuff'. Turned out pretty well and is a sufficient contrast to the vehicle's paint color to work well.
| CONCLUSIONS |
This was another relatively quick build that I did in under a week from the start. It isn't as detailed as the more modern Trumpeter, Revell and Dragon kits in this scale, but it is a nice representation and was fun to work on.
| REFERENCES |
May 2011
Thanks to whatever raffle it was that I won this one.
If you would like your product reviewed fairly and quickly, please contactme or see other details in the