JB Models 1/76 Bedford MK Tactical Aircraft Refueller
| KIT #: | JB 1008 |
| PRICE: | $6.98 |
| DECALS: | Three options |
| REVIEWER: | Scott Van Aken |
| NOTES: |
| HISTORY |
The Bedford MK series, generally known as the '4 tonner', was introduced in the early 1970s to replace the Bedford RL series. While the MK was to provide a general purpose load carrier for the British Army, it was also the be the basis for a number of 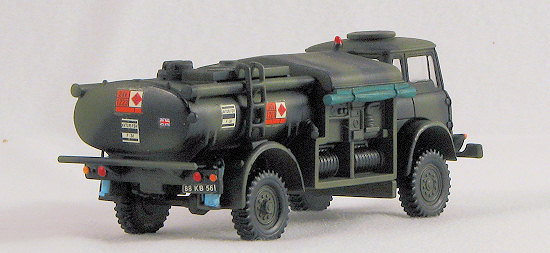 specialist vehicles for military use. Developed for fueling and defueling helicopters and VTOL aircraft under operational conditions, these vehicles came into use with the Army Air Corps and the RAF in the late 1970s.
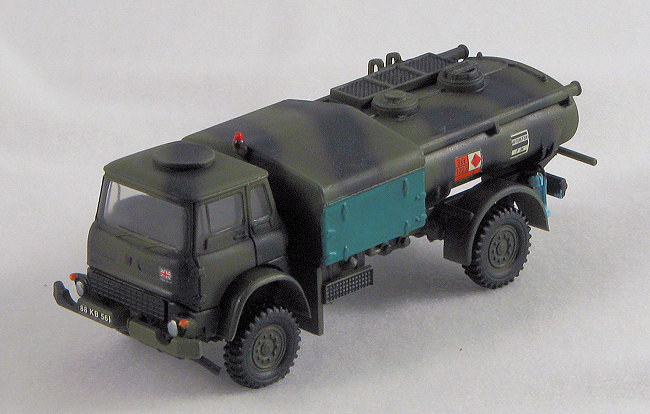
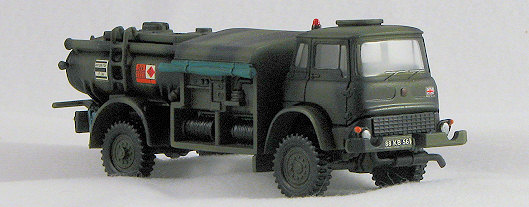
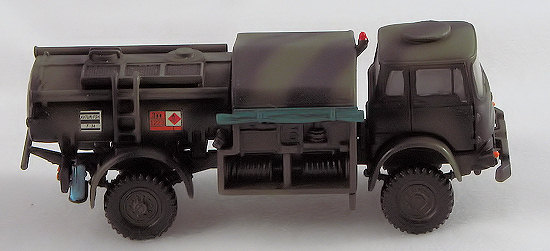
The refueler was produced by Taymech Aviation Equipment and consisted of fitting an aluminum equipment compartment behind the cab and a 4500 liter (1,000 gallon) light alloy tank to the rear of the standard Bedford MK chassis. The forward equipment compartment contained a single stage self-priming centrifugal pump driven by the PTO on the vehicle gear box. This compartment also contained all the pumping and metering equipment, control valves and hose reels. Two 72 foot x 1.25 inch and a single 60 foot x 2.5 inch hose was carried on the reels. Other modifications included repositioning the exhaust to the front of the vehicle and placing a fire screen behind the cab.
| THE KIT |
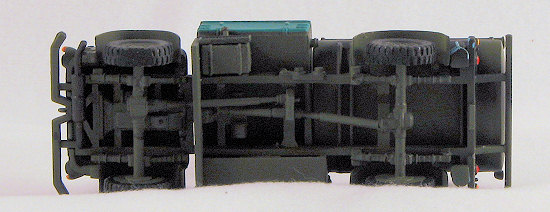
The kit comes packed in two ziplock bags. One for the clear cab and the other for the rest of the parts. The general feel of the kit is very much like a Matchbox offering with its square sprues and rather good detailing. You get a one piece frame with the lower e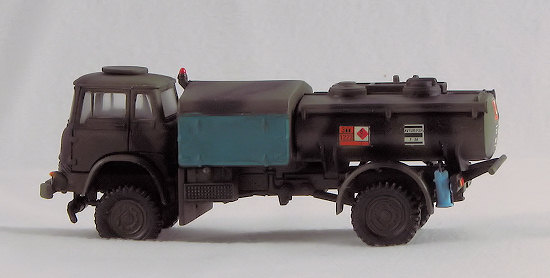 ngine bits molded in place. The front and rear suspension/axles are each a single piece as is the transfer case/driveshafts. Both of my driveshafts were rather bent, but a bit of heat should cure that. The forward accessory/hose section is two pieces and there is a cover for the hoses if you wish to use that. The fuel tank is split horizontally with ladders and rails to attach when it is done.
Instructions are well done on a single sheet. One side has the history and painting guide while the other has a well done set of construction blocks. Painting info is by generic and Humbrol references. On the back of the box is a color three view of the main scheme. There are decals for three vehicles, two in matte green with black and a third in overall desert yellow. They are basically differentiated by the license plates carried. The small sheet is fairly well done, but I noticed that the RAF roundels were off register as was the white (or at least what went over them). Trimming should take care of that problem with most of the markings as they are symmetrical .
| CONSTRUCTION |
This isn't really a complex kit so building it is pretty straight-forward. One does have to be a bit careful in construction as the instructions are not as clear on the placement of some items as one would like. I found that dry fitting the bits allowed any errors to be avoided during building.
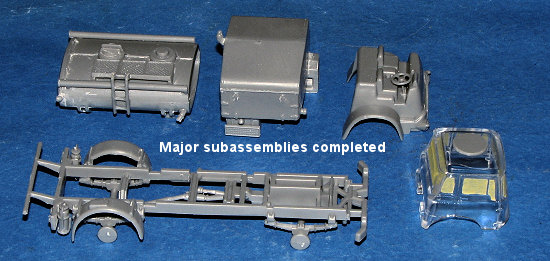 I built this in several subassemblies. The cab had the steering column and wheel glued on and was set aside. The chassis is probably the most complex bit. While I had no trouble locating the suspension bits, I found that the warped drive shafts took a bit of fiddling to get into proper position. Fortunately, the plastic is relatively soft so can be manipulated quite a bit without breaking. I had a lot of trouble locating the rear jacks as they didn't have a very positive fit, nor were the instructions helpful in placing them. I left off the spare tire until the end. The hose and power assembly fit well and thanks to the lack of small detail, filler that was used on this and the tank blended in well. Again, one has to be very careful of placing the small bits. This section has the lone option of having the hose reels visible or behind a cover. An 'up' cover is supplied if one wants to do the additional painting. The fuel tank section was pretty easy. The only fussy part was the attachment of the ladder and the side pipe sections. These side pipes fit more vertical than one would initially suppose and so thanks to my light cementing I was able to reposition these when attaching the ladder. The clear cab body gets some sort of upper hatch or perhaps a ventilator for NBC warfare. I had no trouble masking this section when getting ready to paint.
| COLORS & MARKINGS |
 The instructions call for Humbrol 30 for the main green. I didn't have any so mixed some FS 34087 and 34097 in a 50/50 mixture to get something approximate, using Testors Model Master enamels. When that was painted on, I sprayed on some black stripes. The instructions don't have a top view or even one of the other side so I just guessed. I did paint the tarp covers Emerald Green as they recommended using Vallejo acrylics. The lights and such were also painted using Vallejo acrylics after first painting them white so the Red and Amber would show.
The decals weren't really as bad as I feared and succumbed to Microsol/set without any problems. The vehicle was then sprayed matte clear.
| FINAL CONSTRUCTION |
 Well, the four wheels didn't touch the ground as I'd feared so I sanded on the bottom of them until they did. Somewhere along the line the spare wheel disappeared (I'm blaming cats though they were no where near it). I'll probably find it under something in the next few days or so. I also forgot to paint the fire bottles light blue and so did that just before taking pictures. Nothing fancy and it really needs some touch up, but I'll get to it later on when the mood strikes. I also didn't use the full cover over the reel assembly and chose the rolled up option, gluing that bit in place. The masking was removed and it was off to the photo shop before I dropped it or something.
| CONCLUSIONS |
 Overall, this is a neat little kit. Nothing fancy, but still detailed enough for most of us. Despite its somewhat odd scale, it should fit into any scheme that includes a Harrier or Lynx off in the meadows somewhere during war games. A kit that just about anyone can build and one that provides some pleasant time where obsessing over the fit of the seat harness isn't going to happen!
You can thank me for this one
July 2007
#1475 in a series
Copyright ModelingMadness.com. All rights reserved.
If you would like your product reviewed fairly and
fairly quickly, please contact
the editor or see other details in the