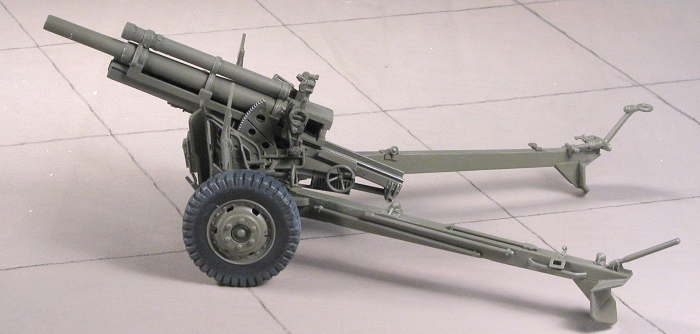
Italeri 1/35 105mm Howitzer
| KIT #: | 319 |
| PRICE: | $11.00 MSRP |
| DECALS: | No options |
| REVIEWER: | Scott Van Aken |
| NOTES: | Hope you like ejector pin marks. |
| THE KIT |
For a look at what comes in the box, please visit the preview.
| CONSTRUCTION |
When I first started on this kit, I wanted to do a bang up job. So the first thing I did was to fill in some ejector pin marks on the gun shields. With this out of the way, I started looking for more to do. Well, I found a lot more than I bargained for. In fact, it seemed as if every major part had ejector pin marks on it. Most of these marks were inside of areas that had a lot of detail  and the filling of them would have ruined the detail Italeri put into the kit. Why the sprues were not designed so that the ejectors would be on the reverse side of these parts (where there was no detail and they'd be easy to fill) is beyond me. After gluing together the wheels and building up some of the main frame/axle assembly, I just couldn't bear the thought of doing all that work on the pin marks so the kit languished in its box for well over two years, gather dust and cobwebs.
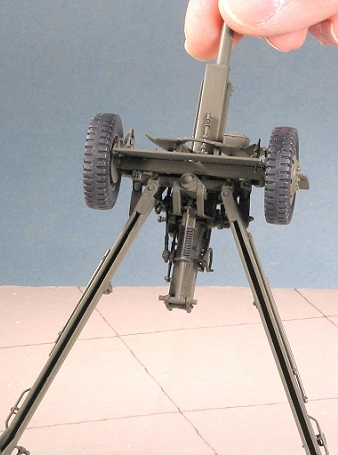
A few weeks back, I decided that the partially completed kit pile was getting out of hand and one of the kits I decided to have a go at was this one. I looked at all the ejector pin marks and decided to totally blow off doing anything with those I couldn't get to and just go ahead and finish the kit. With that little 'problem' out of the way, things got going rather well. I took up where I left off and went to glue on the main shields to the frame/axle assembly. Having not properly followed the construction steps, I had to break off the little cranks from the front to get the shields into place. These hand cranks were then glued back on. I also build up the tow bars. These are handed so pay attention to what goes where.
 Meanwhile, I decided to build up the barrel of the gun. The breech and breech block have HUGE sink areas on them that needed several applications of filler. I left out the block until near the end. I finished the barrel and the harness into which it fits. I also built up the base where the barrel assy fits. This needs filler on the seam and a few sink areas as well.
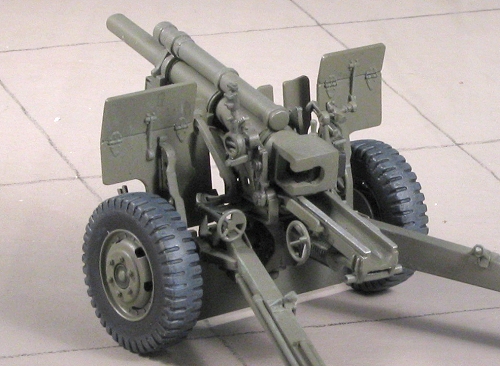
Back at the frame, I attached the two tow bars and put on a few bits like wheel brake handles. This was followed by attaching the gun to the frame. Careful gluing will allow the gun to move in asimuth and in elevation. There is a spring-like assembly on the bottom that sort of snaps in place allowing elevation. The gun shield (as opposed to the chassis shield already on) was then glued in place. The braces fit well, but much care needs to be taken when attaching all the bits to make sure they do not interfere with each other. I can honestly tell you that I wasn't fully prepared for all the fiddly work that putting this kit together takes, but it can be done and by doing little bits at a time, I was able to get everything into place.
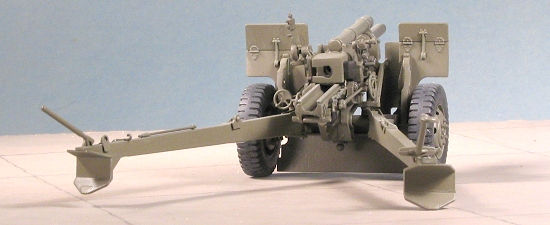 Then I started putting on more bits and pieces. The number of small detail parts is really amazing and the fit of these is quite good, though there are times when you have to compare things with the drawings that are provided to be sure they are in the right spot. The sighting gear gets installed near the forward part on both sides as does an azimuth wheel assembly on the left.
On the long braces (I'll remember what they are really called sometime later), there were quite a few rods (probably for cleaning the barrel) as well as the bits used to hold the barrel assembly when transporting it. To the very rear of these were the tow bars and more latches to secure things. There is no specific location marks for any of these little bits on the plastic so one has to look at the drawings to get their location. I'm sure some of my stuff is off, but unless you've worked on the gun, you'll probably not notice a problem.
With pretty much everything in place it was time for paint.
| COLORS & MARKINGS |
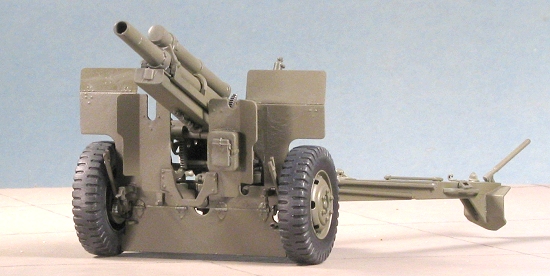
 You'd think that painting this thing would be a snap. Well in some ways it is. It is overall OD with black tires. Period. I looked at a lot of photos via Google and not only were these guns generally well maintained (no grossly worn areas, mud, or rust all over the place, but they were also pretty much overall OD. I first tried Testors Faded OD. Too light. Then I tried Xtracolor OD. Too dark. I mixed the two and that was what I was looking for. Had to spray it on in several sessions as the gun tended to flop around a bit and the gun's shield would often butt up against the chassis shield. Not good when both have fresh paint on them.
Eventually, all was painted to a nice gloss OD (thanks to the effect of the Xtracolor). The tires were then brush painted with black and then the tread and outer sidewall area was heavily dry-brushed with a darkish grey to simulate the usual stuff one gets on your tread when driving down a road.
The entire gun was then drybrushed with some Vallejo acrylics. I used a color quite similar to RAF Sky and did a light job on it. Then I did a black wash in a few areas, also using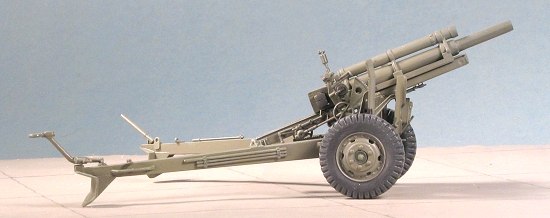 Vallejo acrylics. Not real heavy. A bit of aluminum dry brushing was also done. I did a heavy job on the top of the recoil frame and on the teeth for the elevation and azimuth gears. Generally the gun is pretty clean. The last thing I did was to give the gun an overall matte clear.
| FINAL CONSTRUCTION |
This part is super simple. I put on the wheels. Then, looking in the box for bits I missed, I found a hook that I glued on and then painted. I also slid in the breech block that I'd previously painted Gunmetal as the pics I saw showed this to be a very dark color. There are some clips for the hinged tow-bar thingies. I've not been able to figure out how they are to be fitted so I left them off. Also left unbuilt in the kit are several figures with all their accoutrements, a couple of ammo boxes and, a bunch of shells.
| CONCLUSIONS |
 This is the third Italeri military kit I've ever built. Decades ago I did a Patton Tank and M109. They were both fond memories and built well. I obviously overlooked the ejector pin mark situation and perhaps I take that a bit too seriously. Those marks and the brittleness of the plastic are probably the two major hurdles. The sometimes ambiguous instructions are another, but not for most of us.
The end result is really what matters. No matter how much trouble (or lack, thereof) that it took to produce a model. All that people will see is the end result. I think that the end result is quite good. I have to say it was a more pleasurable build than the ICM gun I did several years ago and it has given me an urge to build more military items.
April 2005
#1357 in a series
Kit courtesy of me.
If you would like your product reviewed fairly and fairly quickly, please contact the editor or see other details in the Note to Contributors.