
Anigrand 1/72 Bell XF-109
| KIT # | AA-2016 |
| PRICE: | $48.50 MSRP |
| DECALS: | one option |
| REVIEWER: | Scott Van Aken |
| NOTES: | Resin kit |
| HISTORY |
Please visit the preview for a look at the kit parts and a brief history on the type.
| CONSTRUCTION |
Full resin kits demand a bit of a different approach than your regular injected plastic kit. For one thing, resin is a different material from polystyrene. It is more brittle, for one thing, more prone to molding, or in this case casting problems, and requires a completely different bonding agent from what is normally used.
 These kits are generally what one would consider a very short run proposition. Where the average 'short run' kit may be produced in quantities of several thousand, the average resin kit is done in total runs of hundreds, or even less. The quality of these kits also varies a great deal, but thankfully, most of what is currently available is quite good. While some kit makers are able to provide glitch-free kits, that is not always the case. Even the best will have some items that need to be corrected or fixed during construction.
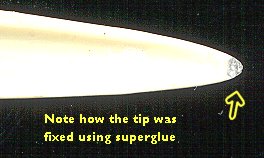
There are two major areas of concern that one needs to look for in a resin kit. This one has both of them, but not in the quantity that one can find. First thing are broken parts. Thanks to the brittleness of the resin, it is not unusual for a kit to have small parts broken or bits knocked out of a part. This kit has those and also has chunks where the mold sprue has broken off the part. If the part broken is relatively large and still in with the kit, simply gluing it back on and sanding the region of the break is sufficient. If the break is small and the part is no longer around, then one can build up the broken area with superglue and file it to shape. I had to do that with at least two parts on this kit so far. One was a forward part of a horizontal stabilizer and the second was the back part of one of the side air scoops.
 To fix these situations took several applications of super glue. One applies the glue in a large blob (I used the thicker stuff) and hangs that portion down. Then an application of accelerator is needed to instantly cure the glue. The area is washed off and then immediately sanded. One does not wait or the superglue will become extremely hard and sanding is much more difficult. Don't wait even five minutes. Several more applications may be needed as in the case of the air scoop shown here. The process is the same each time.
The other area of concern are air bubbles. Superglue is also the best way to cure these if they are large enough. If you see them, simply apply superglue and accelerator. Several shallow applications is much better than one large one as the underlying glue may not cure and will later cause the upper layers to shrink. Very thin filler like Mr. Surfacer 500, again in several applications, can also be used and this is particularly good with pinhole air bubbles. You may often find it effective to enlarge some of the not real small holes to allow you to use super glue to fill them. I found a few parts with air bubbles on this kit and used both methods to take care of them.
I should also mention that over-sanding is a real problem with many when it comes to resin. Resin is soft so leave the 300 grit stuff in your toolbox! It can also cause you to sand through the thicker outer layers and reveal hundreds of small pinhole air bubbles if the resin is not well cast. I've run into this in other kits and fixing this is an exercise in frustration to say the least!
 On with this kit. I started by cleaning up and fixing the engine pod halves. Each gets two compressor blade bits inside prior to closing up the halves. I would recommend a relatively slow setting superglue to give yourself time to position everything properly. Once the glue has set, you are pretty well stuck with what you have! I try to put in a bit too much superglue in the joins so it oozes out a bit, but am never totally successful with this. Once initially sanded, I went over the seams with Mr.Surfacer 500 to fill any extra voids. It may take several applications. There was no way to really do anything about the intake seams so I did nothing to them.
I then glued a large weight into the nose just to make sure it would not tail sit. Then the three interior bits; tub, control stick and instrument panel were assembled and test fit into the fuselage. I test fit all parts on resin kits. I also have to clean up the mold seams on all parts prior to use. Once the tub was together and I was sure it fit, it and the cockpit interior was painted Dark Gull Grey using Testors Model Master enamels. It may have been black, but since most other aircraft of the time had switched to dark grey, I thought it would be more appropriate.
 During this time, I also cleaned up the wing and started looking for a 2mm pin for the wing tips. Not having one around and since all the stuff in hardware stores is not in millimeters, I got a piece of slightly larger copper tubing and rounded out the holes in the wing tips and in the engine pods until it fit.
Then the fuselage halves were glued together. I did this in stages using water thin superglue so it would seep into the join line. Once done and dry, I applied a thin putty to the seams. It took several applications to get them filled. I also needed to do the super glue repair to the tip of the nose as one of my fuselage halves had it either broken off, or incompletely molded.
With that done, the wings were fit. These are very small; like on an F-104, and took a lot of fussing to get them to fit properly. The joins were quite large and I used superglue on the upper ones. Once carefully sanded down, the rest of the join seams were filled using Mr. Surfacer 500 that has thickened up quite a bit since bought new. It is now more the consistency of toothpaste and though it takes a bit longer to dry, it does fill fairly well.
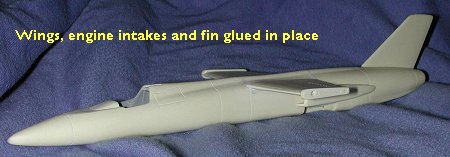 Now that the wings were in place, I installed glued on the engines and fin. With these and the other bits, I put a bead of thick superglue on the engraved marks and gently pushed the part into the glue. This did a fairly good job of sealing all the various holes. Even then, I used Mr. Surfacer to completely fill in the few gaps that were there, followed by sanding with various grits of sandpaper to get a nice join. These steps were repeated with the ventral strakes and the tailplanes. Since these are all butt joins, I had to be especially careful not to knock them off. This care extended to the sanding as well as I didn't want to sand any 'grooves' into the surrounding resin. It is something one always has to be wary of when working with resin. During this process, I glued two sections of copper tubing into the slightly enlarged holes in the wing tips. I then inserted the engines to ensure that they would fit and rotate. The engines were then removed for painting and will be installed during the final steps. Though this all seems like it was a quick deal, it took parts of several days.
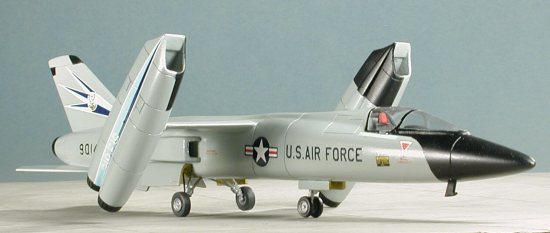
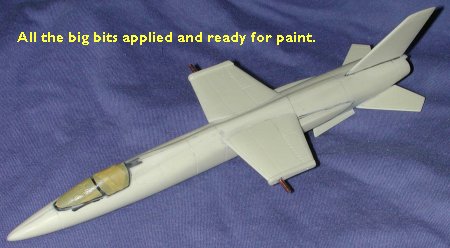 During all of the above, I painted the bang seat a very dark grey and then did the seat cushion and headrest in red, as one often sees in planes of this era. Then I started cutting out the canopy. With only one and no real hope of getting another should I hose it, I was quite careful in the cutting and trimming. The kit is obviously designed so that you can pose it open, but since the cockpit is a bit bare, I decided to forego that option. Besides, I'd probably ruin the canopy when I cut it! Once I got it down to size and did some test fitting to be sure it wasn't totally horrible, I glued in the small tab on the back that was the hinge with superglue. I then put more on the outside of it, hit it with accelerator and then sanded everything smooth. With the back firmly in place, I lifted up the canopy and put a dab of superglue on the very front of the canopy. It was also given the accelerator and sanding treatment. This meant that the front and back of it was firmly in place. The rest was treated with white glue to fill in the gaps. When it was dry, it was time for the paint shop
| COLORS AND MARKINGS |
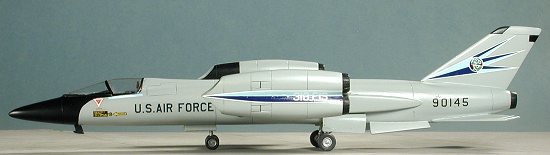
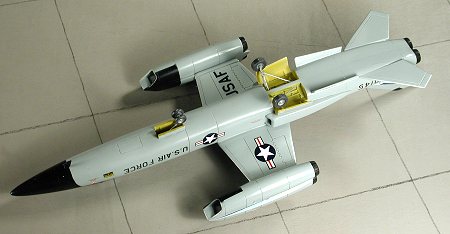 Since the plane never flew, I was able to use my imagination. It would have been put into the Fighter Interceptor Squadrons (FIS) as there really wasn't any room for ordnance of any sort. In the late 50s and 60s that meant an overall ADC Grey (FS 16473) scheme. I like this scheme as it is bright, easy to paint and the units had cool markings. Reaching for a bottle of Aeromaster Acrylic, I mixed up a batch and was rewarded with all sorts of bits and pieces of junk spitting out of my air brush. I tossed out that batch, remixed the paint and had the same thing happen. Obviously, something was horribly wrong with the paint. I've had this happen with acrylics before so went back to old, reliable, Testors ModelMaster enamels. Too bad as the acrylic dried really fast.
With the main color on the kit, the areas for black (nose section, inner forward engine pods and some bits on the fin tip) were masked and then painted. Even though I used innocuous tape, I still managed to pull up a few tiny areas of paint. It is a real problem when doing resin kits and even using an undercoat will not prevent this from happening from time to time.
 Now that things were well painted, I turned my attention to the landing gear. If you recall from the preview, my kit only had one main landing gear. Well fortunately, they are very much like those on an F-16. I built one of the old Revell Thunderbirds display sets many years ago and did them all in-flight so I had a few spare landing gear assemblies. They are crude, but hopefully they won't collapse under the weight of the kit, which is pretty substantial for a 1/72 kit.
I drilled out the holes a bit more so that the gear would fit better and superglued them in place. Then I painted the wheel wells a nice zinc chromate yellow. Moving to the front gear, I had to enlarge the mounting hole but no problem and then glued in the main gear. Returning to the back I stretched some sprue and made some rather crude retraction struts. Actually it is just something to add some stiffness. I then swung the kit around to do the nose gear and promptly broke it off into three parts!
Nothing to do then but damage control. I found the part that holds the nose wheels, drilled it out and inserted a section of paper clip. The now broken stub left in the gear bay was drilled as well and the new, but stronger, nose gear was glued in. A short retraction strut was glued on there as well. The wheels were next and after painting (aluminum wheel) they were glued in place. The main wheels were a tad loose on the Revell gear, but nothing major. The gear doors and the lower antenna/pitot thingie were then glued in place. Gear doors fit well enough even though I'd managed to break a few tabs in the process. The nose gear doors had to be sawn in half as they are molded together. Doors really are way too thick and some of you who actually build this kit may want to replace them or drastically thin them.
Turning to engines, the resin exhaust were either glued in if the fit was loose or press fit into place. Those that had air bubbles (4 out of 6) were installed in such ways as to minimize these faults and hide them as best as could be done. The port fuselage exhaust did not want to fit at all and I ended up having to both carve a bit on it and on the hole in the fuselage to get it to fit.
 With all the bits in place, I turned to putting on decals. Now I already knew that I wasn't going to use the kit decals as I wanted something a bit more colorful. Besides, my experience with them showed me that they were impervious to setting solutions and I didn't like that.
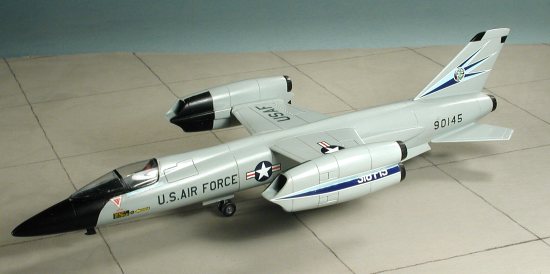
Looking through my decal collection, I keyed in on an F-106 sheet by Microscale (72-091) that had markings that would probably fit this kit. I lucked out big time as they fit very well. Only real problem was that these decals had to be 30 years old and were just starting to fall apart. Some were recoated with Microfilm to keep them together, but a few didn't work as planned!
Anyway, I used the old 318 FIS markings that were on this sheet. The tail markings were a perfect fit and I used sections of the drop tank markings for the outer portions of the engine pods. The insignia were from a newer Superscale insignia sheet and the USAF/US Air Force were from an ancient Scalemaster sheet. I had to coat the decals from this sheet as well. I used setting solutions on them once they had dried a bit to keep them on the kit as best I could. I put on a thin coat of Future over the decals to help hold them in place.
| FINAL ASSEMBLY |
 Final assembly was really a piece of cake. I first removed the masking from the clear bits to see if I either fogged the canopy with the superglue or if I pulled off the Future I'd dipped the canopy in. Much to my delight, neither one of these happened. The other part of final assembly was plugging in the engine pods. A piece of cake. I then hurried to photograph it before I broke something. One thing I discovered during this session is that the landing gear I used are a bit too short as the I couldn't fully rotate the engines without hitting the ground. You may want to keep that in mind if you decide not to use the kit landing gear.
| CONCLUSIONS |
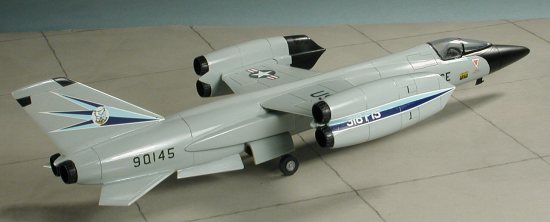
I couldn't be more pleased with the resulting model. It just looks too cool to be true and in that nice ADC grey finish with those splashy decals it has definite staying power. The kit wasn't really that difficult to build once the air bubble and broken bits situation was taken care of. It is one that I can easily recommend to a fairly new builder who is ready to stretch some of those modeling skills into a new arena. I look forward with much anticipation to the next 'XF' in the series.
January 2004
#1300 in a series
Copyright ModelingMadness.com. All rights reserved. No reproduction in part or in whole without express permission.
If you would like your product reviewed fairly and fairly quickly, please contact the editor or see other details in the Note to Contributors.