Hobby Boss 1/72 F9F-2 Panther
| KIT #: | 87248 |
| PRICE: | $25.95 MSRP |
| DECALS: | Two options |
| REVIEWER: | Scott Van Aken |
| NOTES: |
| HISTORY |
The
Grumman F9F Panther was
the manufacturer's first jet fighter and one of the U.S. Navy's first successful
carrier-based jet fighters. The Panther was the most widely used U.S. Navy jet
fighter of the 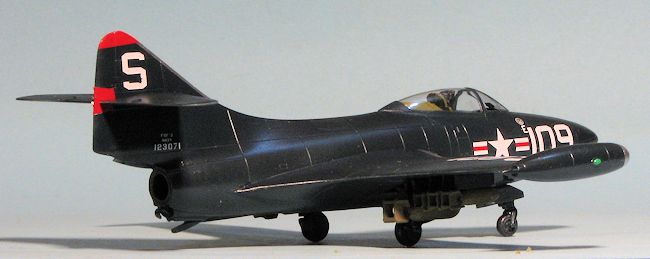 Korean War, flying 78,000 sorties and scoring the first
air-to-air kill by the US Navy in the war, the downing of a North Korean Yakovlev Yak-9 fighter. Total F9F production was 1,382.
Korean War, flying 78,000 sorties and scoring the first
air-to-air kill by the US Navy in the war, the downing of a North Korean Yakovlev Yak-9 fighter. Total F9F production was 1,382.
The only foreign buyer of the Panther was the Argentine Naval Aviation, who bought 24 ex-USN aircraft in 1958. The catapults on the then only Argentine carrier, ARA Independencia (V-1), were considered not powerful enough to launch the F9F, so the aircraft were land-based.
The Argentine Panthers were involved in the general mobilization during the 1965 border clash between Argentina and Chile but no combat occurred. They were taken out of service in 1969 due to the lack of spare parts and replaced with A-4Q Skyhawks.
| THE KIT |
The kit is molded on three
standard grey plastic and one clear plastic sprue. There are small windows on
the clear sprue for the photo recon Panther so you can be sure it will be
released soon. The rivet
 monster did not go nuts on this one. Rivet detail is there
but is more subdued and there is less of it than on the larger scale kit. The
kit's cockpit is a big improvement over the Hasegawa kit in that the instrument
details are raised and there is a more detailed seat. A decal is provided for
the instrument panel if one wishes to use it. This increased detail level also
goes to the wheel wells and the struts look like they have greater detail as
well.
monster did not go nuts on this one. Rivet detail is there
but is more subdued and there is less of it than on the larger scale kit. The
kit's cockpit is a big improvement over the Hasegawa kit in that the instrument
details are raised and there is a more detailed seat. A decal is provided for
the instrument panel if one wishes to use it. This increased detail level also
goes to the wheel wells and the struts look like they have greater detail as
well.
The Panther is a pretty simple aircraft as these
things go so build time should be minimal. One entire sprue is dedicated to
weapons. The kit will require holes in the wings to be opened if you want to use
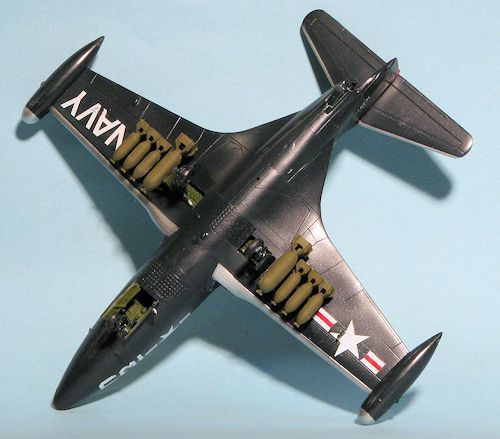
them. There are six single stub 5 inch rocket pylons and one inner one for a 500
lb bomb. Now if you want all eight wing stations to have bombs, you can do so as
there are additional 100 lb bombs and racks to take care of that. I imagine the range
would then be about 50 miles with that load! Wing tip tanks are separate items
and there are no other wing tip options. Panthers rarely flew without these
t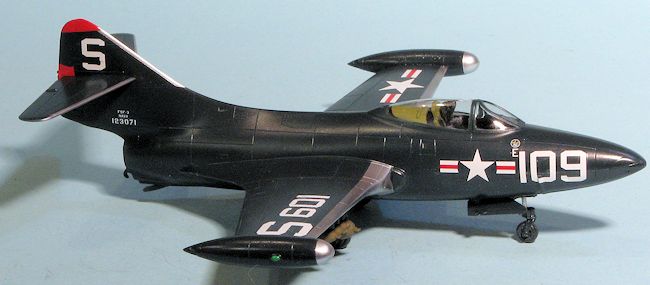 anks. The one think the Hasegawa kit has on this one is a separate speed brake.
This one is molded closed.
anks. The one think the Hasegawa kit has on this one is a separate speed brake.
This one is molded closed.
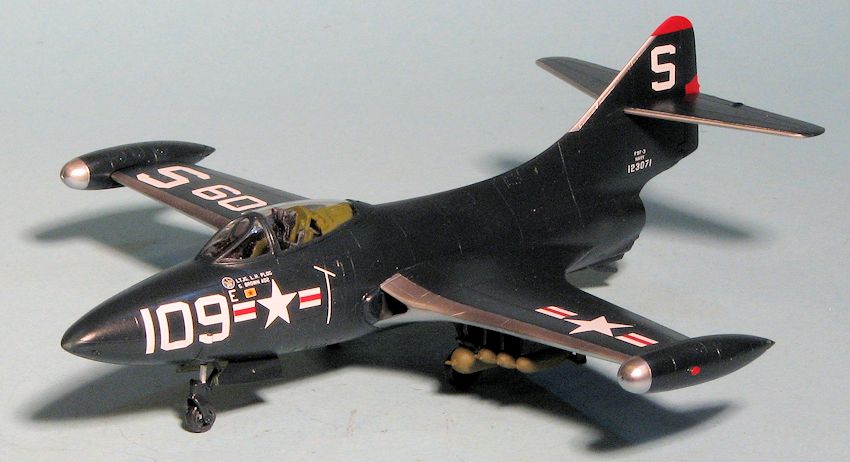
The
kit provides markings for two aircraft. The box art plane is one that is
duplicated on the Hasegawa kit and is for an overall sea blue aircraft from
VF-123. The box art shows the color bits to be an orangeish yellow, while the
decal sheet shows them as a bright yellow. The other option is for the Argentine
plane in light gull grey over white. As a note, the instructions would have you
paint the wheel wells on both items in white. This would not be accurate for the
USN version as you can see from this
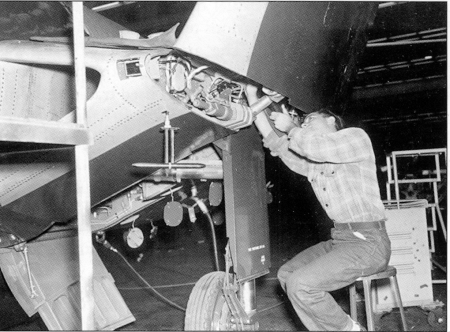 photo,
the wells are a lighter shade, probably chromate green. Wheels could be silver
or sea blue. I should also point out that the interior was interior green with
black console sides and tops on the USN plane and dark gull grey on the
Argentine version. An instruction from March 1954 dictated that all interiors
will be repainted in the grey when the planes go through overhaul. Decals are nicely done and very thin so care is needed when
using them. Those who have old Super Scale decal sheets will probably have some
other options available.
photo,
the wells are a lighter shade, probably chromate green. Wheels could be silver
or sea blue. I should also point out that the interior was interior green with
black console sides and tops on the USN plane and dark gull grey on the
Argentine version. An instruction from March 1954 dictated that all interiors
will be repainted in the grey when the planes go through overhaul. Decals are nicely done and very thin so care is needed when
using them. Those who have old Super Scale decal sheets will probably have some
other options available.
| CONSTRUCTION |
As often happens, my decision to build this kit was totally due to a decal sheet, specifically one of the latest releases from Starfighter Decals. I could have used the Hasegawa kit I have in my stash, but I wanted to give the Hobby Boss kit a go and see what it was like.
First steps were painting the interior. This is interior green with areas above the side consoles in black along with the consoles. I then glued the tip tanks together and opened up the holes in the wings for ordnance. I decided to do a full bomb load on this one with a 500 and three 100 pound bombs on each wing. The 100 pound bombs are in halves like the 500 and were the devil to get together since they were so small. Sanding off the sprue attachment area wasn't easy either and I ended up taking a thin section of rod to help hold the bombs while I sanded/scraped.
 With the bombs assembled, I then returned to the main
airframe. The cockpit was dry brushed and installed in one fuselage half. I also
installed the nose gear well with the attached nose gear. I generally do not
like kits that have you install gear prior to closing the fuselage as it just
begs for those bits to be broken off during handling. Hopefully this will
survive. Some weight was added to the nose and the tailpipe along with the tail
hook was installed. The halves were then joined. The tail hook seems to have
kept the very end of the lower fuselage from joining all the way, but any
wiggling I did was insufficient to get it to join all the way. I'd suggest
cutting the mounting tabs off the tail hook and sliding it in once the
halves are joined. I also glued on the tail bumper in the lowered position. It
seems this was normal while the plane was on the deck.
With the bombs assembled, I then returned to the main
airframe. The cockpit was dry brushed and installed in one fuselage half. I also
installed the nose gear well with the attached nose gear. I generally do not
like kits that have you install gear prior to closing the fuselage as it just
begs for those bits to be broken off during handling. Hopefully this will
survive. Some weight was added to the nose and the tailpipe along with the tail
hook was installed. The halves were then joined. The tail hook seems to have
kept the very end of the lower fuselage from joining all the way, but any
wiggling I did was insufficient to get it to join all the way. I'd suggest
cutting the mounting tabs off the tail hook and sliding it in once the
halves are joined. I also glued on the tail bumper in the lowered position. It
seems this was normal while the plane was on the deck.
While the glue dried and the inevitable sanding took place to take care of the seams, I glued the wings together. As feared, the sanding of the sprue attachment areas (which are on the gluing surface) resulted in some gaps that needed to be dealt with. The wings were then attached to the fuselage and aside from the very ends of the wing root, fit quite well. I then glued in the pylons, figuring that it would be easier to paint at this time. This was an error
Tailplanes were then installed and I glued in the bang seat. The canopy and windscreen were then masked and installed. As good a time as any to head for the paint shop so I did.
| COLORS & MARKINGS |
These schemes are fairly easy to paint. First thing was to paint the airframe, tip tanks, outside of gear doors, and the landing gear components and wheels with Sea Blue. For this I used Model Master Enamels. After letting the kit thoroughly dry, I masked off the areas for the unpainted metal and used Alclad II to take care of those areas.
With the blue in place, I repainted the wheel wells
to take care of any overspray. Then I installed the lan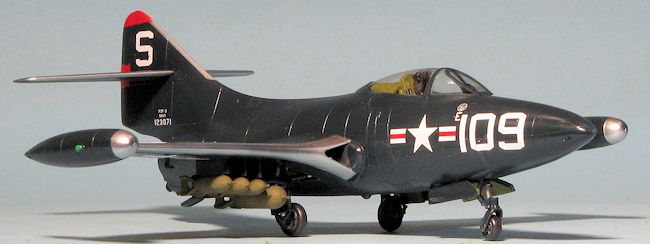 ding gear. These have to
be installed along with the gear doors as the retraction struts affix to the
doors, not the landing gear. A rather odd arrangement, but there you have it. The wheels were then installed. The nose wheel was a particular
challenge as I was afraid I'd snap off one of the gear forks during the process.
It is very tight.
ding gear. These have to
be installed along with the gear doors as the retraction struts affix to the
doors, not the landing gear. A rather odd arrangement, but there you have it. The wheels were then installed. The nose wheel was a particular
challenge as I was afraid I'd snap off one of the gear forks during the process.
It is very tight.
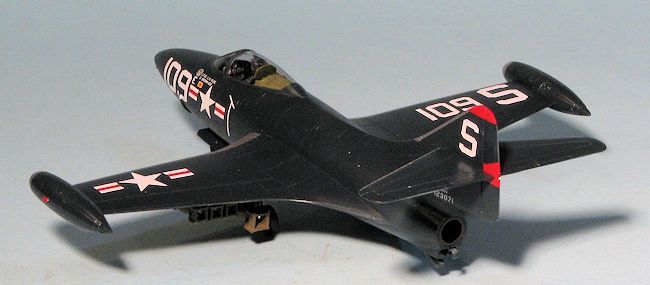
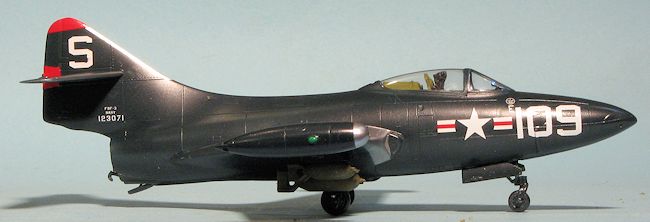
With that done, I started on the decals. For this build, I went with Starfighter Decals latest sheet; 72-141. It has markings for three planes and I chose the F9F-3 from VF-51 as flown by Len Plog for the 1st USN kill. This scheme is a bit unusual as there is no Navy or unit marking on the aft fuselage. I immediately discovered that installing the wing racks before painting wasn't a hot idea as some of the decals fit under the racks. I ran into this issue when it came to the markings under the tail planes. Those should have also been left off until after decaling. For the former, I did nothing and for the latter I ended up cutting the red wedges, a rather messy chore. I also discovered that Mr. Mark Softer is too strong and some decals had the ink run. However, Microsol is too weak and will cause issues with silvering.
Eventually I got on all the decals, despite some problems as mentioned above.
| FINAL CONSTRUCTION |
For this portion of the build, I installed the pitot
tube and the nose gear doors. I had issues with the nose doors thanks to cutting
off the mounting tab on the piece that fits into the doors when I cut it off
 the sprue. I then installed the bomb anti-sway braces for the inner bomb rack. The
instructions suggest installing these on the bomb first and this would have been
the smart way to go. The rest of the bombs were installed, fitting well. The
last bits to be glued in place were the tip tanks. Having those off made masking
the aluminum edges a lot easier. Hobby Boss supplies what I guess is supposed to
be a small brace for the rear fuselage as I could not find any images that
showed this piece. As I'd put in nose weight, this was left off. Some touch up
painting for formation lights and exhaust and I was done.
the sprue. I then installed the bomb anti-sway braces for the inner bomb rack. The
instructions suggest installing these on the bomb first and this would have been
the smart way to go. The rest of the bombs were installed, fitting well. The
last bits to be glued in place were the tip tanks. Having those off made masking
the aluminum edges a lot easier. Hobby Boss supplies what I guess is supposed to
be a small brace for the rear fuselage as I could not find any images that
showed this piece. As I'd put in nose weight, this was left off. Some touch up
painting for formation lights and exhaust and I was done.
| CONCLUSIONS |
 I have to say that issues with the kit were pretty much self-imposed.
I did not have any white decal stripe for the glass surrounds so left that off,
but the aircraft should have it. I also did not see the raked canopy issue that
was prevalent with the larger scale kit. Not sure if this is a better kit than
the older Hasegawa offering, but it seems to have a bit more detail and is
probably easier to locate on your dealer's shelves. Next time I'll think before
attaching pylons and things to ensure that there are no issues with decals.
I have to say that issues with the kit were pretty much self-imposed.
I did not have any white decal stripe for the glass surrounds so left that off,
but the aircraft should have it. I also did not see the raked canopy issue that
was prevalent with the larger scale kit. Not sure if this is a better kit than
the older Hasegawa offering, but it seems to have a bit more detail and is
probably easier to locate on your dealer's shelves. Next time I'll think before
attaching pylons and things to ensure that there are no issues with decals.
| REFERENCES |
http://en.wikipedia.org/wiki/F9F_Panther
November 2013 Thanks to Squadron Products for the preview kit. Get
yours
here. Also thanks to Starfighter Decals for the decal set. You can buy yoursat this link.
If you would like your product reviewed fairly and fairly quickly, please contact the editor or see other details in the Note to Contributors.