
Hobbyboss 1/48 F8F-1 Bearcat
| KIT #: | 80356 |
| PRICE: | $29.99 SRP |
| DECALS: | Two options |
| REVIEWER: | Scott Van Aken |
| NOTES: | New tool kit |
| HISTORY |
The F8F prototypes were ordered in November 1943 and first flew on 21 August 1944, a mere nine months later. The first production aircraft was delivered in February 1945 and the first squadron, VF-19, was operational by 21 May, but World War II was over before the aircraft saw combat service.
Postwar, the F8F became a major U.S. Navy fighter, equipping 24 fighter squadrons. Often mentioned as one of the best-handling piston-engine fighters ever built, its performance was sufficient to outperform many early jets. Its capability for aerobatic  performance is illustrated by its selection for the Navy's elite Blue Angels in 1946, who flew it until the team was temporarily disbanded in 1950, during the Korean War. The F9F Panther and McDonnell F2H Banshee largely replaced the Bearcat in USN service, as their performance and other advantages eclipsed piston-engine fighters.
An unmodified production F8F-1 set a 1946 time-to-climb record (after a run of 115 ft/35 m) of 10,000 ft (3,048 m) in 94 seconds (6,383 fpm). The Bearcat held this record for 10 years until it was broken by a modern jet fighter (which still could not match the Bearcat's short takeoff distance).
Other nations that flew the Bearcat included the French Air Force and Royal Thai Air Force. French aircraft saw combat service against the Viet Minh in the First Indochina War as fighter-bombers in the early 1950s.They were used to support French Forces at the Battle of Dien Bien Phu, operating at the edge of their combat radius, but failed to prevent the French defeat that brought about the end of the war. Upon its creation in 1955, nearly 70 surviving aircraft passed to the Vietnam Air Force.
| THE KIT |
Always nice to see a new kit and this one from Hobby Boss looks to be a good one. Undoubtedly, this one is based on the 1/32 Trumpeter kit, about which much bemoaning about several 'fatal flaws' was heard. Whether those have carried across to this kit is unknown, but I am sure you will have no difficulty finding out.
 One would think that with the Hobby Craft kit being available that a new Bearcat would not be required. Regardless, this one is very nice. It has crisp engraved detailing, including the engraved rivet pattern that some love and others hate. The cockpit is quite well appointed offering raised instrument detailing and a decal for the main instrument panel. A full accessory section behind the engine is also provided. Apparently one can see this through the opening in the wheel wells. The engine looks a bit generic, but for most is well detailed enough to pass inspection.
Nicely done wheel wells are provided and like its 1/32 cousin, the tail wheel gear is bulkheads on either side. This will need to beinstalled prior to closing the fuselage halves so care will be needed to protect the tail wheel. The tail hook simply slides in place so you can pose it extended should you wish. A nice touch is the option to fold the wings. One will need to cut along the hinge lines on the wings to accomplish this. Wing formers and hinges are supplied for this option. For things under wings, there are two bombs and four rockets. A centerline tank is also provided. Unfortunately, Hobby Boss has already opened up the holes and slots for these things so you will need to fill them if you will not be using them. I really wish model companies would not do that. It takes no effort to open these slots and so much effort to close them. I should also mention that the kit comes with the 20mm barrels, but as the upper wings do not have the cannon bulges, they would not be appropriate for this boxing. It is undoubtedly why the kit comes with the upper wings on their own sprue.
Markings are for two planes. One is the box art aircraft with VF-3 from 1946 in overall sea blue. The other is 'Beetle Bomb', the solo display plane of the Blue Angels in 1949. Though the painting guide shows it with full tanks and weapons, this plane was not normally armed so break out the filler. Decals look to be very well done.
| CONSTRUCTION |
 As many of you know, I like to start by building sub-assemblies. The Bearcat has quite a few of them so this was not a problem. I began by assembling the wing halves. Now one has to make a major decision. 95% of all the photos I have seen of the F8F shows them with nothing under the wings. Yet the kit not only provides weapons, but has already opened the holes for them. If you wish to model a Bearcat without rockets and bombs, now is the time to fill those holes. I did not as I wanted to build the kit pretty much as what is provided. Those wishing to build the Blue Angels plane will have to fill the holes as that plane was never armed. You also will need to seal all of the leading edge openings outboard of the carb intakes.
So having decided to build an armed plane, I started on my least favorite part of building some kits; constructing the rockets and bombs. A point to note here. Hobby Boss would have you assemble the bomb fins to form a + when viewed from the back. The photo I found of a bomb armed Bearcat showed the bomb fins as you would expect; in a X shape. You will need to round out the attachment hole so you can turn the fins 45 degrees. I also assembled the centerline tank. This has sprue gates that invade the reinforcement rib that runs around the circumference. I used micro-files to carefully remove all the excess plastic from these areas. Time consuming, but necessary.
 My attention then went to the engine. I cemented the two sets of cylinders together, but after verifying that I had everything properly aligned. You can glue these together out of alignment which would end up putting the magnetos somewhere other than at the top of the engine. You have been warned!
I next started on interior bits and the stuff that stuck onto the fore and aft bulkhead. As many of these parts were to be painted the same color, I glued as many of them as I could, leaving off those of contrasting color until later. While the instructions call for the accessory section to be painted interior green, those few photos I have been able to find of this area show it to be very bright, like unpainted aluminum.
At this time, I decided to do a bunch of painting of all these subassemblies I had constructed. That way, I could make good use of my paint booth time. I decided to paint the engine black and then dry brush silver on the cooling fins as images I have of the engine show it to be pretty dark.
| COLORS & MARKINGS |
 Perhaps a bit early to be in this section, seeing as how the fuselage halves are not yet joined, but thanks to all the various openings, I felt it best to paint many of the parts prior to attaching them. Now this does not speed up construction as not only do parts get painted on the sprues, but after clean up, they have to be painted again, though this is not as onerous as one might think as the second time around, there are already painted areas to hold the part. Anyway, I decided to go the Interior Green route with all the fuselage cavities as stated in the instructions. However, the gear wells and inside doors were painted with the exterior shade; gloss sea blue. Using Testors enamel for this shade also increased build time as even thinning with lacquer thinner, the paint takes a day or two to cure past being a bit sticky. You can pick it up briefly without any damage to the finish, but it feels sticky.
 Anyway, once the fuselage was painted I put in all the various inserts. I found both the very forward and the tail gear bulkheads to be tricky to get aligned. I made sure that they fit by closing the fuselage halves to let them all dry. Should also mention that in the cockpit, I used a set of Eduard pre-painted belts to add some interest. The instrument panel decal fit very well. With everything in place, the fuselage halves were cemented shut and work was done on the inevitable seam. As a note, I did not paint the area where seam work would be needed as it would need to be repainted anyway once done. The fit is quite tight and I needed to use a lot of tape to hold parts together while the glue dried. Then followed the usual filler and sanding. The area just aft of the tail wheel was particularly troubling and needed additional attention. The various openings were then masked and the seams were painted.
| FINAL CONSTRUCTION |
I now had pretty much most of the painting done, having also attended to the gear and gear doors while doing the rest of the airframe. The tailplanes were glued in place and fit very well. They were nice and tight, too. The engine was next, followed by the cowlings. On the wings, I glued on the clear tip lenses. The one on the left wing fit better than the one on the right for some reason. Turning to the main gear, the oleos were wrapped with Chrome Bare Metal Foil and the wheels glued in place after the brakes were painted steel. I also glued on the centerline tank racks and left this all to dry for a while. I found it helpful to attach the tank at this time to help keep the braces aligned. It was pulled off once the braces were dry.
Other things that needed attention was the installation of the gun sight and the masking of the clear bits. These were later painted and set aside. I should point out that there is a seam running down the center of the canopy. This was done to get the proper  bubble shape and so it must be polished out. I used the Master Details polishing kit that comes with a number of fine grit papers, followed by polishing the canopy on my t-shirt.
I then glued on the wings and when dry, went for the landing gear. These are rather fiddly as one has two struts to attach and keeping the gear even with each other was quite a challenge. I also installed the area aft of the cockpit and did some painting in that area. The gun sight got its clear lens at this time. The tail hook was glued in and it really is a super loose fit so be careful. It is almost as if it is designed to be glued in the extended position, which looks super silly on the ground.
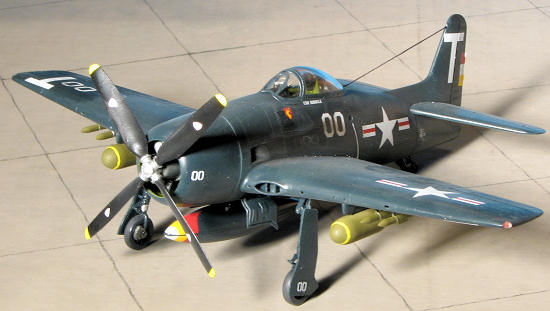
I then started applying decals. For this one I picked the CAG bird from CAG 1 aboard the USS Boxer in 1948. Nothing like the color on 60's birds, but some nice color on the tank and rudder trim tab. I usedStarfighter Decals 4805 for this one and first applied the decals to the centerline tank. These are not supposed to meet, being bisected by the flange on the tank. While I was initially unsure if they would fit, after a dose of Mr. Marker Softer, they performed superbly. I slowly added others during the time I was sticking on other bits and had no issues with them at all. One thing I noticed is that these decals were probably not printed with the Hobby Boss kit in mind. The rudder trim tab marking, for instance, is larger than the trim tab on the kit. There is no way to reduce the size proportionally, so I installed it as it was.
 Once the markings were in place, all the gear doors and weapons were glued in place. I did my usual horrible job of painting on the yellow ring around the bombs. I was also surprised that these have no fuses on the nose, something that I figure needs to be there. The rockets had the stubs painted sea blue with metal bands. A neat touch for the main gear doors is that the pegs on the doors fit into sockets on the gear. Nice and neat. I sprayed the kit with a semi-matte clear then attached a radio wire using large EZ-Line after drilling holes in the canopy and fin. Next time, I'll stick with the small stuff. I was going to pose the canopy open, but I tacked it in place so well it would not easily come loose. Besides, I already attached the radio wire. Tamiya weathering kits were used for the exhaust. Sure, it is the CAG bird, and though I did not weather it, it still is a plane that would collect exhaust soot.
| CONCLUSIONS |
It is a very nice kit and at a price that today, we consider to be reasonable for what you get. To me, it is an improvement over the Hobbycraft kit I built over 11 years ago, and one that I can easily recommend to you.
| REFERENCES |
F8F Bearcat in Action, Squadron/Signal, 1990 http://en.wikipedia.org/wiki/F8F_Bearcat November 2011 My thanks to Squadron Products for the preview kit. Get yours today at your local retailer. Thanks to Starfighter Decals for the decal sheet. If you would like your product reviewed fairly and fairly quickly, please contact the editor or see other details in the