HobbyBoss 1/72 A-4F Skyhawk
| KIT #: | 87255 |
| PRICE: | $47.95 SRP |
| DECALS: | Three options |
| REVIEWER: | Scott Van Aken |
| NOTES: | 2019 tooling |
| HISTORY |
 Ed Heinemann's Skyhawk is one of the world's success stories. A small,
light attack aircraft designed for operation from aircraft carriers. In
addition, it had to carry a sizeable amount of ordnance and have fairly decent
range as well. At the time, it seemed to be an impossible task, but the result
speaks for itself. The aircraft was able to exceed expectations and became a
mainstay of light attack craft for the USN and USMC for decades.
Ed Heinemann's Skyhawk is one of the world's success stories. A small,
light attack aircraft designed for operation from aircraft carriers. In
addition, it had to carry a sizeable amount of ordnance and have fairly decent
range as well. At the time, it seemed to be an impossible task, but the result
speaks for itself. The aircraft was able to exceed expectations and became a
mainstay of light attack craft for the USN and USMC for decades.
Even after its retirement from the USN, the USMC flew the type well into the 1980s and it enjoyed considerable overseas success as well. Even today, sixty years after its first flight, the type is serving military air arms.
| THE KIT |
It has a nicely done cockpit with a fair seat shape that lacks belts, decals for the main instrument panel and side consoles and a proper stick shape. This all fits atop the nose gear well as is the norm. Now I am not sure how many of you will build up the landing gear before painting, but this kit has you do that for both the nose and main gear.
 The intakes will lead to a
short trunk and stop at the first compressor stage. You have to do a little bit
of trimming of molded on bits that are not needed. There is no indication of
nose weight needed, but I always add a
The intakes will lead to a
short trunk and stop at the first compressor stage. You have to do a little bit
of trimming of molded on bits that are not needed. There is no indication of
nose weight needed, but I always add a
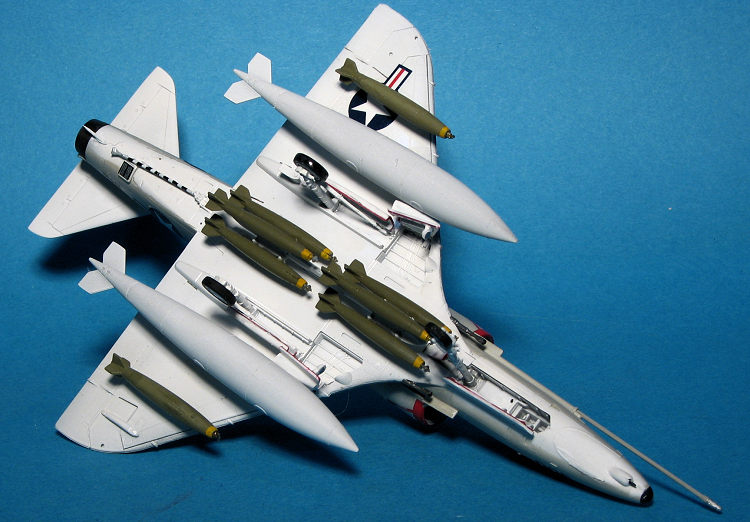
When building up the wing, no need to open holes as HB has already done that for you. The gear look nicely done. Now for the pylons. you get two pylons per wing and one centerline. The centerline pylon has an odd looking rack molded on it with a large, square brace near the front. Rather suspect to me. For the very outer pylon, HB wants you to put a missile rail on it for a Sidewinder. I was quite unable to find a photo of any early A-4F as is so kitted with this feature. It is quite common on Australian A-4s, but I'd not use it for this build.
You
are committed to doing an early A-4F with the markings supplied as it only comes
with the straight refueling probe. Like the 1/48 kit, no aggressors unless you
find the proper bent probe. The inner wing ra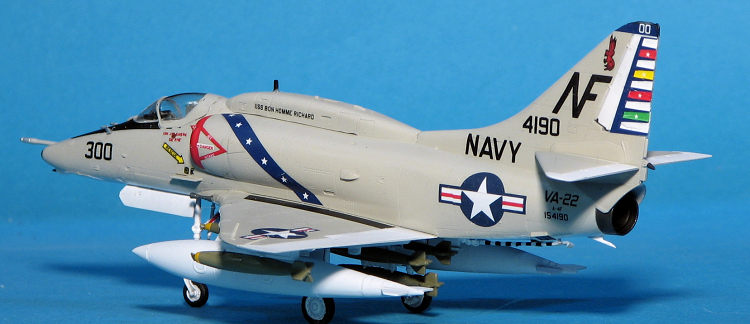 cks each have a multiple ejector
rack for a bunch of small Mark 8
cks each have a multiple ejector
rack for a bunch of small Mark 8
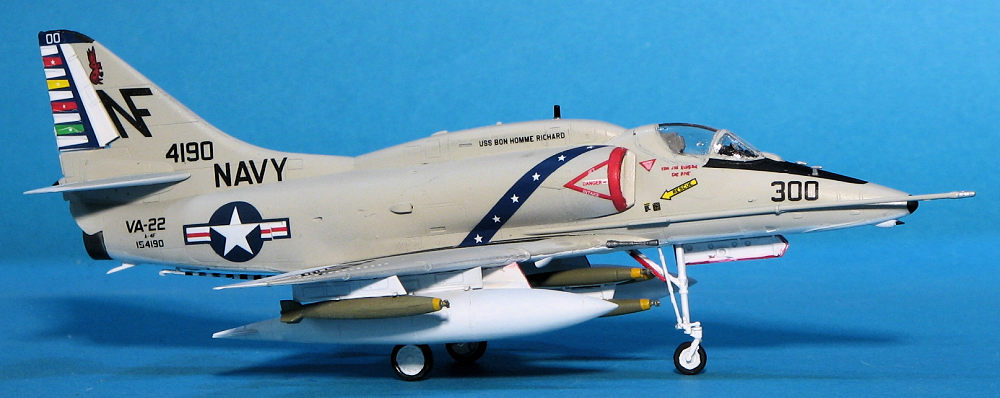
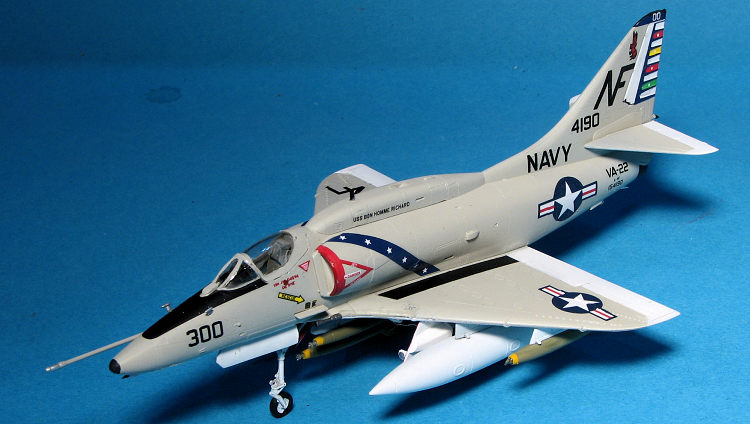
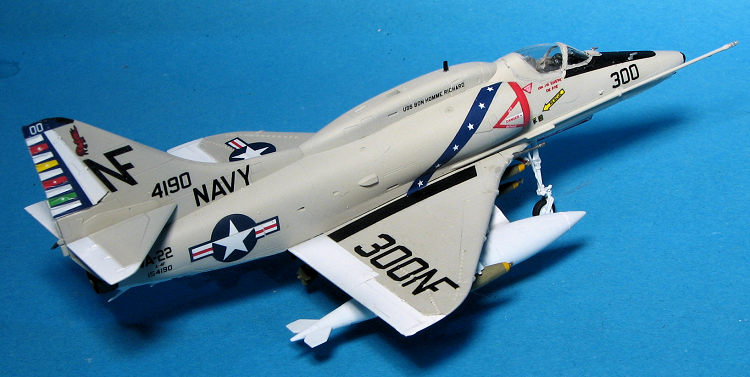
Instructions are well done with Gunze paint references. There are full color exterior paint and decal pages that offer other paint options. The decal sheet is nicely done, but as usual, there is a glitch or two. One is that the fin markings for the VA-22 option are smeared so replacements have been included. Another is that 'Lady Jessie' was with VA-164, not VA-16 as on the decal sheet. the third option is with VA-94. A nice selection for building out of the box. There are aftermarket sheets if you so wish to use those.
| CONSTRUCTION |
When working on this, I found that the build sequence seemed to be pretty standard among all the Skyhawk kits I've done and this one is no exception. The cockpit makes use of some decals for the instruments if you wish to use those. The cockpit tub fits atop the nose gear well and Hobby Boss wants you to build and attach the landing gear at this time. You don't have to and can wait until after painting if you so wish. Note that the nose wheel steering bits don't look like the real deal and placement of the torque tube is vague to say the least.
 Since this kit has the avionics hump, you'll be removing the
blade antenna. Intake is a single piece that fits well and will let you see down
it to the first compressor stage of the engine. Note that the hole just before
the exhaust on the fuselage does not need to be opened. That is for the
parachute and this aircraft at the time of any of the kit markings did not have
it. I installed the compressor piece and the cockpit assembly in the fuselage
half, added a touch of weight just to be sure and closed up the halves. I left
the exhaust piece off until near the end. I skipped step 4 until the end of the
build to keep from knocking things off the airframe.
Since this kit has the avionics hump, you'll be removing the
blade antenna. Intake is a single piece that fits well and will let you see down
it to the first compressor stage of the engine. Note that the hole just before
the exhaust on the fuselage does not need to be opened. That is for the
parachute and this aircraft at the time of any of the kit markings did not have
it. I installed the compressor piece and the cockpit assembly in the fuselage
half, added a touch of weight just to be sure and closed up the halves. I left
the exhaust piece off until near the end. I skipped step 4 until the end of the
build to keep from knocking things off the airframe.
Wings are next. All the pylon holes are opened up already and I skipped most of step 5 as it dealt with building and adding main gear and doors. I also skipped adding the pylons as shown in step 6, but did attach the wings to the fuselage. Note that rarely did the Skyhawk carry air to air missiles so I'd skip those rails when you build your model unless you have photographic proof. In step 7, don't add the ESM antennas to the rear of the fuselage as those were a post-war addition. I did add the avionics hump. I also masked and attached the windscreen and canopy. Fit of the latter is not very good. I also left off the guns and built up the drop tanks.
| COLORS & MARKINGS |
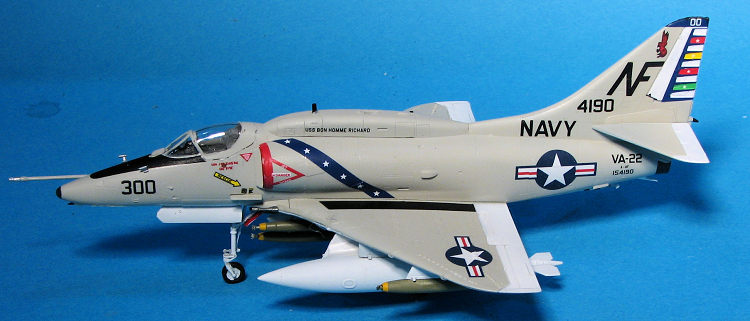 Once the kit was gloss coated I started applying decals. I decided to go
with the kit decals as I've always liked VA-22s markings. The decals were
actually very good and succumbed to Microsol, one of the weaker of the
various solutions. It was at this juncture that the build really slowed down
as I am slow at applying markings and there are quite a few on this kit.
Once the kit was gloss coated I started applying decals. I decided to go
with the kit decals as I've always liked VA-22s markings. The decals were
actually very good and succumbed to Microsol, one of the weaker of the
various solutions. It was at this juncture that the build really slowed down
as I am slow at applying markings and there are quite a few on this kit.| CONCLUSIONS |
So what's the verdict on this one. It has been a while since I did what was the previous best kit in this scale from Fujimi, but this one has a lot to offer. For one thing, the fuselage is not in four parts. The pieces (aside from the canopy) seem to fit a lot better and I really like the pegs on the MERs for the bombs. Even the decals worked quite well. However, I think it is over priced. True, you can get it from time to time at half of retail, and if so, then snag one. I'm sure there are issues with this that Scooteristas will spot and I do wish Hobby Boss and other Chinese kit makers would spend a few cents on research so we wouldn't have to do it, but there it is.
May 2020
Copyright ModelingMadness.com. All rights reserved.
If you would like your product reviewed fairly and fairly quickly, please contact the editor or see other details in the Note to Contributors.
Back to the Main Page Back to the Review Index Page Back to the Previews Index Page