Heller 1/72 F-84G Thunderjet
| KIT #: | 278 |
| PRICE: | $3.00 when new |
| DECALS: | Two options |
| REVIEWER: | Scott Van Aken |
| NOTES: |
| HISTORY |
The Thunderjet had a distinguished record during the Korean War.
Although the F-84B and F-84C could not be deployed because their J35 engines had
a service life of only 40 hours, the F-84D and F-84E entered combat with 27th
Fighter Escort Group on 7 December 1950. The aircraft were initially tasked with
 escorting the B-29 Superfortress bombers. The first Thunderjet air-to-air
victory was scored on 21 January 1951 at the cost of two F-84s.The F-84 was a
generation behind the swept-wing Soviet Mikoyan-Gurevich MiG-15 and outmatched,
especially when the MiGs were flown by Soviet pilots, and the MiG counter-air
mission was soon given to the F-86 Sabre. Like its famous predecessor, the P-47,
the F-84 switched to the low-level interdiction role at which it excelled.
escorting the B-29 Superfortress bombers. The first Thunderjet air-to-air
victory was scored on 21 January 1951 at the cost of two F-84s.The F-84 was a
generation behind the swept-wing Soviet Mikoyan-Gurevich MiG-15 and outmatched,
especially when the MiGs were flown by Soviet pilots, and the MiG counter-air
mission was soon given to the F-86 Sabre. Like its famous predecessor, the P-47,
the F-84 switched to the low-level interdiction role at which it excelled.
The F-84 flew a total of 86,408 missions, dropping 55,586 tons (50,427 metric tons) of bombs and 6,129 tons (5,560 metric tons) of napalm. The USAF claimed F-84s were responsible for 60% of all ground targets destroyed in the war. Notable F-84 operations included the 1952 attack on the Sui-ho Dam. During the war, the F-84 became the first USAF fighter to utilize aerial refueling. In aerial combat, F-84 pilots were credited with eight MiG-15 kills against a Soviet-claimed loss of 64 aircraft. The total losses were 335 F-84D, E and G models.
| THE KIT |
 For a time in the mid-late 1970s, Heller was
really a force with which to be reckoned. In addition to producing kits of some
very esoteric (to most) French aircraft, they also produced a number of equally
nice 1/72 kits of other planes. Many of these were those that saw some French
service and such is the case with the F-84G. For many of us, this was the first
decent 1/72 plank wing Thunderjet around.
For a time in the mid-late 1970s, Heller was
really a force with which to be reckoned. In addition to producing kits of some
very esoteric (to most) French aircraft, they also produced a number of equally
nice 1/72 kits of other planes. Many of these were those that saw some French
service and such is the case with the F-84G. For many of us, this was the first
decent 1/72 plank wing Thunderjet around.
It is very nicely molded with fine raised detail and that includes the cockpit.
There is a reasonable intake that extends far enough back to please most. The
two piece canopy allows one to display what is a well detailed for the time
cockpit. The rather stalky nose landing gear is well formed and like many F-84
kits, the lower gear door is molded to the landing gear leg. One gets both the
early slotted speed brake and the later perforated
 version. This was normally
extended on the ground as the hydraulics bled off.
version. This was normally
extended on the ground as the hydraulics bled off.
Wing tip tanks were molded on the upper wing so no worries about alignment. The
only things under the fuselage are a pair of large drop tanks that nearly touch
the ground. Fortunately, one does not have to use those and I, for one, would
have liked actual ordnance.
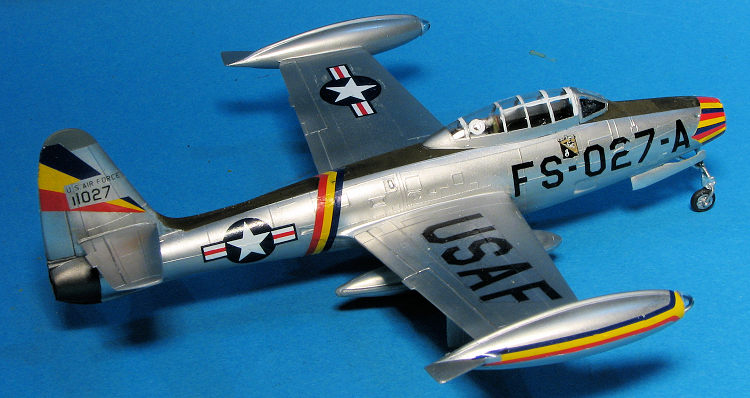
Markings are for two planes. One is French with EC 1 in 1955. Color comes
from orange tip tanks. The other is Norwegian with 331 Squadron in 1957. It
seems like Heller decals of the time were made yellowed and so it is with this
one. I doubt they'd be viable, but one never knows. Fortunately, aftermarket
decals are not impossible to find.
| CONSTRUCTION |
Many current modelers will bypass these kits when they see them. In a hobby where newer is better, they are called to the much more detailed Tamiya offering in this scale. I don't blame people for doing this, but feel that they are missing on what is actually a fairly nice model. So who would be interested in this kit? Those on a budget and those who are simply building to have a fairly easy build for their shelves.
 In my case, I cannot pass up a deal and got this one started for a couple of
dollars. The previous owner had removed many parts from the sprues, painted the
interior and the inside of the fuselage, and installed the intake piece. I
painted and installed the instrument panel and the cockpit. Then I taped all the
major airframe bits together to see how much nose weight I needed. I installed 5
grams under the cockpit and that seemed enough. Then I started gluing the
fuselage halves together. Fit isn't all that bad. The nose cone, however, is a
tad larger than the surrounding area so some sanding will be required there. One
thing I discovered was that the gunsight piece was missing. I cobbled together
something out of bits laying about to represent this. Once painted matte black,
its origins were not so noticeable.
In my case, I cannot pass up a deal and got this one started for a couple of
dollars. The previous owner had removed many parts from the sprues, painted the
interior and the inside of the fuselage, and installed the intake piece. I
painted and installed the instrument panel and the cockpit. Then I taped all the
major airframe bits together to see how much nose weight I needed. I installed 5
grams under the cockpit and that seemed enough. Then I started gluing the
fuselage halves together. Fit isn't all that bad. The nose cone, however, is a
tad larger than the surrounding area so some sanding will be required there. One
thing I discovered was that the gunsight piece was missing. I cobbled together
something out of bits laying about to represent this. Once painted matte black,
its origins were not so noticeable.
Then the wings were assembled and the seams around the tip tanks dealt with. I use super glue for a filler as it doesn't shrink and surprise me with 'ghost' seams after the kit is finished. It also sands very smooth and doesn't crumble when scribed through, issues that I've had with the multitude of standard fillers I've used in the past. The wings and tail planes were then attached. Note that the right tailplane will not fit as far forward as needed to match the root so the mounting tab needs to be trimmed back.
With the wings and tailplanes attached, I masked the canopy and windscreen using Tamiya tape. Normally, I'd fill the gear wells with Silly Putty and start painting, so that is just what I did.
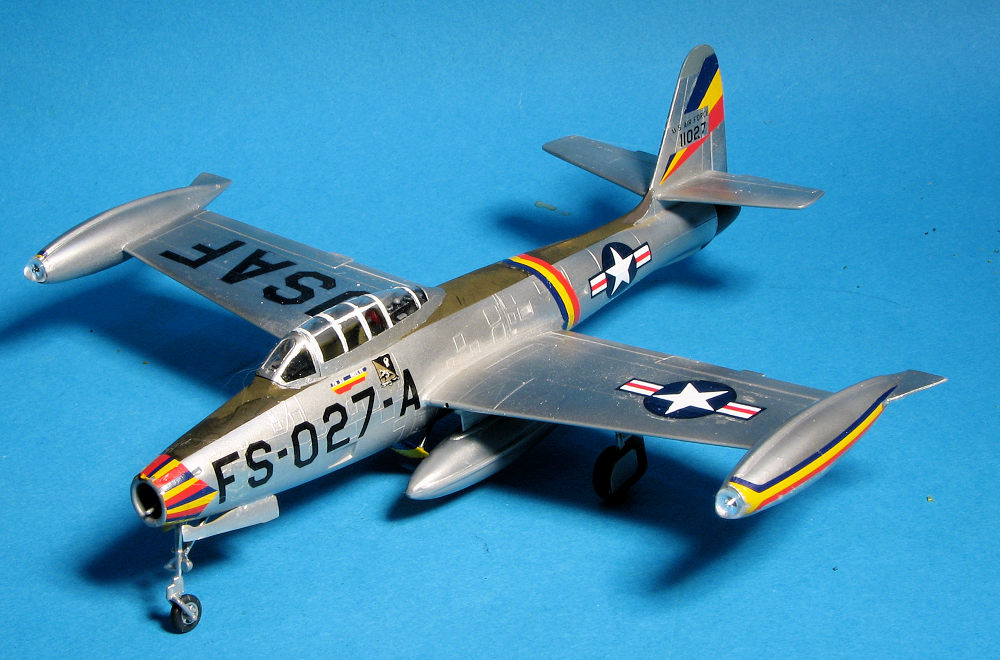
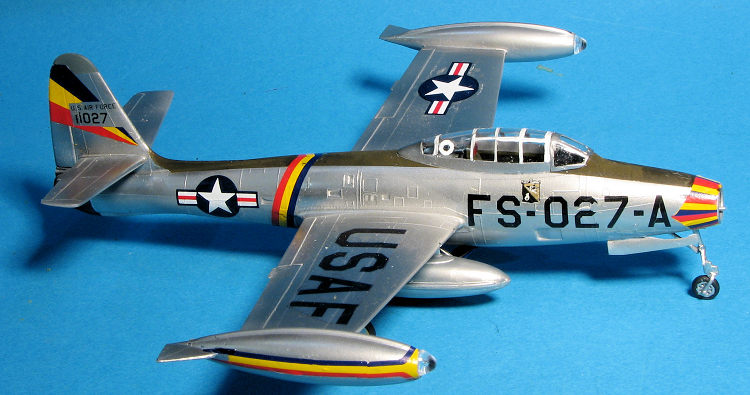
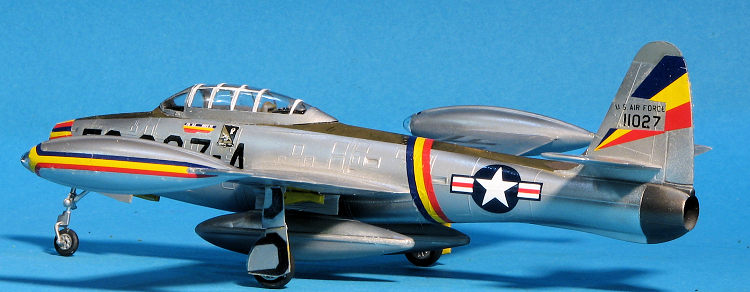
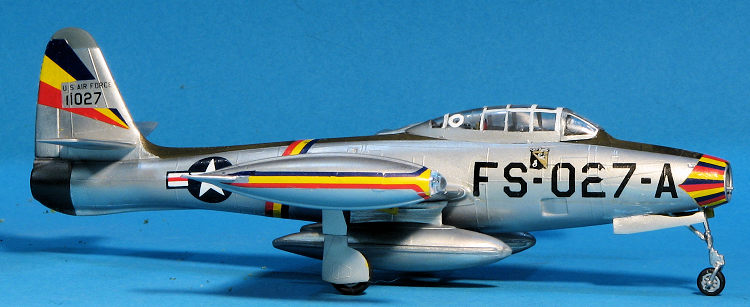
| COLORS & MARKINGS |
 These are
fairly easy to paint. Basically overall aluminum with an OD anti-glare area on
the upper fuselage. This is somewhat complicated by needing to paint the canopy
braces in white, but I simply used a fine brush and painted over the already
masked and painted frame lines. I used Alclad II for the metallics and Tamiya
for the other colors.
These are
fairly easy to paint. Basically overall aluminum with an OD anti-glare area on
the upper fuselage. This is somewhat complicated by needing to paint the canopy
braces in white, but I simply used a fine brush and painted over the already
masked and painted frame lines. I used Alclad II for the metallics and Tamiya
for the other colors.
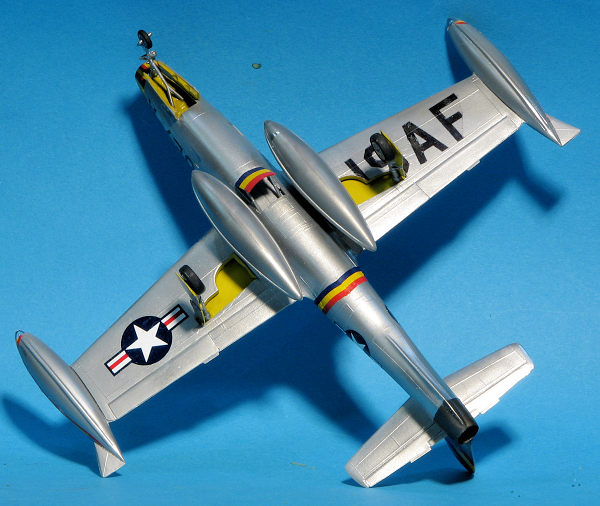
With the plane painted (I did prime this one before applying the Alclad), I glued on the landing gear legs. The main gear legs include the lower gear door. Then for the decals and this is where things got complicated. You see, I wanted to do a USAF plane. I have an ancient Microscale sheet, 72-203 that had markings for Don Blakeslee's 27th FEG boss bird. Back when this sheet was produced, Microscale rarely included common things like insignia and USAF markings. However, the Heller kit was aimed at the European market and did not include those. Back in the 70's Microscale provided separate sheets with just the USAF markings and insignia. Insignia were not an issue. The USAF markings were.
Fortunately, I have a scanner, a printer and a Tamiya
kit that DOES have the USAF markings. I simply scanned the sheet area I wanted,
resized it a zillion times to get the right size, removed the light blue
background and printed the markings. After the usual coating to keep the colors
on the decal when I get it wet, I cut out what I needed and applied them to the
kit. The other decals needed to have a clear film put
 over
them and for this I used the Microscale decal film. I did this after I
discovered that the clear carrier on the decals had deteriorated to the point
this section fell apart when I got it wet. The color areas were not so badly
affected, but did need the clear just to be safe.
over
them and for this I used the Microscale decal film. I did this after I
discovered that the clear carrier on the decals had deteriorated to the point
this section fell apart when I got it wet. The color areas were not so badly
affected, but did need the clear just to be safe.
After a considerable time applying these ancient decals I was done and moved on to the other bits. The drop tank pylons have a very curved attachment surface while the wing is basically flat. I needed to sand on this for a good fit and even then kept knocking the tanks off during handling. I had this same issue with the nose gear doors. Eventually I drilled some holes in the pylon and wing, inserted a small section of wire and reattached the tanks. Masking was removed, a bit of touch up was done, the clear areas on the wing tanks were attached that that was it.
| CONCLUSIONS |
Despite it being a fairly old kit, it is worth building if you already have one. The Academy and Tamiya kits are easier to build and have more detail, but if you are simply wanting something to help use up a decal sheet or two, then these can be found for very little money and can be made into nice models.
| REFERENCES |
http://en.wikipedia.org/wiki/F-84_Thunderjet
November 2018
Copyright ModelingMadness.com. All rights reserved.
If you would like your product reviewed fairly and fairly quickly, please contact the editor or see other details in the Note to Contributors.