
| KIT #: | JS-035 |
| PRICE: | $3.00 in a bag with no decals |
| DECALS: | None provided |
| REVIEWER: | Scott Van Aken |
| NOTES: |
| HISTORY |
The North American F-100 Super Sabre is an American
supersonic jet fighter aircraft that served with the United States Air
Force (USAF) from 1954 to 1971 and with the Air National Guard (ANG) until 1979.
The 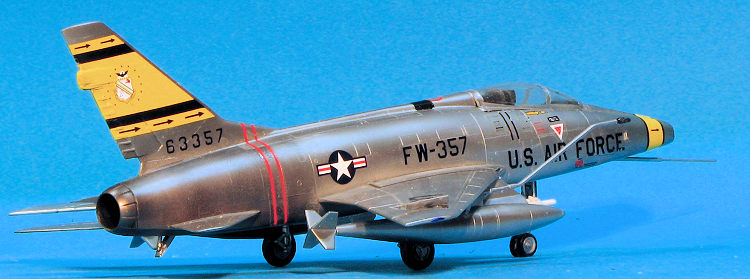 first of the Century Series of USAF jet fighters, it was the first USAF
fighter capable of supersonic speed in level flight. The F-100 was designed
by North American Aviation as a higher performance follow-on to the F-86 Sabre air
superiority fighter.
first of the Century Series of USAF jet fighters, it was the first USAF
fighter capable of supersonic speed in level flight. The F-100 was designed
by North American Aviation as a higher performance follow-on to the F-86 Sabre air
superiority fighter.
Adapted as a fighter-bomber, the F-100 was supplanted by the Mach two-class F-105 Thunderchief for strike missions over North Vietnam. The F-100 flew extensively over South Vietnam as the air force's primary close air support jet until being replaced by the more efficient subsonic LTV A-7 Corsair II. The F-100 also served in other NATO air forces and with other U.S. allies. In its later life, it was often referred to as the Hun, a shortened version of "one hundred".
| THE KIT |
Back in the early 1970s, Hasegawa pretty well held the lead in terms of the USAF's Century Series fighter kits in 1/72 scale. True, today, these things are woefully inadequate in terms of detail and most modelers will shun this one. However, they are pretty inexpensive as things go, especially when ordering direct and do make into quite passable models for one's display shelves.
This is one of the original boxings and comes
in a dark olive drab. The cockpit is quite Spartan consisting of
lit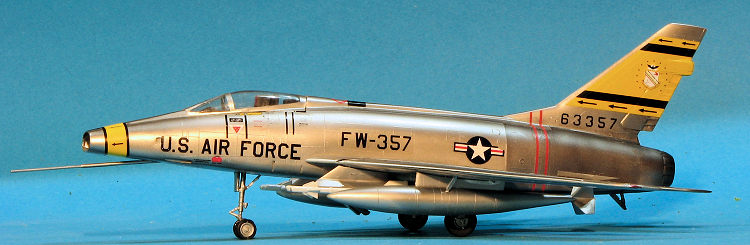 tle more than a seat with radio bits behind it, a floor and a pilot to
put into the seat. The instrument panel is molded in with the panel
anti-glare panel and takes a decal for instruments.
tle more than a seat with radio bits behind it, a floor and a pilot to
put into the seat. The instrument panel is molded in with the panel
anti-glare panel and takes a decal for instruments.
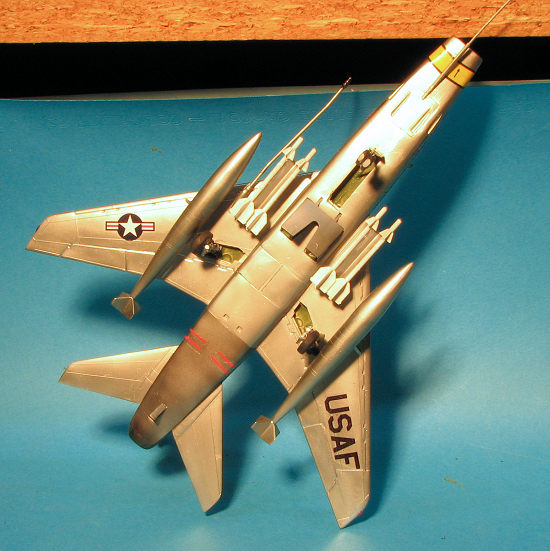
The instructions don't indicate any nose weight, but I'd add some just to be sure. Both the intake and exhaust pieces are somewhat shallow, but no worse than what you'd get on the ESCI kit. You only get the early exhaust so if modeling something from its later history where it had the F-102 burner can, you'll have to source that from somewhere else. The kit has a single piece canopy to cover your pretty empty cockpit. Wings have a full span lower wing with upper halves and separate fences on the outer wings. All of the pylon holes are already opened up.
Wheel wells are equally Spartan as the cockpit with no real detail. Fortunately, the inner gear doors will cover up much of that. The speed brake can be positioned down if one wishes. There is also a separate tail bumper. Gear legs are fairly well done, though a bit light on detailing. The nose gear on many early kits had issues with alignment on the nose wheels, but it seems that that has been corrected. You get two different refueling probes, an early straight one and later curved version. Note that not all 'foreign' planes had this so if modeling one of the options, that will require the holes being filled.
 The kit comes with the long 335 gallon fuel tanks as well as the
small 200 gallon versions. Note that the centerline has what is shown as a
'practice bomb'. I'd fill those holes and not use this bit. There are
Bullpups for the inner pylon or one can attach dual Sidewinders. The
Sidewinder pylon is wrong as it should be a Y shape, but the kit provides a
T. The Sidewinders themselves are rather basic.
The kit comes with the long 335 gallon fuel tanks as well as the
small 200 gallon versions. Note that the centerline has what is shown as a
'practice bomb'. I'd fill those holes and not use this bit. There are
Bullpups for the inner pylon or one can attach dual Sidewinders. The
Sidewinder pylon is wrong as it should be a Y shape, but the kit provides a
T. The Sidewinders themselves are rather basic.
According to the instructions this kit originally came with two SEA camouflaged planes with the 131 and 308 TFS with an overall silver 8 TFW plane. Instructions are completely Japanese though not difficult to decipher. All of the SEA camouflage colors show they need to be mixed, though I've no idea what paints are represented.
| CONSTRUCTION |
 adio rack that fits onto a
plate. The pilot is supposed to cover the fact that there is no real
detail in there, not even a control stick. The fuselage halves were
glued together after I put in some nose weight, and the usual filler and
filing/sanding was done. At this stage I also attached the burner can.
As a note, you do not get the F-102 burner can so are limited to active
duty F-100s. I also glued on the intake and smoothed things out best I
could.
adio rack that fits onto a
plate. The pilot is supposed to cover the fact that there is no real
detail in there, not even a control stick. The fuselage halves were
glued together after I put in some nose weight, and the usual filler and
filing/sanding was done. At this stage I also attached the burner can.
As a note, you do not get the F-102 burner can so are limited to active
duty F-100s. I also glued on the intake and smoothed things out best I
could. | COLORS & MARKINGS |
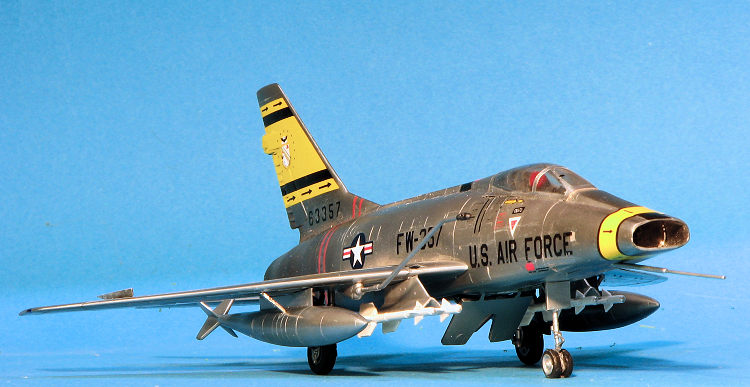
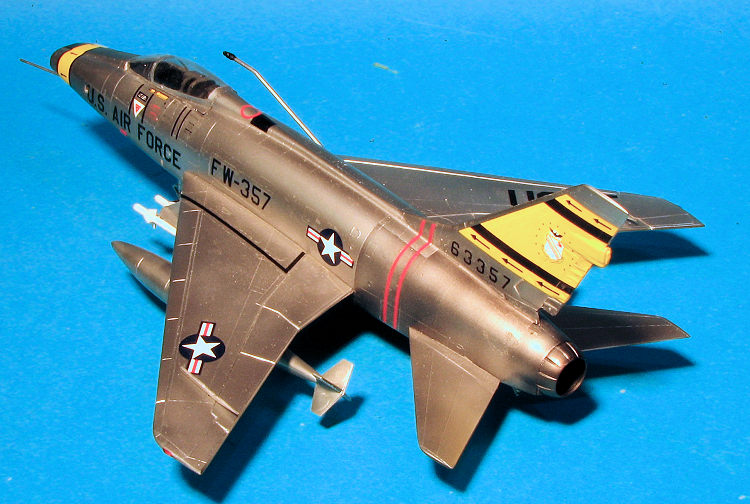
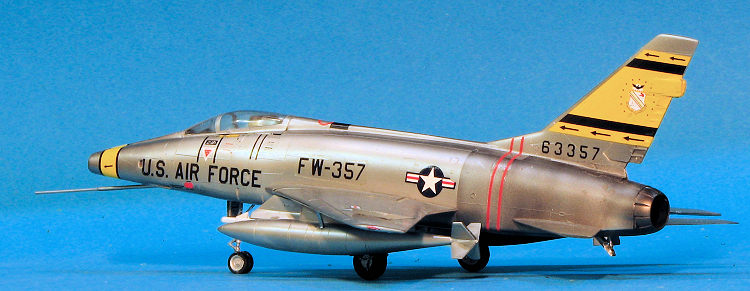
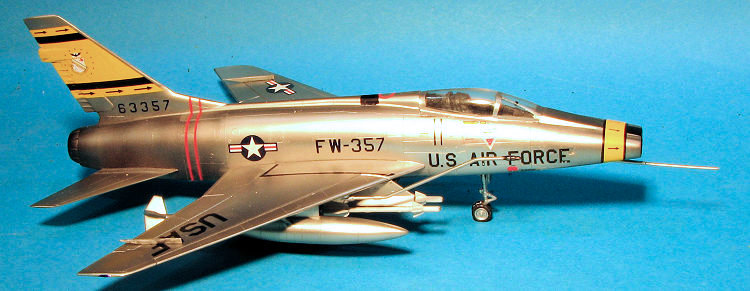
 Eventually the airframe was painted with Alclad II. The rear hot section was
masked off and that was painted with a variety of darker metallics. I also
masked off the gun radar section and an area on the upper fuselage. I had
filled the gear wells with Silly Putty after painting them with chromate
green. That was removed and it was time to attach the landing gear.
Eventually the airframe was painted with Alclad II. The rear hot section was
masked off and that was painted with a variety of darker metallics. I also
masked off the gun radar section and an area on the upper fuselage. I had
filled the gear wells with Silly Putty after painting them with chromate
green. That was removed and it was time to attach the landing gear. | FINAL CONSTRUCTION |
 With all the decals in place, I started adding the rest of the bits.
Hasegawa's missile pylon is fantasy, but I had the ones from the Trumpeter
kit I could use. I also used the Trumpeter refueling probe. Both of these
required some additional holes to be drilled to fit properly. I used a pair
of AIM-9Bs from the Hasegawa Weapons set as the Trumpeter ones were a later
version and the kit ones are just poorly done.
With all the decals in place, I started adding the rest of the bits.
Hasegawa's missile pylon is fantasy, but I had the ones from the Trumpeter
kit I could use. I also used the Trumpeter refueling probe. Both of these
required some additional holes to be drilled to fit properly. I used a pair
of AIM-9Bs from the Hasegawa Weapons set as the Trumpeter ones were a later
version and the kit ones are just poorly done. | CONCLUSIONS |
 Frankly, I'm somewhat surprised that Hasegawa continues to release this kit and
that it is still in their catalogue. I guess it has enough home market sales to
make it a viable offering, but the truth is that it is long in the tooth and
more modern releases (including the somewhat ancient ESCI kit) are better
builds. The Italeri kit suffers from an additional frame in the canopy and the
Trumpeter kit has that very oddly shaped intake to deal with, things that
neither the ESCI or Hasegawa kit suffer from.
Frankly, I'm somewhat surprised that Hasegawa continues to release this kit and
that it is still in their catalogue. I guess it has enough home market sales to
make it a viable offering, but the truth is that it is long in the tooth and
more modern releases (including the somewhat ancient ESCI kit) are better
builds. The Italeri kit suffers from an additional frame in the canopy and the
Trumpeter kit has that very oddly shaped intake to deal with, things that
neither the ESCI or Hasegawa kit suffer from.
To make a bit more accurate Hun I had to use spare bits from the Trumpeter kit, which is one of the nice things about that kit. However, as you can see from this, though not a contest model by any means, it does build into a model that looks good on one's display shelf and I guess that is what is really important.
| REFERENCES |
https://en.wikipedia.org/wiki/North_American_F-100_Super_Sabre
18 January 2019
Copyright ModelingMadness.com. All rights reserved.
If you would like your product reviewed fairly and quickly, please contact the editor or see other details in the Note to Contributors.