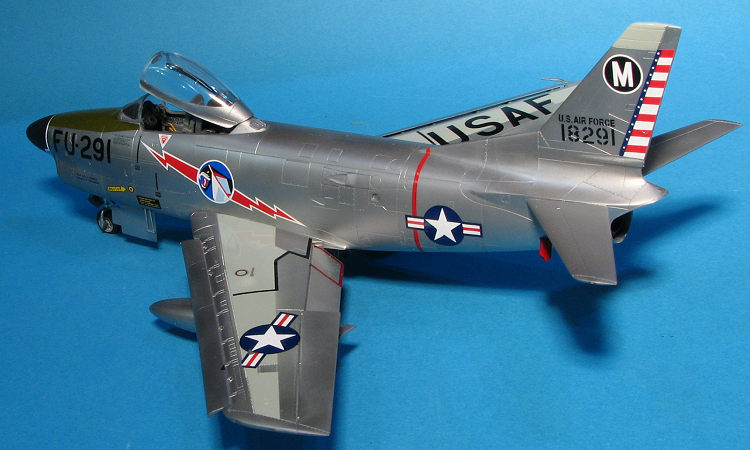
Revell 1/48 F-86D Sabre Dog
| KIT #: | 05868 |
| PRICE: | $8.00 in a bag |
| DECALS: | none supplied |
| REVIEWER: | Scott Van Aken |
| NOTES: | kit bought with no box, no decals and no instructions. |
| HISTORY |
The YF-95 was a development of the F-86 Sabre, the first aircraft
designed around the new 2.75-inch (70 mm) "Mighty Mouse" Folding-Fin Aerial
Rocket (FFAR), which were adaptations of the German R4M rockets used during
WWII. Begun in March 1949, the unarmed prototype, 50-577, first flew on 22
December 1949, piloted by North American test pilot George Welch and was the
first U.S. Air Force night fighter design with only a single crewman and a
single engine, a J47-GE-17 with afterburner rated at 5,425 lbf (24.1 kN)
static thrust. Gun armament was eliminated in favor of a retractable
under-fuselage tray carrying 24 unguided Mk. 4 rockets, then considered a more
effective weapon against enemy bombers than a barrage of cannon fire. A second
prototype, 50-578, was also built, bu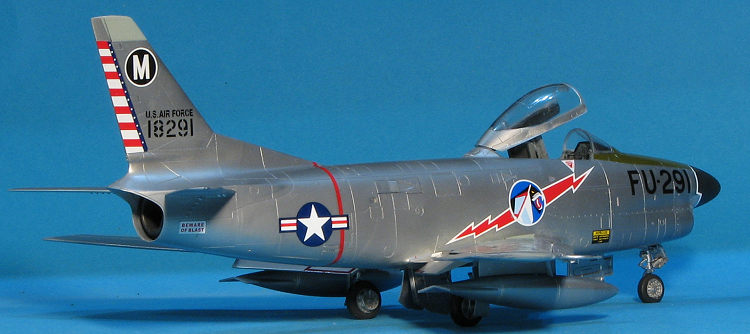 t
the YF-95 nomenclature was short-lived as the design was subsequently
redesignated YF-86D.
t
the YF-95 nomenclature was short-lived as the design was subsequently
redesignated YF-86D.
The fuselage was wider and the airframe length increased to 40 ft 4 in (12.3 m), with a clamshell canopy, enlarged tail surfaces and AN/APG-36 all-weather radar fitted in a radome in the nose, above the intake. Later models of the F-86D received an uprated J-47-GE-33 engine rated at 5,550 lbf (24.7 kN) (from the F-86D-45 production blocks onward). A total of 2,504 D-models were built.
Despite being rushed into service to counter what was considered a major threat from Soviet bombers, the issues the aircraft had were quickly worked out through massive upgrade programs, the biggest being Project Pull-Out which began in 1953, a major part of which was removing the aft fuselage from aircraft and sending them back for rework to add a braking parachute. All extant airframes were modified by late 1954. Many planes were later modified by fuselage cooling scoops in place of the early NACA intakes. The F-86L had these scoops as well as extended and slatted 6-3 wings and the SAGE electronic equipment.
| THE KIT |
This kit was bought as just the sprues in a sealed bag. It is the early version without the parabrake. This variant was the initial release from ProModeler and subsequently put into a Revell box. This isn't the ProModeler kit as it is in silver plastic whereas all the PM kits were light grey plastic. The only major difference in the sprues is that you don't get the tow tractor that came with the initial release. The other missing bits were not an issue as I have the PM kit from which to get build instructions and aftermarket decals for this version.
Detailing has everything you'd want in a modern 1/48
kit. Monogram/Revell has always had a
 reputation
for good OOB cockpits and this one is no different with nicely raised detail on
the instrument panel and side consoles. The seat is also quite nicely done.
reputation
for good OOB cockpits and this one is no different with nicely raised detail on
the instrument panel and side consoles. The seat is also quite nicely done.
There are several options such as a raised or lowered gun tray, open or closed speed brakes, and the kit is designed to have the slats and flaps lowered. As a note, few planes sat on the ramp with the rocket tray lowered and the speed brakes were raised more often than not. Note also that when open, the speed brakes did not open straight out, but distinctly down at the rear. There are period photos on the 'net that will be useful for this purpose.
Note that Monogram used the F-86D that is at the USAF Museum. However, that aircraft was only used to test systems and other modifications. It is also one of the first F-86Ds built. This means that it has the early instrument panel used in only a few planes. It also has an enlarged rudder trim tab that was on no other plane. Easy enough to fix the trim tab, but not the instrument panel. Various resin cockpit sets do have the correct one and Eduard has a non-color etched set that has it. I would hope that perhaps Yahu might do one.
| CONSTRUCTION |
As usual when I'm doing a kit I've built before, I started by gluing as many parts together that would be the same color as I could. This included the drop tanks, the main gear wells, the cockpit and the seat. When gluing the seat into its frame, it is a good idea to set it in the cockpit so that you can get the placement just right. I also installed the NACA intake pieces on the fuselage. Note that the kit does come with scoops, but those are not used on non-parabrake planes. I also did not assemble the rocket pack as these were normally retracted unless loading or for maintenance.
 Once these
areas were built, I painted the seat assembly, interior, interior surrounds and
other bits indicated in the instructions with dark gull grey. All the gear bays
got chromate green or at least a shade that is close. The interior intake halves
were painted Alclad II aluminum as were a few other pieces, like door interiors.
The main instrument panel and nose radome got some black. This was all left to
dry for a day.
Once these
areas were built, I painted the seat assembly, interior, interior surrounds and
other bits indicated in the instructions with dark gull grey. All the gear bays
got chromate green or at least a shade that is close. The interior intake halves
were painted Alclad II aluminum as were a few other pieces, like door interiors.
The main instrument panel and nose radome got some black. This was all left to
dry for a day.
Then I started assembling the cockpit. This is not an easy task as some of the parts are quite small. I would highly recommend test fitting the cockpit once it comes time to attach the various bits that hold the instrument panel in place. This ensures a good fit. Meanwhile I painted the detail bits of the seat, the area behind the seat and the exhaust was assembled and painted. After the interior was done (minus the seat), it was attached to the intake trunking. Now the instructions would have you glue the nose gear to the well prior to closing the halves. This is not necessary so I left that off. Then I glued the area behind the cockpit, the interior/intake assembly and the exhaust into one fuselage half.
The interior/intake assembly takes some fiddling
around to get everything to fit properly so take your time and it will finally
get into place. I then rolled up a length of lead weight and placed it atop the
intake. Back when T erry
Dean was doing nose weights, he had one that fit right into the radome, but he
is no longer doing these, which is a shame. I then glued the other half of the
fuselage, making sure all fit properly and left it to dry. This amount turned
out to be well more than enough. As a note, you can buy sheets of lead of
various thicknesses on-line and a fairly small sheet will last a very long time.
I believe this is 1/16th inch thick. Once that was installed, the nose was
attached and I did the usual seam work on the fuselage.
erry
Dean was doing nose weights, he had one that fit right into the radome, but he
is no longer doing these, which is a shame. I then glued the other half of the
fuselage, making sure all fit properly and left it to dry. This amount turned
out to be well more than enough. As a note, you can buy sheets of lead of
various thicknesses on-line and a fairly small sheet will last a very long time.
I believe this is 1/16th inch thick. Once that was installed, the nose was
attached and I did the usual seam work on the fuselage.
Meanwhile I assembled the wings. Then I installed the speed brakes in the closed position. The tailplanes were then glued in place. These can be difficult to get fully installed and I had to use tape to ensure they were straight. Wings were then glued in place. The fit of these is very good. I then masked the canopy and windscreen, attaching the windscreen and then masking off the rest of the cockpit with tape and Silly Putty. I used the latter to fill the gear wells and then it was off for some painting.
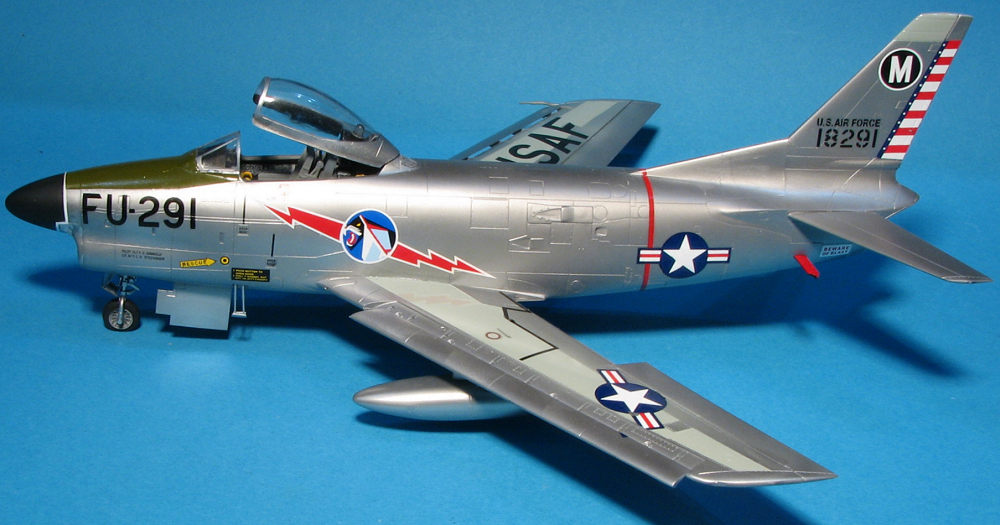
| COLORS & MARKINGS |
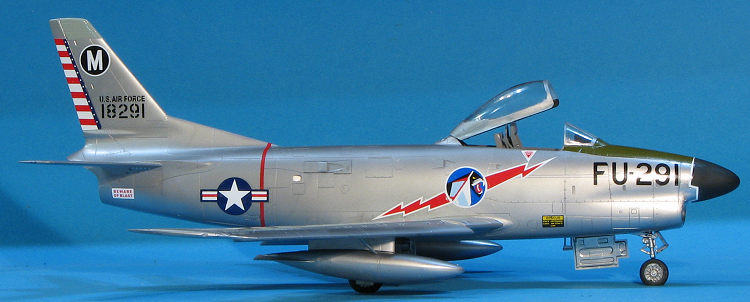 One thing that
struck me when I was last at the USAF Museum (which was at least 15 years ago),
was that the as yet unrestored F-86D that was on display had ADC grey inserts in
the wings. This surprised me and I do have photos. Looking at period images on
Google verified this so I've been painting these areas on my D Sabres ever
since. I also painted the fin tip with this shade. These areas were then masked
off and the rest of the airframe painted aluminum using Alclad II. During this
evolution, I also installed the slats as they would be painted aluminum as well.
The radome area was masked off and this was painted NATO black.
One thing that
struck me when I was last at the USAF Museum (which was at least 15 years ago),
was that the as yet unrestored F-86D that was on display had ADC grey inserts in
the wings. This surprised me and I do have photos. Looking at period images on
Google verified this so I've been painting these areas on my D Sabres ever
since. I also painted the fin tip with this shade. These areas were then masked
off and the rest of the airframe painted aluminum using Alclad II. During this
evolution, I also installed the slats as they would be painted aluminum as well.
The radome area was masked off and this was painted NATO black.
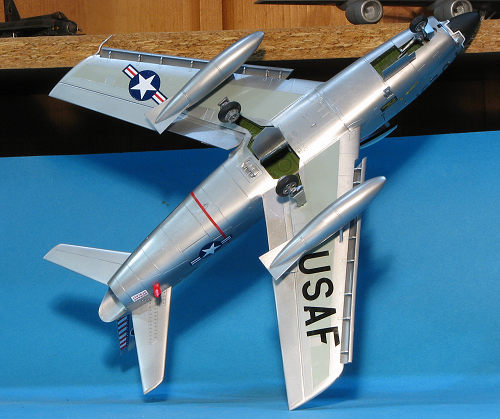
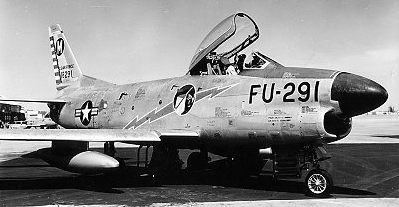
With that done, I returned the kit to the bench and attached the landing gear minus the wheels. The gear and the doors had been prepainted with aluminum prior to installation. Now, this aircraft had the later nose wheel as you can see in the image, which is not included in this boxing. This meant I needed an aftermarket set. In this case I chose the Brassin set, which is designed for the Hasegawa kit. In this set, the nose wheel attachment is far too large. I drilled a smaller hole, being careful not to drill too far and this was sufficient. I then attached the outer main gear doors. This is a fairly tricky procedure and took a while.
 It was at
this point that I started adding decals. I chose Superscale sheet 48-954, which
provides markings for an 85th FIS plane that was based nearby at Scott AFB. The
unit was inactivated the same month we arrived in 1959 (my father was with
AACS). The alert hangars are still here and used to store snow removal
equipment. For some reason, the decals on this sheet require multiple
applications of solvent to snuggle down. Eventually all of them were applied. I
also used a few items from the kit decals and those behaved better than the
Superscale versions. I did not use the myriad of stencils that these planes
carried because I'm lazy and did not want to add two weeks to the build to put
them on.
It was at
this point that I started adding decals. I chose Superscale sheet 48-954, which
provides markings for an 85th FIS plane that was based nearby at Scott AFB. The
unit was inactivated the same month we arrived in 1959 (my father was with
AACS). The alert hangars are still here and used to store snow removal
equipment. For some reason, the decals on this sheet require multiple
applications of solvent to snuggle down. Eventually all of them were applied. I
also used a few items from the kit decals and those behaved better than the
Superscale versions. I did not use the myriad of stencils that these planes
carried because I'm lazy and did not want to add two weeks to the build to put
them on.
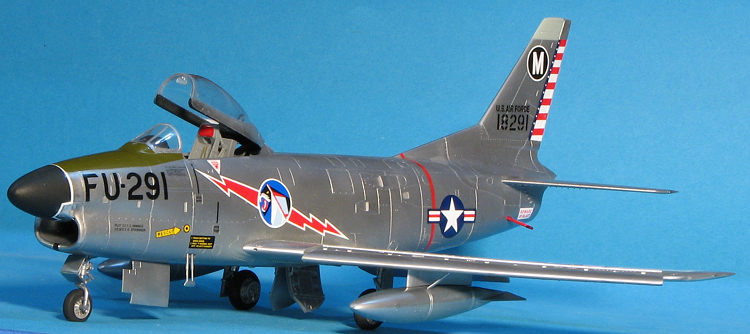
This left quite a few other
items to attach, so I got to it. The inner gear doors take a lot of light and
tweezers to get everything in place. Same with the nose gear doors. I recommend
gluing the forward two gear doors before attaching them to the airframe. I was
going to use an MV Products lens for the landing light, but did not
 have the right
size so I put a dollup of Cementine clear gel cement in there and that worked
out fine. This cement was used on all the other clear parts. The fuel dump had
to be painted then installed and I then went on to attaching the drop tanks.
have the right
size so I put a dollup of Cementine clear gel cement in there and that worked
out fine. This cement was used on all the other clear parts. The fuel dump had
to be painted then installed and I then went on to attaching the drop tanks.
Attaching the drop tanks is a bit tricky. They are not a solid fit. I first attached the pylon to the tank. Then the feed piece was attached to the lower wing. It was only at this time that the tank/pylon were glued to the wing and the smaller feed section then glued to the tank. This has to happen rather quickly before the glue sets. The rear view mirror was attached to the canopy and painted. I gave up trying to get the teeny wing tip light lenses in place and used a drop of Cementine to duplicate these. The canopy was then installed and boarding ladder glued in place.
| CONCLUSIONS |
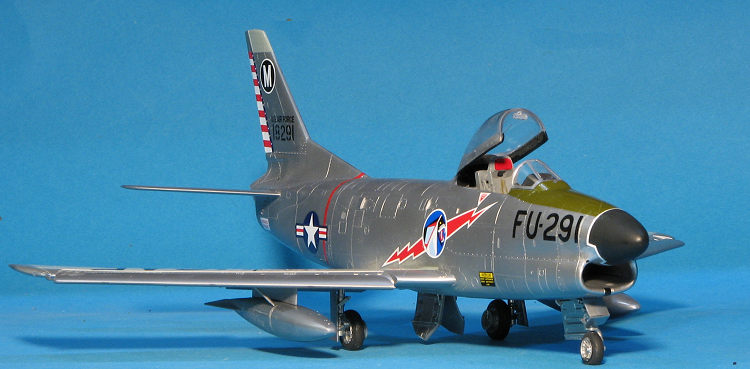
 As often
happens, I had forgotten about some of the fiddly aspects of this kit, but that
did nothing to dampen my enthusiasm for building what was now the third one of
these. I was happy that a set of markings for what was a local unit were
available but less than thrilled with the performance of the Superscale decals.
Their lack of response to setting solutions and the fact they are a bit oversize
is not a plus. Kit decals that I used were great. The situation with the nose
wheel shows that one really needs to have a photo reference to be able to build
an accurate representation. Despite these minor glitches, the kit builds quite
well and is a must have for 50's ADC fans.
As often
happens, I had forgotten about some of the fiddly aspects of this kit, but that
did nothing to dampen my enthusiasm for building what was now the third one of
these. I was happy that a set of markings for what was a local unit were
available but less than thrilled with the performance of the Superscale decals.
Their lack of response to setting solutions and the fact they are a bit oversize
is not a plus. Kit decals that I used were great. The situation with the nose
wheel shows that one really needs to have a photo reference to be able to build
an accurate representation. Despite these minor glitches, the kit builds quite
well and is a must have for 50's ADC fans.
| REFERENCES |
https://en.wikipedia.org/wiki/North_American_F-86D_Sabre
29 November 2019
Copyright ModelingMadness.com. All rights reserved.
If you would like your product reviewed fairly
and fairly quickly, please
contact the editor
or see other details in the
Note to Contributors.
Back to the Main Page
Back to the Review Index Page
Back to the Previews Index Page