| KIT #: | 5481 |
| PRICE: | $7.00 from a vendor |
| DECALS: | Two options |
| REVIEWER: | Scott Van Aken |
| NOTES: | 1999 tooling |
| HISTORY |
The Thunderjet had a distinguished record during the Korean War. Although the F-84B and F-84C could not be deployed because their J35 engines had a service life of only 40 hours, the F-84D and F-84E entered combat with 27th Fighter Escort Group on 7 December 1950. The aircraft were initially tasked with escorting the B-29 Superfortress bombers. The first Thunderjet air-to-air victory was scored on 21 January 1951 at the cost of two F-84s. The F-84 was a generation behind the swept-wing Soviet Mikoyan-Gurevich MiG-15 and outmatched, especially when the MiGs were flown by more-experienced pilots, and the MiG counter-air mission was soon given to the F-86 Sabre. Like its famous predecessor, the P-47, the F-84 switched to the low-level interdiction role at which it excelled.
 The F-84 flew a total of 86,408 missions, dropping 55,586 tons (50,427 metric
tons) of bombs and 6,129 tons (5,560 metric tons) of napalm. The USAF claimed
F-84s were responsible for 60% of all ground targets destroyed in the war.
Notable F-84 operations included the 1952 attack on the Sui-ho Dam. During the
war, the F-84 became the first USAF fighter to utilize aerial refueling. In
aerial combat, F-84 pilots were credited with eight MiG-15 kills against a
Soviet-claimed loss of 64 aircraft. The total losses were 335 F-84D, E and G
models.
The F-84 flew a total of 86,408 missions, dropping 55,586 tons (50,427 metric
tons) of bombs and 6,129 tons (5,560 metric tons) of napalm. The USAF claimed
F-84s were responsible for 60% of all ground targets destroyed in the war.
Notable F-84 operations included the 1952 attack on the Sui-ho Dam. During the
war, the F-84 became the first USAF fighter to utilize aerial refueling. In
aerial combat, F-84 pilots were credited with eight MiG-15 kills against a
Soviet-claimed loss of 64 aircraft. The total losses were 335 F-84D, E and G
models.
The F-84G was the first single-seat fighter-bomber capable of delivering the Mark 7 nuclear bomb using the LABS, J35-A-29 engine, autopilot, capable of inflight refueling using both the boom (receptacle in left wing leading edge) and drogue (probe fitted to wingtip fuel tanks), introduced the multi-framed canopy which was later retrofitted to earlier straight-winged F-84s. A total of 3,025 were built (1,936 for NATO under MDAP). The larger engine required more air to the face of the engine than the intake could provide at taxiing speeds. Commencing with block 20, auxiliary "suck-in" doors were added laterally to the intake runners ahead of the wing roots. When the engine was deficient of air, the spring-loaded doors were sucked open by the vacuum created by the engine to allow additional air to the engine. When the aircraft reached sufficient airspeed to supply adequate air through the nose intake, the auxiliary doors would close.
| THE KIT |
This particular kit was originally released in the ProModeler boxing back in 1999. It has since been released by Revell AG and also, with some different bits, as an F-84E.
This one is typical of Revell's uber-flimsy boxes. So much so that there is a thick cardboard stiffener installed to help protect the parts. Since Revell USA does not provide a parts diagram, you won't see a layout with this one. Suffice it to say that it is an engraved panel line kit and actually, looks quite nice. Perhaps not Tamiya nice, but still quite presentable.
 The cockpit is quite well done with a late bang seat and molded on straps.
There are separate side consoles with individual instrument panels. A decal
is provided to add over the main instrument panel if you wish. A pilot
figure is also included, a staple of Monogram-designed kits, though this one
is not seated.
The cockpit is quite well done with a late bang seat and molded on straps.
There are separate side consoles with individual instrument panels. A decal
is provided to add over the main instrument panel if you wish. A pilot
figure is also included, a staple of Monogram-designed kits, though this one
is not seated.
Now, an F-84E and F-84G look the same to the uninitiated, but there are differences. To start, the F-84G has engine blow-in doors to provide additional cooling when on the ground. The E does not have this. Revell has a relatively large insert on each side of the fuselage to account for this difference. The E apparently also has a bit shorter exhaust, so Revell has a one-piece insert for the rear fuselage to deal with this. There are also differences with speed brakes. The G has one with a lot of perforations while the E has four largish rectangles instead. However, I should point out that you will find the E style speed brake on Gs, so if you are really concerned about this, check photos. This kit only has the G style.
Nose gear and intake are divided into left and right sections, leaving a nasty seam that will be impossible to properly fill. There is room at the top of this for weight, though the instructions are moot on how much. ou can also put some inside the intake piece. If all else fails, a clear support rod is provided. Note that the nose gear doors are molded on the intake halves.
 Moving to the wings, the tip tanks are molded in place and have refueling
probes molded in. These were removable and most photos of Gs show them
without them. The G had a refueling door on the leading edge of one wing so
there is an insert to deal with this. The builder will need to open holes
for the rocket rails. The ones for the inner pylon, which could carry either
fuel tanks or bombs, is already open.
Moving to the wings, the tip tanks are molded in place and have refueling
probes molded in. These were removable and most photos of Gs show them
without them. The G had a refueling door on the leading edge of one wing so
there is an insert to deal with this. The builder will need to open holes
for the rocket rails. The ones for the inner pylon, which could carry either
fuel tanks or bombs, is already open.
The main gear wells are built up of several pieces. The inner well includes the inner gear doors. Outer doors are separate units that attach to each other then the main gear strut. Torsion links and retract struts are included. The speed brake well is separate and allows the speed brake to be posed either raised or lowered. These would often bleed down when on the ground. Separate flaps are provided and while you can pose them down, pretty much all the period photos you see of the plane have them raised. The kit does come with two canopies. One is the braced version that is normally seen and the other is a smooth one which is not really applicable to the G. While the brace on the real plane is on the inside, there are external frame lines so you can properly paint it.
Instructions are well done with generic and FS595 paint colors provided. Two overall unpainted metal planes are provided on the very large decal sheet. One is the box art plane from the 77th FBS in dorea during 1952. The other is from the 9th FBS in Korea during 1953. The big decal sheet is nicely printed and even provides the olive drab anti-glare panel on the top of the fuselage for those who don't want to paint this area. Aftermarket decals are easy to find if you want something else.
| CONSTRUCTION |
This is another of those kits that has been in my stash for years, and since
I've never built one, I thought this might be good time to do so. I
started off by prepainting the cockpit bits, following the kit's instructions,
which are correct on the color used, according to photos of extant airframes.
Some think that the cockpit is all black and that is simply not the case. With
that completed, the nose gear/intake piece was built. Revell/Monogram like to
mold gear doors on gear well pieces. Normally this works well. Not in
 this case
as I broke the gear doors off during handling. Not wishing to use the tail stand
I packed the area above the intake with weight and hoped for the best. The
interior and nose piece were install into one fuselage half and the halves
joined. A bit later I realized I'd forgotten the speed brake well so had to pry
apart the still-curing cement to install that. The intake piece contains the
upper portion of the nose landing gear. It wasn't until I got around to
attaching the gear that I realized the intake section was not on straight. So my
nose gear is off at a bit of an angle.
this case
as I broke the gear doors off during handling. Not wishing to use the tail stand
I packed the area above the intake with weight and hoped for the best. The
interior and nose piece were install into one fuselage half and the halves
joined. A bit later I realized I'd forgotten the speed brake well so had to pry
apart the still-curing cement to install that. The intake piece contains the
upper portion of the nose landing gear. It wasn't until I got around to
attaching the gear that I realized the intake section was not on straight. So my
nose gear is off at a bit of an angle.
While that was drying, I built up the main gear wells, added the insert for the wing refuelling probe and cemented the wing halves together. At this time I also removed the tank refueling probes as I had no photo proof that the markings options I was using had these items.
With the wings together, these along with the tailplanes and the intake piece were attached. The various wells were painted with chromate yellow and then filled with Silly Putty. I still had not attached the exhaust section and test fitting showed a very tight fit. This was left off until near the end. I also masked the canopy using Eduard EX 159 masks. Note that this plane uses the canopy with the white reinforcement bands. This means masking the canopy with the masks, painting it white, then using tape to cover all the white bits and finally painting the canopy with exterior color. It would have been nice had Eduard provided the overlay mask, but they didn't. Time to paint.
| COLORS & MARKINGS |
This would be overall aluminum. So I grabbed a can of
Alclad IIs gloss black primer. This was their original formula. The can was
shaken and stirred then sprayed on.
Three weeks later it was still a bit tacky but I decided to spray the aluminum
over it. Disaster. The next day there were all sorts of cracks on the surface.
This is caused by the underlying paint not being fully cured. OK. So I sanded
off the aluminum and let it sit another month. This time not sticky. Disaster
2.0, but not as bad.
Still, this left me with a choice. Do I toss the kit in the trash (seriously
considered as I have another I can build), or continue on with it anyway. It
won't see the light of day and will spend the rest of its life on one of my
shelves. I've only tossed one kit in my life and that was a Heller 1/72 P-36
(kept the prop). So this one was saved from incineration and I moved forward to
finishing it.
 This included attaching the rest of the landing gear
parts. Note that the nose gear is very weak and mine broke fairly early due to
handling. The area just above the nose wheel steering is the weak area. Recommend metal gear
and I think SAC makes them. Eventually it was on its gear and the doors
attached. During all this, one of the fuel dumps disappeared (I blame invisible
part-stealing Leprechauns, which tend to infest this part of the state). The
exhaust piece was plugged in, the bomb racks build up and I started with decals.
This included attaching the rest of the landing gear
parts. Note that the nose gear is very weak and mine broke fairly early due to
handling. The area just above the nose wheel steering is the weak area. Recommend metal gear
and I think SAC makes them. Eventually it was on its gear and the doors
attached. During all this, one of the fuel dumps disappeared (I blame invisible
part-stealing Leprechauns, which tend to infest this part of the state). The
exhaust piece was plugged in, the bomb racks build up and I started with decals.
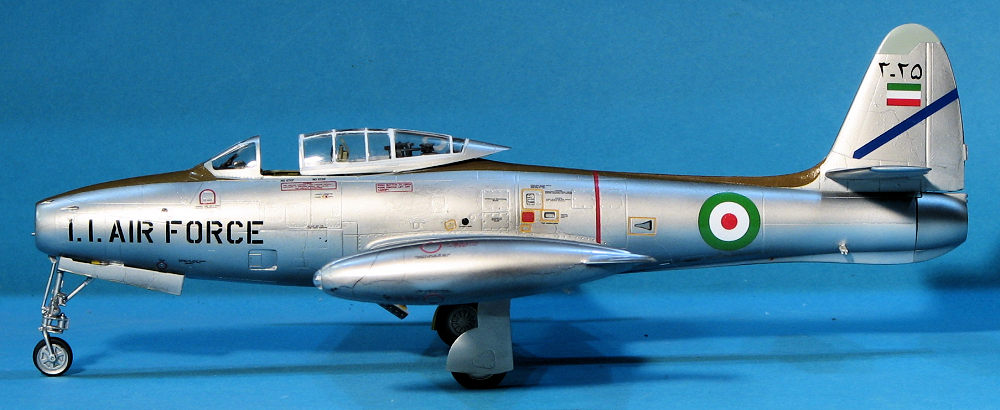
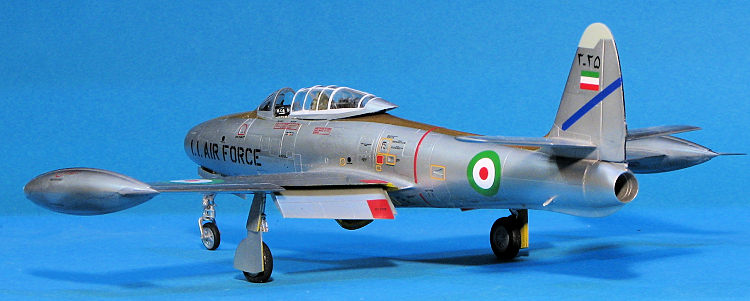
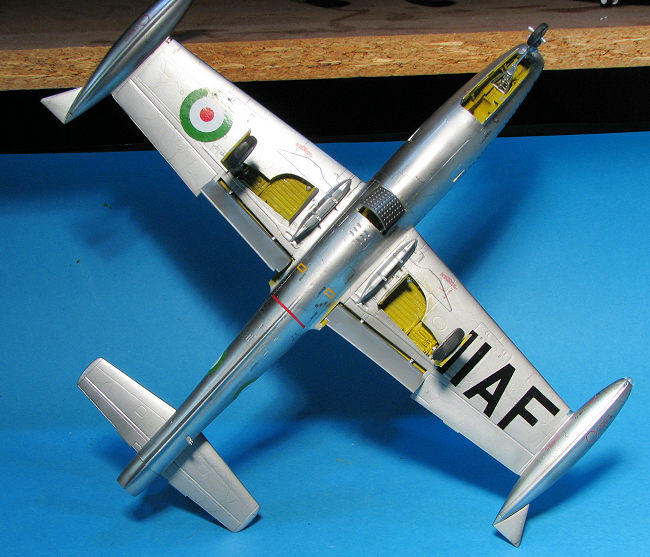
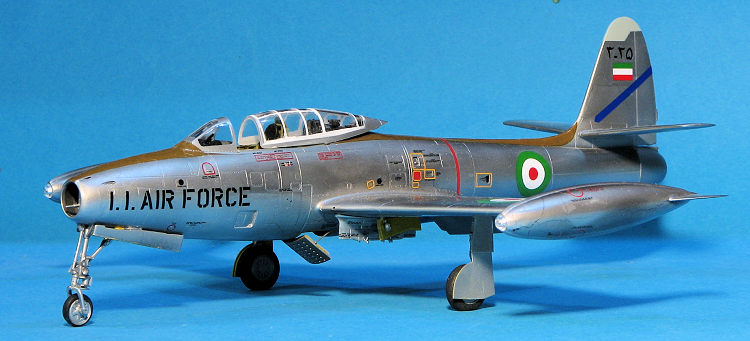
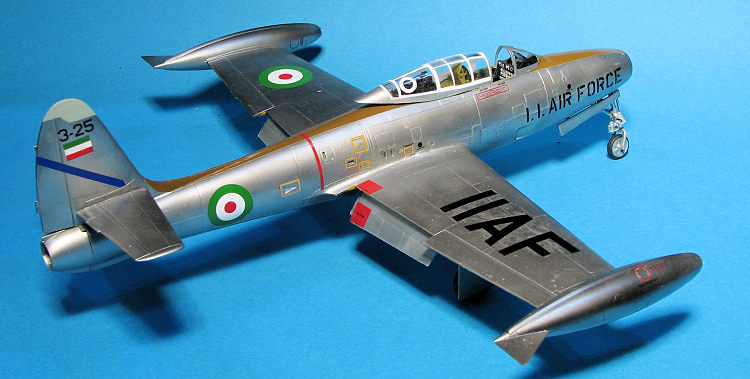
For this one I used a Hi Decal sheet, # 48-017 which has nice markings for an Imperial Iranian Air Force aircraft. The kit supplied stencils and I used about 60% of them as there are a lot. The Hi-Decals worked just great. The lone downside is that the lower wing IIAF marking is all one piece and since I didn't attach it before gluing on the main gear and doors, it is a bit more outboard than it should be. I also found that the kit provided OD anti-glare panel was a bit of a chore to attach, though it does work and looks good enough when done.
With the markings on it, I installed were the various clear lights and lenses. These are very tricky to get installed and I'm surprised that I didn't lose any of those items as they are the types of bits that go flying off into the netherworld. The last thing was the canopy. It was unmasked, the rear insert attached and it was posed open. Yes, the rear does kick up like that. Check period photos and you'll see this is the case.
| CONCLUSIONS |
Despite my issues with the painting and nose gear, this is a nice kit. The Tamiya version is probably the best around in this scale, but it can be pricey. For those on a bit of a budget, I can easily recommend this one. If you have the original Alclad II black primer, throw it away; I did.
| REFERENCES |
https://en.wikipedia.org/wiki/Republic_F-84_Thunderjet
9 October 2020
Copyright ModelingMadness.com. All rights reserved.
If you would like your product reviewed fairly and fairly quickly, please contact the editor or see other details in the Note to Contributors.
Back to the Main Page Back to the Review Index Page Back to the Previews Index Page