Kinetic 1/48 F-104A/C Starfighter
| KIT #: | K48096 |
| PRICE: | $ |
| DECALS: | Four options |
| REVIEWER: | Scott Van Aken |
| NOTES: | 2021 release |
| HISTORY |
 Designed as the smallest airframe that would around a J-79 turbojet and
meet the requirements of a supersonic point defense interceptor, the F-104 met
all the requirements of the USAF. At first view, many thought that the plane
would be unable to fly properly, but that was not the case. It just took skill
to get the best out of it. The 104 broke many speed and time to climb records
and was the interceptor the USAF had wanted. However, issues with the then new
J-79 engine and its short range meant that its time in the USAF was limited.
Designed as the smallest airframe that would around a J-79 turbojet and
meet the requirements of a supersonic point defense interceptor, the F-104 met
all the requirements of the USAF. At first view, many thought that the plane
would be unable to fly properly, but that was not the case. It just took skill
to get the best out of it. The 104 broke many speed and time to climb records
and was the interceptor the USAF had wanted. However, issues with the then new
J-79 engine and its short range meant that its time in the USAF was limited.
The F-104A was supplied to Pakistan, Jordan and the Republic of China when retired from the USAF. The C model had an upgraded radar and engine to help perform the fighter-bomber role. The later GS model was a big export success operating with numerous nations until the last ones were retired in the early 2000s.
| THE KIT |
This is the latest F-104 variant to be kitted by Kinetic, having done the G and J versions previously. Not surprising is that some sprues are the same as those earlier kits. However, there is a sprue that is unique to this variant. I very much like that Kinetic offered a full fuselage half instead of splitting the fuselage to enable all the variants to be done with a basic forward section and separate tail sections.
Detailing of the kit is first rate with fine engravings and some recessed rivet detailing. The cockpit is very nicely done with a multi-piece bang seat and p.e. harness. Unlike several model companies, Kinetic does not offer a decal for the instrument panels so those areas will need to be painted. Once the cockpit is built, construction turns to the exhaust, nose gear well, main gear well, and nose cone. Again, the wells are nicely detailed and perfect for those who like to pick out details. Before installing these items in the fuselage, one has to make a choice of whether to open the holes for the refueling probe.
 Then the rest of the fuselage is built up which includes the cockpit
anti-glare panel, the lower fuselage sections, the horizontal stab, and the
engine intakes. Note that there are different lower fuselage sections depending
on the A or C model and if using the fuselage missile pylons, there are holes to
open.
Then the rest of the fuselage is built up which includes the cockpit
anti-glare panel, the lower fuselage sections, the horizontal stab, and the
engine intakes. Note that there are different lower fuselage sections depending
on the A or C model and if using the fuselage missile pylons, there are holes to
open.
The next construction steps cover the assembly and installation of the landing gear and doors. The main gear are fairly complex and unlike many 104 kits, each side of the main gear is a separate construct. At the rear, there is a ventral fin, tail hook, and speed brakes to install. The latter can be open or closed.
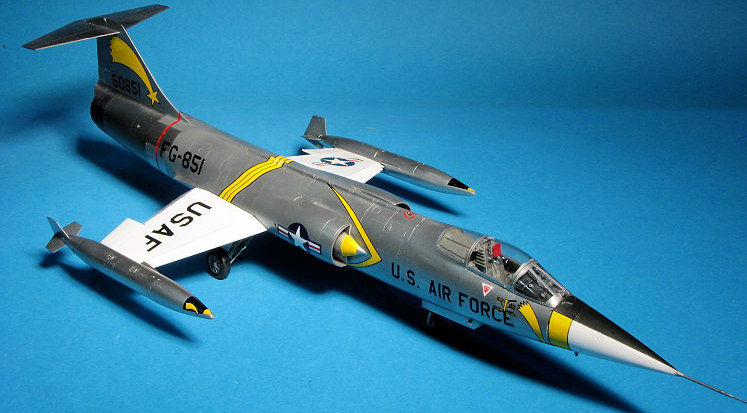
Wings have separate flaps, slats, and ailerons. You can pose the flaps lowered if you wish. If not installing the tip tanks, there is a photo etch piece to insert in the tip of the wing. The canopy and the section behind it can be posed open if you so wish and it was not unusual to see this aft bit open during pre- and post-flight operations. The final bits are wing tip tanks, wing tanks and pylons as well as the fuselage missile rack and missiles.
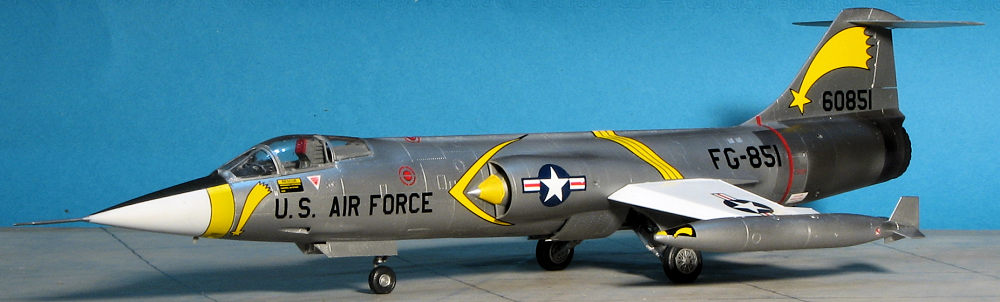
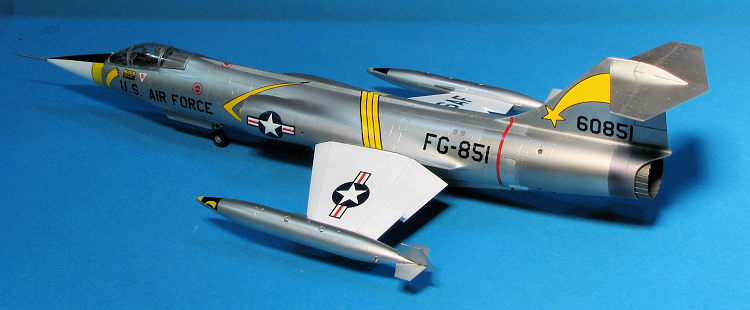
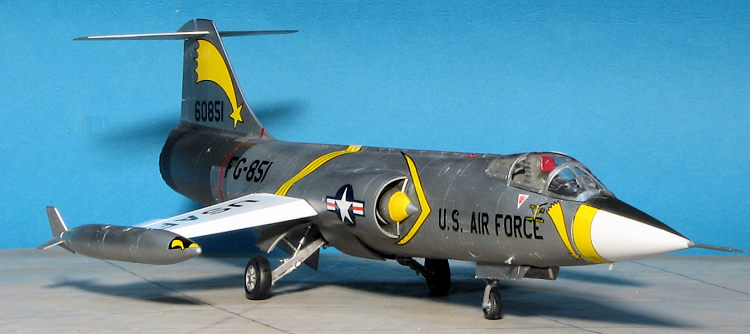
Instructions are in a very nice booklet form with color references offered in the MiG line of paints. There is a conversion chart with FS 595 and generic color names. Four options are provided. Two are in SEA camouflage and that is an aircraft with the 434 TFS in Vietnam and the 198 TFS, Puerto Rico ANG. Both of these options are F-104Cs. Two unpainted metal options are included, both being the red-trimmed 434 TFS/479th TFW based at George AFB in the late 1950s. One of these is an F-104A. Note that the wings are white on the upper surface and not on the underside. The decal sheet is nicely printed by Cartograf and has a glaring error on the US insignia as the star is not centered. You need to visit your spares for replacements.
| CONSTRUCTION |
 Kinetic has you start with the interior and the initial item is the seat. This
is multi-pieces and includes some photo etch seat harness pieces. I had
difficulty with the small detail items that were quite thin and basically I
broke them. Most folks won't notice the omissions. As mentioned in the kit
description, there are no decals for instruments so a bit of flat black with a
small brush followed by some white drybrushing to bring out details. While all
that was being done, other subassemblies that fit into the fuselage were
constructed.
Kinetic has you start with the interior and the initial item is the seat. This
is multi-pieces and includes some photo etch seat harness pieces. I had
difficulty with the small detail items that were quite thin and basically I
broke them. Most folks won't notice the omissions. As mentioned in the kit
description, there are no decals for instruments so a bit of flat black with a
small brush followed by some white drybrushing to bring out details. While all
that was being done, other subassemblies that fit into the fuselage were
constructed.
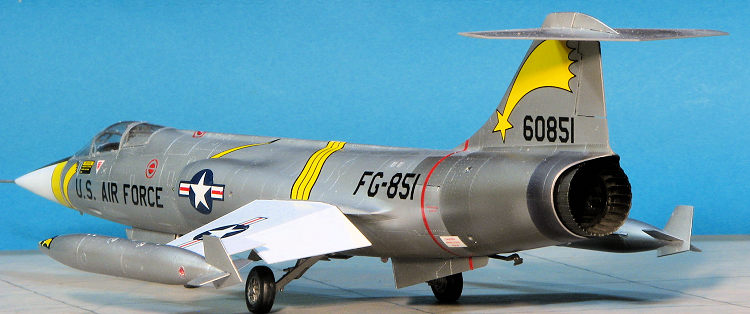
First was the exhaust section. Note that you don't have to attach the afterburner section as it can be installed after painting. The nose gear has to be built up as does the main gear well. With the nose well, there are two struts to be glued in place, so carefully look over the instructions as you can install these in reverse and it will cause fit issues. Also assembled was the nose radome minus the pitot to keep it from being broken off during the build.
Next, the subassemblies are glued into the fuselage half. If you are going to build a version with the air refueling probe, there are holes to open. As a note, the F-104 does not need nose weight. The fit is quite positive, but you will need to fiddle around a bit to get the cockpit section properly aligned. Fortunately, the open areas for later inserts makes this an easy task. Once the halves are together, then I started on the various inserts. Most of these were very tight fitting, but not all of them. The tail hook well piece did not fit flush with the surface. Neither did the gun port fit all that well.
 While the fuselage was being taken care of, I did some other sub-assemblies. The
wing tip tanks require the smaller inner stabilizing fin and the outer one is a
different shape from the norm. Use the part numbers provided in the
instructions. I also assembled the wings. I chose not to open any of the pylon
holes and also attached the wing leading edge slat and flaps in the lowered
position. These will not be attached until everything is painted as the wings
are white on the unpainted metal planes. This was done while the rest of
the kit was assembled.
While the fuselage was being taken care of, I did some other sub-assemblies. The
wing tip tanks require the smaller inner stabilizing fin and the outer one is a
different shape from the norm. Use the part numbers provided in the
instructions. I also assembled the wings. I chose not to open any of the pylon
holes and also attached the wing leading edge slat and flaps in the lowered
position. These will not be attached until everything is painted as the wings
are white on the unpainted metal planes. This was done while the rest of
the kit was assembled.
Intakes were assembled and installed. It is recommended that you glue together all the intake parts at the same time and then install the intake before the glue sets so you have some wiggle room. I then installed the rudder and glued the small section atop the horizontal stab. Meanwhile, the instrument panel anti-glare panel was painted and installed along with the three tiny pieces that go atop it and the sight glass. The windscreen was masked and installed as well as the rear glass piece. To get this to fit, I had to trim on the bottom of the seat as well as the foot rests to get the seat down low and forward enough. Next I moved on to the multiple items inside the canopy. These were a bit tricky to fit, but I got them in place. Unfortunately, I had to cut the part over the seat or it would not fit in the closed position. I find this sort of thing happens fairly often with kits that have a lot of 'open' options.
I then turned to the landing gear since they'd be painted aluminum as well. Fit of these items is fairly good, but they are not tight so one has to adjust them until the glue sets. I left off the gear doors until later in the build. The speed brakes were installed closed. This requires a fair amount of the door's interior detailing to be removed so it will fit flush. I used a motor tool with sanding drum on the slowest speed to grind away the detail.
| COLORS & MARKINGS |
 vided by the kit
decals. I also sourced the wing insignia from an ancient Microscale sheet
and used the USAF from the kit decals as the Superscale ones were way too
large. I found the yellow markings to be fairly brittle, though the standard
black ones provided no issues. I also discovered the nose band to be too
short, so that was extended using Fantasy Printshop yellow stripes. That
brand was used for the thin black outlines as well. Decals took me a while
as they generally do for jet models. Then the airframe was sprayed with
Testors Metallizer Sealer to keep the markings from being damaged during
handling.
vided by the kit
decals. I also sourced the wing insignia from an ancient Microscale sheet
and used the USAF from the kit decals as the Superscale ones were way too
large. I found the yellow markings to be fairly brittle, though the standard
black ones provided no issues. I also discovered the nose band to be too
short, so that was extended using Fantasy Printshop yellow stripes. That
brand was used for the thin black outlines as well. Decals took me a while
as they generally do for jet models. Then the airframe was sprayed with
Testors Metallizer Sealer to keep the markings from being damaged during
handling. | CONCLUSIONS |
It would be appropriate to compare this with the Hasegawa offering. Both have a lot of features, but there is more detail in the Kinetic kit. I found it interesting that there was no option for wing tip Sidewinders, nor were the instructions clear on how to attach the underfuselage missile pylons so I didn't use them. Aside from the intakes, which always give me issues, I had no real problems with this kit. Fit is generally quite good and you do have to pay attention to things as you go along.
I did make a few blunders building this one. First, I didn't completely buff out the sanding marks so those are fairly visible. Second, I forgot to paint the underside of the wings ADC Grey. This is not the first time I've messed that up, so perhaps the next time I'll finally get it right. Third is that I had to paint the yellow on the intake with a brush. It looks OK, but should have been done before assembling the intakes. Would I build another in the series? Yes I would as it was a nice experience. For Starfighter fans, this one is well worth picking up.
26 November 2021
Copyright ModelingMadness.com. All rights reserved. No reproduction without express permission.
Thanks to Kinetic Models North America and Glen Coleman for the preview kit. This kit should now be available at your local retailer.
If you would like your product reviewed fairly and fairly quickly, please contact the editor or see other details in the Note to Contributors.