| KIT #: | 72120 |
| PRICE: | $27.00 MSRP |
| DECALS: | Three options |
| REVIEWER: | Scott Van Aken |
| NOTES: | Short run with photo etched parts |
| HISTORY |
During the Korean War, it was realized that a dedicated nuclear capable fighter bomber was required. There were some planes, such as the F-84F that were able to handle this type of weapon, but it was not quite what the USAF needed. A modified Sabre with a larger J-73 engine was developed. Though the fuselage was different, the wings and tail planes were all Sabre. The fuselage was enlarged to handle the additional air flow of the bigger engine and all but the early planes got 4 20mm cannon in place of the standard 6 .50 cal machine guns. The aircraft served for many years with regular USAF units until replaced by the F-100, after which the H model went on to serve in the Air National Guard until the early 1970s.
| THE KIT |
 This
Special Hobby kit is one of the later aircraft with the four cannon. It comes on
two grey plastic sprues with an additional clear plastic sprue for the
windscreen/canopy. Molding of the plastic is quite good and up to MPM/Azur/Special
Hobby's current standards. Thanks to the way the sprues are laid out, the wing
tips on the lower wing have no protection and mine were bent back quite a bit
from rattling around in the slightly oversized box. I also found some sink areas
in the thin main gear doors and one of the nose gear doors. This problem also
occurs near the jet exhaust on the fuselage and is quite prominent on the intake
piece. There is an upper and lower intake section that has several large ejector
towers that will have to be ground away as they will be quite visible on the
completed model unless one makes an intake cover. The intake is see-through as
no compressor face is provided. This is not true with the exhaust as the four
piece tailpipe does have a blanking plate that also acts to position the exhaust
in the fuselage as there is no other positioning shelf provided.
This
Special Hobby kit is one of the later aircraft with the four cannon. It comes on
two grey plastic sprues with an additional clear plastic sprue for the
windscreen/canopy. Molding of the plastic is quite good and up to MPM/Azur/Special
Hobby's current standards. Thanks to the way the sprues are laid out, the wing
tips on the lower wing have no protection and mine were bent back quite a bit
from rattling around in the slightly oversized box. I also found some sink areas
in the thin main gear doors and one of the nose gear doors. This problem also
occurs near the jet exhaust on the fuselage and is quite prominent on the intake
piece. There is an upper and lower intake section that has several large ejector
towers that will have to be ground away as they will be quite visible on the
completed model unless one makes an intake cover. The intake is see-through as
no compressor face is provided. This is not true with the exhaust as the four
piece tailpipe does have a blanking plate that also acts to position the exhaust
in the fuselage as there is no other positioning shelf provided.
The upper intake section includes the cockpit tub with a separate back bulkhead that will help to blank off the intake. The section behind the cockpit under the canopy is bare as it should be with the radio beacon equipment a separate piece that attaches to the back of the canopy. The windscreen and canopy are well molded, but rather distorted, so you need to have the canopy open to appreciate the detail you have put into the cockpit. Much of the cockpit consists of photo-etch parts for the seat bits, instrument panel consoles and the like.
The wings are a single lower piece with two upper wing halves into which a wheel well center section is placed, very much like the Hobbycraft F-86E/F kits. The wings are the extended 6-3 variety without slats. The speed brakes are molded closed.
 You get separate options for the tail planes and rudder
trim tab depending on the markings you will use, with one set being smooth and
the other having stiffeners. Landing gear are fairly well done as are the
wheels, though resin replacements of the same design will have crisper
detail. A set of late drop tanks are supplied, but oddly, they are missing the
end plates on the fins that are so typical of post Korean War Sabres. Why this
was missed is a puzzler as it is clearly shown on the box art and in the
markings guide. You can make them out of sheet brass or perhaps rob them from
another kit that has them. Unbelievably, the kit provides separate vortex
generators and bases for the aft fuselage and the underside of the stabs. Good
luck getting these teensy bits in place without losing any of them. In fact, I
would be surprised if many will still have the placement guide points left on
the aft fuselage after filling in the sink areas. The small wing fences are also
made of photo etch.
You get separate options for the tail planes and rudder
trim tab depending on the markings you will use, with one set being smooth and
the other having stiffeners. Landing gear are fairly well done as are the
wheels, though resin replacements of the same design will have crisper
detail. A set of late drop tanks are supplied, but oddly, they are missing the
end plates on the fins that are so typical of post Korean War Sabres. Why this
was missed is a puzzler as it is clearly shown on the box art and in the
markings guide. You can make them out of sheet brass or perhaps rob them from
another kit that has them. Unbelievably, the kit provides separate vortex
generators and bases for the aft fuselage and the underside of the stabs. Good
luck getting these teensy bits in place without losing any of them. In fact, I
would be surprised if many will still have the placement guide points left on
the aft fuselage after filling in the sink areas. The small wing fences are also
made of photo etch.
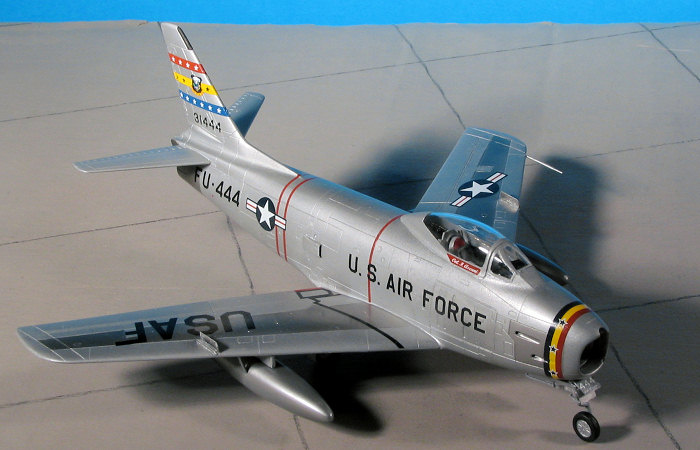
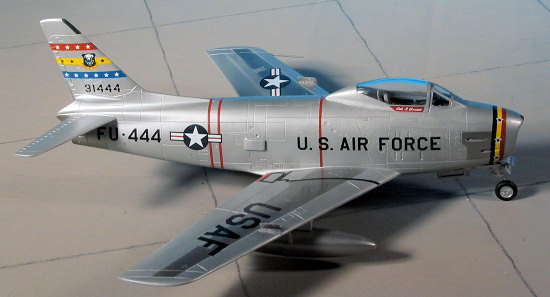
The instructions are typical of any of the MPM group with nicely done construction steps, and painting information. All the colors given are generic names only. There are markings for three aircraft; the box art plane from the 34th FDS/413 FDW at George AFB in 1955, a yellow and black marked plane from the the 429th FBS at Clovis AFB, NM, and finally the wing commander's plane from the 50th FBW at Toule-Rosieres AFB in France during 1956. The decals are superbly done by Avi Print so choosing which one to do will be difficult.
| CONSTRUCTION |
 As I tend to do things by subassembly, I looked around
for what was there. The drop tanks, wings and engine intake were glued together,
after first removing the ejector pin towers where appropriate. The drop tank
bodies seem a bit odd to me when it comes to the rear of them. With other F-86
kits, the tank comes to a near point at the back when the upper and lower
As I tend to do things by subassembly, I looked around
for what was there. The drop tanks, wings and engine intake were glued together,
after first removing the ejector pin towers where appropriate. The drop tank
bodies seem a bit odd to me when it comes to the rear of them. With other F-86
kits, the tank comes to a near point at the back when the upper and lower
![]() sections
swoop up to meet. This one has a sort of 'boat tail' to it. I'm not sure it is
correct, and would like some feedback in this regard. I think that MPM/Special
Hobby would benefit from molding the ailerons and flaps into the upper wing
surface in order to get a nice, sharp trailing edge to these items. Of course,
it may be beyond the technology of their molding process, but it would be a real
boon.
sections
swoop up to meet. This one has a sort of 'boat tail' to it. I'm not sure it is
correct, and would like some feedback in this regard. I think that MPM/Special
Hobby would benefit from molding the ailerons and flaps into the upper wing
surface in order to get a nice, sharp trailing edge to these items. Of course,
it may be beyond the technology of their molding process, but it would be a real
boon.
I also painted the interior bits and inside cockpit sections of the fuselage with Dark Gull Grey, using Testors enamels. The instrument panel and side console parts of the etched fret were given a matte black with Foquil's enamels. The intake's seam was given some filler. This was then smoothed out with a piece of sandpaper rolled around a paint brush handle. Aluminum was then sprayed inside. Meanwhile, the exhaust bits were glued together. This did not get any filler as the opening is just too small to do anything about sanding it down. It will be painted matte black and the should help.
Next, I started adding on some of the photo-etch to the interior. For these parts, I generally used clear gloss paint as I find it works just as well as super glue and gives some working time to get things straight. This is particularly helpful when gluing the acetate instruments to the back of the panel. You get the added bonus that the paint will fill the instrument faces as you move the acetate in place. This acetate had the back painted gloss white prior to application.
 While waiting for those bits to dry so I could move on,
I glued in the exhaust and the blanking plate behind the pilot. The exhaust has
no positive contact points. The most inward piece with the burner face on it has
a plastic 'tail'. One just glues it where it hits the fuselage. No indication on
how far the exhaust sticks out if at all so I put it where it looked like it
should go. There is a tab for the rear cockpit blanking plate, but it is too
short. I taped the fuselage halves together and then glued this plate to one
side of the fuselage where it looked like it should fit. Heck, it may even be
flush, but there is no indication of this in the instructions and it would
require quite a bit of trimming.
While waiting for those bits to dry so I could move on,
I glued in the exhaust and the blanking plate behind the pilot. The exhaust has
no positive contact points. The most inward piece with the burner face on it has
a plastic 'tail'. One just glues it where it hits the fuselage. No indication on
how far the exhaust sticks out if at all so I put it where it looked like it
should go. There is a tab for the rear cockpit blanking plate, but it is too
short. I taped the fuselage halves together and then glued this plate to one
side of the fuselage where it looked like it should fit. Heck, it may even be
flush, but there is no indication of this in the instructions and it would
require quite a bit of trimming.
Back at the drop tanks, I tried to fit the robbed fins with endplates (scoured from a Heller kit), but they were too small. The kit fins are too large and do not fit well. I'll be making some new end plates out of plastic card, using the Heller ones as a template. The reason I don't use the Heller tanks is that they appear to be smaller than what the H model normally carried.
Back at the photo-etch, I added all the various bits to the seat. These did add quite a lot to how things look. These were later painted as needed. The belts were just laid on the bottom of the seat after being trimmed a bit. These normally fit through slots in the side of the seat and not over the sides as shown.
Returning to the fuselage, I glued the interior/intake
to one half of the fuselage. I basically lined up the nose gear well. Doing this
means that the nose piece will not butt up against the intake, but moving this
assembly more forward means that the gear well will be misaligned and you won't
get the instrument panel to fit. Conversely, leaving it alone means that the
rear section to the cockpit that I glued in place won't fit as the backing plate interferes. It is a tough choice to make. I'm
sure that some creative trimming or shimming will fix things to where it all
fits, but I just couldn't see an easier fix.
won't fit as the backing plate interferes. It is a tough choice to make. I'm
sure that some creative trimming or shimming will fix things to where it all
fits, but I just couldn't see an easier fix.
With this part in place, I removed the backing plate earlier glued in so that the back to the cockpit would fit. Then, with the back bulkhead in place, I glued weights into the nose and then closed the fuselage halves. That plate I removed was then glued back in along with the intake. This had filler applied to the seams and set aside to dry.
Back at the drop tanks, I filled the seams left between the fins and the tank, then when dry, these were sanded down and the tanks set aside to figure out the end plate deal.
I sanded the fuselage seams and attached the wings. Another application of filler in several areas was required, though the general fit of the wings is quite good. Moving on, I cut out the trim tab on the rudder and glued in the ribbed version. Not that I didn't like the scheme provided for the 'as is' option, but I figured most wouldn't cut this part out!
Then I glued the little vortex generator plates onto the underside of the horizontal stabilizers. I figured I'd try to attach these bits. I got as many as three of them on before I lost too many of them to complete the project so removed them, leaving the plates in place. Same happened with the fuselage ones. Frankly, these would be MUCH better done as a single resin assembly. Those who can get these all on have my deepest admiration. How one would put the decals for the box option over these is a real mystery. Perhaps that is why one never sees a build up of these kits on the side of the box. I then glued on the tail planes.
Returning to the cockpit, I glued on the upper cowl piece and the the windscreen. Well, I tried to glue on the windscreen. The instrument panel had to have a considerable amount of side material removed to initially fit, and this meant that the panel kept the windscreen from being able to be properly attached. I had to clip off corners of it until the windscreen eventually fit into place. Then there is the canopy.....
 Once upon a time, there was a group of elves. These
elves lived in the forests of eastern Europe and like all elves, wanted to do
good for people. Those elves that turned evil are called trolls. Anyway, one
day, a group of elves decided that they would make a lot of people happy by
producing plastic models of subjects that modelers wanted and no one else
produced. And so began a long line of very nice and interesting models, all made
by elves.
Once upon a time, there was a group of elves. These
elves lived in the forests of eastern Europe and like all elves, wanted to do
good for people. Those elves that turned evil are called trolls. Anyway, one
day, a group of elves decided that they would make a lot of people happy by
producing plastic models of subjects that modelers wanted and no one else
produced. And so began a long line of very nice and interesting models, all made
by elves.
As time went on, these elves got better and better. The initial offerings were pretty crude by current standards, but the elves learned. The kits they produced started fitting better and relied less and less on crutches such as vacuformed canopies, resin and photo etch. However, even after 15 years of kit production, the elves were never able to get everything just right. And that is where we are with this kit.
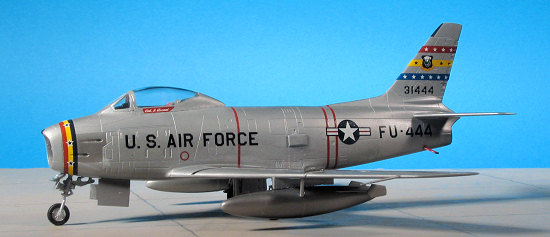
You see, the canopy that is provided with the F-86H kit looks very much like that which fits on other types like the F-86A and F-86F where it slides back. Yet the F-86H canopy is supposed to be like that on the F-86D where it opens upwards. While the frame line is proper for the upward opening canopy, there should be a part on the upper fuselage decking that is integral with the rest of the fuselage. There should also be a seam to show the new hinge line. Special Hobby chose not to add this quite prominent feature. What it means is not only will the builder have to fair in the back of the canopy, but unless one is very good with a saw (as no canopy line is provided), the kit will have to be built with the canopy closed.
This brings on another problem as the fit of the canopy is not at all good. This may have been my fault so I won't blame SH for this one. Once the canopy was attached, I glued on the wing fence base and then the fences (which were quickly knocked off). I also would have appreciated some sort of placement marks on the wing for these as I ended up with them not the same distance apart. At this time, I was ready to paint.
| COLORS AND MARKINGS |
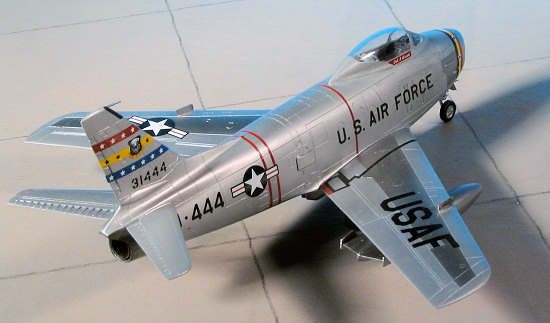
The F-86H markings options are all unpainted metal,
though those with the ANG and the Navy were later painted in the SEA camouflage
scheme. First, I gave the airframe a good coat of primer, followed by a sanding
using 2000 grit paper to smooth things out. I decided to try some SnJ Aluminum
on this one as Hawkeye Hobbies had been kind enough to send me several bottles.
I'd stopped using SnJ back in the old days because the paint generally
coagulated in the bottle before I'd used most of it. Then came Alclad II and you
know the story in that regard. However, this is a reformulated SnJ (I could tell
as it didn't smell as strong as before) and so it would only be fair to give it
a go. I put on several light coats and have to say that it certainly goes on
well and does look like s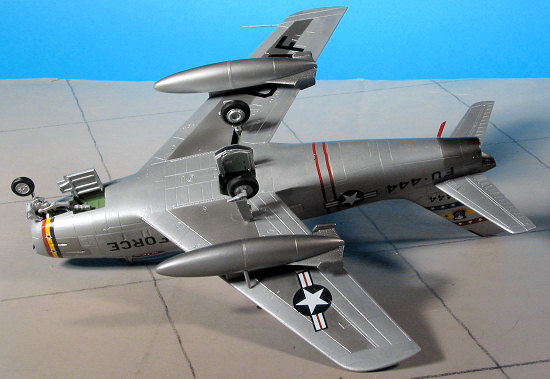 tandard, unpolished aluminum when one is done. The real
benefit to SnJ is that it is much easier to apply than Alclad II and one doesn't
have to be quite as careful about it puddling and etching into the plastic or
underlying paint. In other words, it is much more forgiving.
tandard, unpolished aluminum when one is done. The real
benefit to SnJ is that it is much easier to apply than Alclad II and one doesn't
have to be quite as careful about it puddling and etching into the plastic or
underlying paint. In other words, it is much more forgiving.
The instructions on the bottle say that it can be handled after about an hour. Well, it can actually be handled in less time than that, but one shouldn't handle it much. Just enough to get everything painted. Once all the coats had dried, I then masked off several sections using Tamiya tape and painted those with Alclad II dark aluminum with the exhaust section painted with steel. When it came time to remove the tape, all went rather well, though there was one section where I pulled up the paint and the primer under it. Obviously, this section had some sort of material on the surface (like a mold release oil) that prevented the primer from sticking. I then sanded that area and reapplied the SnJ. Another nice thing about SnJ is that it sands well. Alclad II is not quite as easy to sand because it dries so hard. That area was repainted with no problems.
I then returned to the bench where I repainted the wheel wells with green zinc chromate primer and then attached the landing gear legs. This is so that I can more easily apply the markings. I decided that I wanted the 50th FBW markings on mine so started applying them. The decals are really superb. Nice and thin and with some care in handling, fit very well. Be sure to either cut the lower wing USAF marking or apply the pylons after the decal. I didn't and it was a bit of fussing to trim things. Some things that I noticed. One is that the blue in the tail stripe isn't the same shade as that on the nose. Second, the decals show five stars on each side of the nose band while there are only three on the decal. The fit of the nose band isn't perfect either as you can either get the top to fit or the bottom but not both. I opted for the top. These decals are also a bit long, as if they were intended to go over the gear doors, but according to the guide, they don't. I should also point out that it is best to apply all the data/warning decals first as the insignia and markings go over several of them. It seems to me that the surround to the insignia and the center red bar are a tad thin, but it could well just be me.
| FINAL BITS |
For this part, it meant doing something about the drop tanks. After considering making new end plates out of card stock, I passed on that one as I knew I'd get four different sizes. So I cut off the ones from the Heller tanks, sanded them down and after sanding on the fins to get them level enough, glued the Heller fin caps in place. This was easy to do as silver plastic shows where the bits attached. I then painted the tanks and glued them on the pylon. No attachment guides, of course. Actually, they turned out rather well.
 Then the
gear doors were attached. There are photo-etched bits to go to the smaller outer
doors and as actuator assemblies for the inner ones. These fit rather well. The
nose gear has two tiny etched bits which are the mounts for the lower small
door. Naturally, one disappeared. I crudely made a replacement out of a section
of thick card, trimmed it to shape and glued it on, followed by the door. Unlike
the other F-86s, the two nose gear doors lay rather flat. A difficult thing to
do with these kit doors as I think they were robbed from a standard F-86 and are
quite thick. This makes it impossible for the upper door to lay atop the lower
one. I recommend sanding the inside of both your smaller nose gear doors until
they are flat. Then they will fit. I built mine as comes in the box and you can
see how odd then look. The wheels were also glued in place. They look OK, but
not great as their detail is quite flat. Really a nice set of aftermarket ones
needs to be done for this. Perhaps those for a T-33/F-94 will work as I don't
think anyone makes F-86 wheels in this scale.
Then the
gear doors were attached. There are photo-etched bits to go to the smaller outer
doors and as actuator assemblies for the inner ones. These fit rather well. The
nose gear has two tiny etched bits which are the mounts for the lower small
door. Naturally, one disappeared. I crudely made a replacement out of a section
of thick card, trimmed it to shape and glued it on, followed by the door. Unlike
the other F-86s, the two nose gear doors lay rather flat. A difficult thing to
do with these kit doors as I think they were robbed from a standard F-86 and are
quite thick. This makes it impossible for the upper door to lay atop the lower
one. I recommend sanding the inside of both your smaller nose gear doors until
they are flat. Then they will fit. I built mine as comes in the box and you can
see how odd then look. The wheels were also glued in place. They look OK, but
not great as their detail is quite flat. Really a nice set of aftermarket ones
needs to be done for this. Perhaps those for a T-33/F-94 will work as I don't
think anyone makes F-86 wheels in this scale.
Nearly done. The tanks were then glued on. There is no indication of where they fit, there are no guides on the tanks and there is a raised piece around the tank that makes it impossible to get more than about 15% of the pylon to touch the tank. One just takes a good guess and goes from there. A good guess is also needed for the tank brace as there is no mark on the tank and none on the wing to show where it fits. A hole needs drilled in the wing for the pitot tube and the fuel dump was glued where it looked good as this has no attachment indication. The teensy-tiny trim tab actuator was glued on, some black paint was dabbed on the nose for the gun sight radome (again, no indication of where this is) and on the leading edge of the fin. Masking was taken off, showing that the seat seems to sit rather low, and that was it.
| CONCLUSIONS |
 I have to
tell you that I was really looking forward to a fine F-86H kit. I like Sabres in
general and have always thought that the F-86H was a real brute of an airplane.
This is the best 1/72 F-86H kit on the market and possibly in any scale.
However, it does leave something to be desired in terms of complete accuracy and
especially in the lack of help in placing some of the parts. I could go into a
litany of what needs fixed like the canopy situation, drop tanks, intake, and so
on, but I think that you get the idea of how much extra you'll have to do to
this one.
I have to
tell you that I was really looking forward to a fine F-86H kit. I like Sabres in
general and have always thought that the F-86H was a real brute of an airplane.
This is the best 1/72 F-86H kit on the market and possibly in any scale.
However, it does leave something to be desired in terms of complete accuracy and
especially in the lack of help in placing some of the parts. I could go into a
litany of what needs fixed like the canopy situation, drop tanks, intake, and so
on, but I think that you get the idea of how much extra you'll have to do to
this one.
It is a kit that I can recommend, but with a caveat in terms of the additional work you'll have to do. I know I shouldn't expect perfection from a short run kit like this, but I'd have thought that after all these years, the folks at Special Hobby would at least do some basic research into the subject as some of these errors would not have occurred had they done so.
January 2007
#1448 in a series
Copyright ModelingMadness.com. All rights reserved. No reproduction in part or in whole without express permission.
You can thank me for buying this kit (another impulse purchase).
If you would like your product reviewed fairly and fairly quickly, please contact the editor or see other details in the Note to Contributors.