Trumpeter 1/72 F-100C Super Sabre
| KIT #: | 01648 |
| PRICE: | $29.99 SRP |
| DECALS: | Two options |
| REVIEWER: | Scott Van Aken |
| NOTES: | 2009 tooling |
| HISTORY |
 America's first supersonic fighter (at least able to go supersonic in a
straight line) was the F-100. North American at the time was one of the
premier aircraft manufacturers, well known for innovative and sturdy
aircraft that would get the job done with minimal fuss. Very much a
child of its time, the F-100 was initially armed with four cannon, but
later was outfitted to carry bombs and even later, both air to air and
air to ground missiles. Such was the success of the type that it served
with distinction in Vietnam until replaced by the F-105. It then
soldiered on in the ANG until nearly 1980.
America's first supersonic fighter (at least able to go supersonic in a
straight line) was the F-100. North American at the time was one of the
premier aircraft manufacturers, well known for innovative and sturdy
aircraft that would get the job done with minimal fuss. Very much a
child of its time, the F-100 was initially armed with four cannon, but
later was outfitted to carry bombs and even later, both air to air and
air to ground missiles. Such was the success of the type that it served
with distinction in Vietnam until replaced by the F-105. It then
soldiered on in the ANG until nearly 1980.| THE KIT |
Trumpeter's 1/72 F-100s are basically scaled down versions of their larger 1/32 and 1/48 kits of this aircraft. Unfortunately, they did not fix the errors that were prevalent in the earlier kits. Why they did not when they knew of the fauts is beyond me, but there it is.
First off let me say the the general detailing of
the kit is excellent. Even with its glitches it is vastly superior to the
only other F-100C that has been on the market, that being the kit by PM.
There are two bang seats provided, of which yhou only use one. The cockpit
is quite nicely done and fits atop a full intake trunk. There are two
different designs of speed brake well and brake, though only one is called
out for this
 version. Interestingly, both the standard and later F-102
burner can are offered. Save the 102 can for the D kit as it doesn't seem to
have it.
version. Interestingly, both the standard and later F-102
burner can are offered. Save the 102 can for the D kit as it doesn't seem to
have it.
The kit also has separate flaps and wilerons though they are designed to be modeled in the neutral position. Separate slats are given and this is the first time this feature has been offered in this scale. Other features are both styles of refuelling probe as well as a straight or stowed pitot tube. Landing gear and nicely done and you are provided with a separate windscreen and canopy as well as a boarding ladder. For things under wings you are provided with the larger 335 gallon drop tanks, the Y-shaped Sidewinder pylon and standard inner and outer pylons, though there are no other weapons to put on these.
Now for the glitches. The biggest is the
flattened bottom to the intake. Even if Trumpeter only looked at the box
art, they'd have seen this is wrong. There is, to my knowledge, no
aftermarket fix it part for this, though you could cut this section from
other 1/72 F-100s to fix it. Probably the best donor
kit is the Hasegawa version, which should be fairly easy to find on the
cheap. Another glitch is that the fin is too broad and
 should be thinner.
There is no easy fix for this and again, no resin replacement. I should also
mention that the tires are too tall. Wheels are find, but I'd get resin
replacements. I should also mention that while ANG F-100Cs did have the
cranked refueling probe and the F-102 burner nozzle, neither of these should
be used on the two markings options provided in the kit.
should be thinner.
There is no easy fix for this and again, no resin replacement. I should also
mention that the tires are too tall. Wheels are find, but I'd get resin
replacements. I should also mention that while ANG F-100Cs did have the
cranked refueling probe and the F-102 burner nozzle, neither of these should
be used on the two markings options provided in the kit.
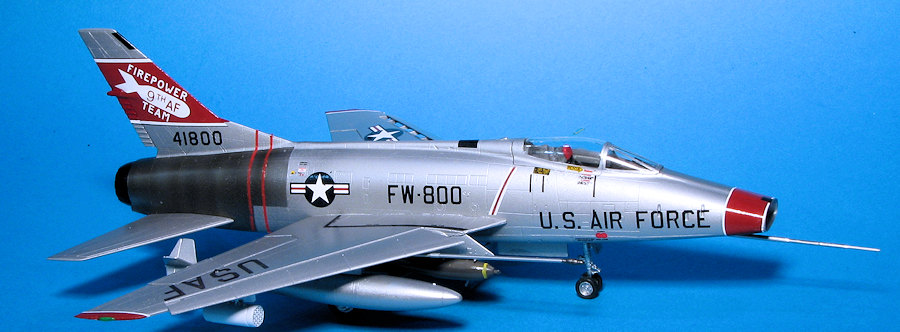
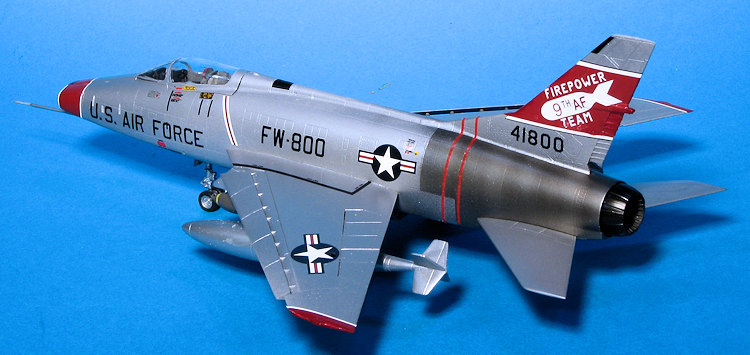
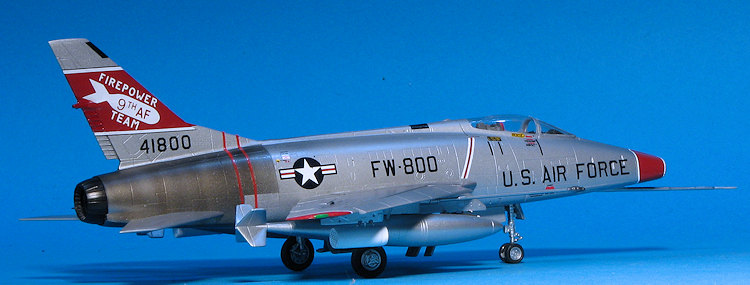
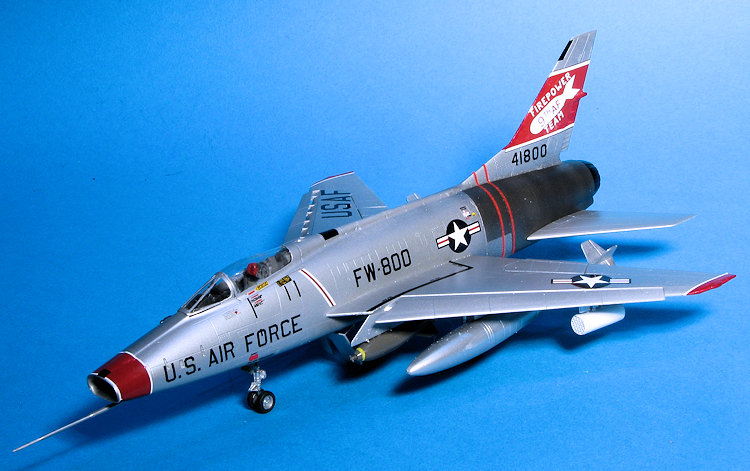
Instructions are typical Trumpeter and should cause no issues. There are two very colorful markings options, neither of which are identified on the placement guide, only on the side of the box, also typical of Trumpeter. The box art plane is from the 450 FDW at Foster AFB, Texas in 1956 while the other is from the 435th TFS at George AFB in 1957. Those with good eyes will notice that the wing "USAF" is only included with the wing stripes for one of the options. If doing the box art plane, you'll have to cut these free or use aftermarket decals.
| CONSTRUCTION |
Despite my misgivings about the intake, I located a set of resin wheels and decided to give it a go. I built up the interior and the intake, cementing the interior atop it. The kit provided two bang seats, but you only need one. Take the other and put it in with your ESCI kit. The instrument decals are quite colorful and help to add a lot to the interior. They are also too large so you'll need to keep that in mind when applying them. I left the seat out until later in the build.
I then built up the exhaust except for the burner can
(you can add it at the end of the build). The wings were cemented together.
Note that there are a myriad of ejector marks on the inside of the wing
pieces, some with flash so ensure those are gone or the wings will not fit
together well. Take a very sharp scalpel to r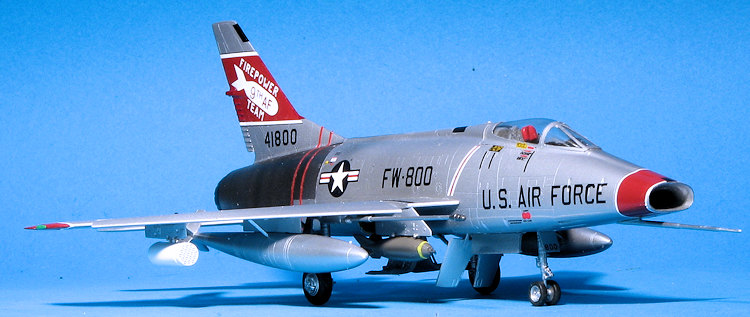 emove the sprue from the slat attachment
points. Note also that the fuselage halves have the sprue attachment areas
on the gluing surface. For me, this guarantees the need for filler as I
oversand the area removing these.
emove the sprue from the slat attachment
points. Note also that the fuselage halves have the sprue attachment areas
on the gluing surface. For me, this guarantees the need for filler as I
oversand the area removing these.
I should mention that any more, I prepaint a lot of areas of the kit before gluing, Seems to help, but I do wonder why the outside of the intake is supposed to be painted as you'll never see it. The interior/intake/nosegear well piece was then installed. It is a very positive fit. It also mates with the speed brake well of your choice (I picked the early version) and so that has to be attached along with the intake bit. The exhaust was glued in the area designated for it and to be sure, I added some nose weight, though none was called out. All of these pieces are a bit tight, but if you get it right, they will literally click into place. The piece in front of the instrument panel was installed and the fuselage halves glued together.
It was then that I decided to see what I could do
about the intake. The issue with the kit's is that it is too flat on the
bottom and the lower corners are too square. I first tried boiling water to
see if I could reshape the corners to s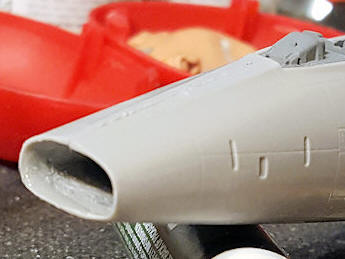 omething more
round. That did not work but did round the lower portion a bit. I think the
corners are too thick. I then sanded the corners to something a bit rounder,
and found that to do so, would make the plastic there very thin so I
reinforced that area on the inside with super glue. I finally got a shape
that looked better, but it took some doing and the inside of the intake
needed smoothed out. The bottom of the intake still seems too flat so I'll
have to see what I can do with the next kit.
omething more
round. That did not work but did round the lower portion a bit. I think the
corners are too thick. I then sanded the corners to something a bit rounder,
and found that to do so, would make the plastic there very thin so I
reinforced that area on the inside with super glue. I finally got a shape
that looked better, but it took some doing and the inside of the intake
needed smoothed out. The bottom of the intake still seems too flat so I'll
have to see what I can do with the next kit.
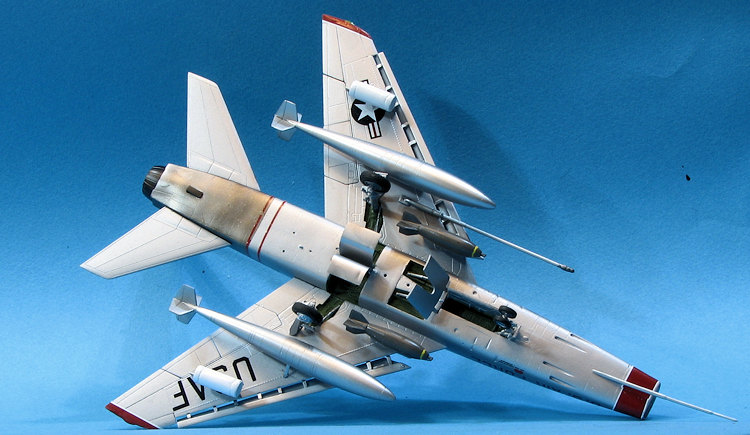
Once done with that, I dealt with the fuselage seams, especially those areas where I'd oversanded to remove the sprue attachment points. The kit provides small retraction struts for the inner main gear doors that are tricky to install. Normally, these doors are open when on the ground, though you can find photos of the planes with them locked in the up position. Somehow I managed to lose the back wall piece for the gear well (typical).
I then glued on the wings. Fit is fairly good, but I do wish that there was a more positive way of attaching them as there is a lot of up and down wiggle room. This makes getting them aligned a bit difficult. Once those were on and solid, I sprayed all the gear wells with FS 34097 green and when dry, they were filled with Silly Putty.
I then installed the seat after shaving the lower portion a bit so it would fit into the tub. Then the clear bits were masked and glued on. Fit on these isn't the greatest, but it isn't all that bad. The rear tail bumper was glued on and I decided to attach the two inner wing pylons on each side. The inner pylons have separate anti-sway braces. While detail folks might like this, I found that for each I managed to attach, I lost one or two others. This sort of set up was obviously designed by Satan. Fortunately, since there is a TER (triple ejector rack) included that you have to build up(!), I had lots of spares. With that done, the kit was taken to the paint shop.
| COLORS & MARKINGS |
 First step was to give everything a primer coat using Tamiya extra fine
primer. When dry, I used some AS-12 aluminum from the spray can as it
looks as much like painted aluminum as anything I've ever used. After an
initial coat, the burned exhaust area was treated using several
different shades of Alclad II.
First step was to give everything a primer coat using Tamiya extra fine
primer. When dry, I used some AS-12 aluminum from the spray can as it
looks as much like painted aluminum as anything I've ever used. After an
initial coat, the burned exhaust area was treated using several
different shades of Alclad II. | THE FINAL BITS |
 attached the wheels. For this one I used Aires 7304 which fit
perfectly once I shortened the axle stubs a bit. They also take care of
the 'too tall' main wheel tires provided with the kit.
attached the wheels. For this one I used Aires 7304 which fit
perfectly once I shortened the axle stubs a bit. They also take care of
the 'too tall' main wheel tires provided with the kit.
| CONCLUSIONS |
This one is a bit of a conundrum. It offers detail
that is superior to what has come before it, but it comes at the price of shape
glitches that seem to be so common with the Trumpeter/Hobby Boss crowd. Perhaps
 it is part of our higher expectations from manufacturers that makes these
glitches so disappointing. It is not a slap together kit (at least not for me as
I made a ton of errors while building it),
and if you are willing to make some corrections, then you can have a nice model
to place on your display shelf.
it is part of our higher expectations from manufacturers that makes these
glitches so disappointing. It is not a slap together kit (at least not for me as
I made a ton of errors while building it),
and if you are willing to make some corrections, then you can have a nice model
to place on your display shelf.
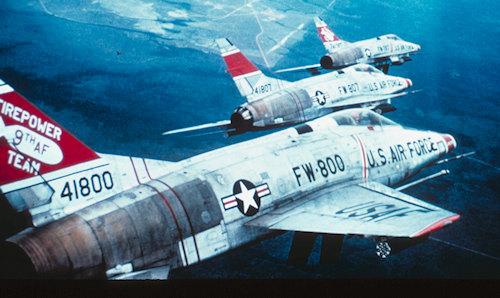
After completing this one, I found a dupe photo in my slide collection of this plane. It shows several aspects that I'd missed and were also missed on the decal sheet. First of all, the very upper portion of the rear fuselage was painted and not burned metal. Secondly, the tail marking is supposed to have a gap at the lower front, whereas I dutifully painted in the red parts. The third thing I noticed is that there is supposed to be something printed in white on the nose band. Finally, the font on the USAF and US AIR FORCE appears to be the factory applied rounded type and not the squared off version offered in the Xtradecal sheet.
| REFERENCES |
http://en.wikipedia.org
Thanks to me for sharing this with you. 27 May 2016
If you would like your product reviewed fairly and fairly quickly, please contact the editor or see other details in the Note to Contributors.