
Platz 1/144 C-46D 'JASDF'
| KIT #: | PD 21 |
| PRICE: | ¥2800 SRP |
| DECALS: | Multiple options |
| REVIEWER: | Scott Van Aken |
| NOTES: | New tool kit |
| HISTORY |
The Curtiss C-46 Commando is a transport aircraft originally derived from a commercial high-altitude airliner design. It was instead used as a military transport during World War II by the United States Army Air Forces as well as the U.S. Navy/Marine Corps under the designation R5C. Known to the men who flew them as "The Whale," the "Curtiss Calamity," the "plumber's nightmare", and among ATC crews, the "flying coffin," the C-46 served a similar role as its counterpart, the Douglas C-47 Skytrain, but was not as extensively produced. At the time of its production, the C-46 was the larg est twin-engine aircraft in the world, and the largest and heaviest twin-engine aircraft to see service in World War II.
After World War II, a few surplus C-46 aircraft were briefly used in their original role as passenger airliners, but the glut of surplus C-47s dominated the marketplace with the C-46 soon relegated to primarily cargo duty. The type continued in U.S. Air Force service in a secondary role until 1968. However, the C-46 continues in operation as a rugged cargo transport for Arctic and remote locations with its service life extended into the 21st century.
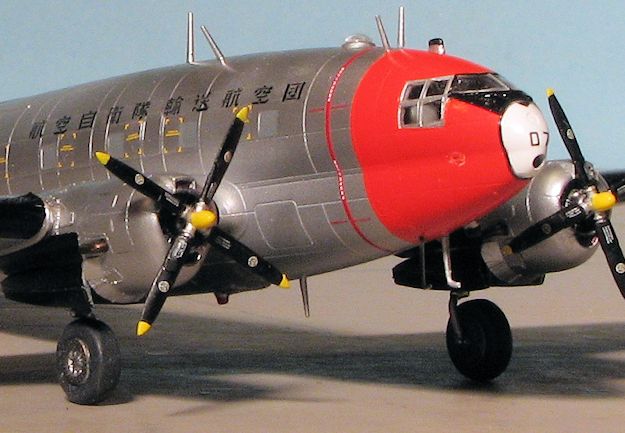
The C-46D of which this kit represents, differed from most models by having an additional jump door on the starboard side of the fuselage. It was this version that was used widely by the JASDF, who kept them in service for many many years, some serving well into the 1970s.
| THE KIT |
I saw this one in the 'coming' section of the Platz web site and was very much hoping for one to be sent in for review. Those who know realize this is the second injected C-46 to be produced, the first one in 1/72 by Williams Brothers, which is more of a short run kit than a main-line offering.
 1/144 is a good scale for this aircraft as the C-46 was quite large. It measures a wingspan in this scale of 23 centimeters, which is around 9 inches. The 55 parts are all newly molded and are very nicely done. There is a cockpit with seats and instrument panel molded to the floor and a pair of control columns. A clear cockpit transparency is provided with the cabin windows being represented by decals. As there is nothing to see on the inside, this would be adequate for most.
There is a forward engine molding that goes into a three piece cowling with the forward part of the cowling molded to the lower third. Nicely done Curtiss-Electric props are provided. Landing gear are nicely done with a separate wheel and tire to ease painting. The C-46 was festooned with antennas and those are also provided in the kit. Holes for these will need to be drilled by the builder. This tells me that other C-46 boxings are going to come, perhaps including the JASDF's EC-46D. The only option is the installation of the ADF 'football' under the nose or an ARN-6 antenna. Judging by the drawings for the different markings options the instruction sheet has which is used for which backwards.
Instructions are very well done and pretty much all in Japanese. However, it will not be difficult to figure out what goes where. I noted a lack of color information for the cockpit as well as the inside of the gear wells  and inner doors. A good reference search should turn up this information. The decal sheet is huge. There were two transport wings that flew the C-46D, the 401st out of Miho AB and the 402nd out of Kisarazu AB. Platz has provided serials for every C-46D in the JASDF inventory so you can pick your own. All of the da-glo red markings are decals as are all the black painted areas of the lower nacelles, wing walks, and the de-icer boots on the flying surfaces. You only have to paint the nose white. In addition, there is one aircraft in the delivery scheme without the da-glo or white bits and with a USAF serial. A USAF plane as used in Korea with a black underside is also provided (hence the red USAF). It is quite generic with no unique markings. Both Gunze and Model Master paint numbers are provided.
| CONSTRUCTION |
 Thanks to the reference book, there was a color photo of the cockpit and despite the light grey background of the cockpit bulkhead provided on the etched set, it was obvious that it was painted an overall matte black. Not wanting things to appear too stark, I used dark gull grey as the base color, else some of the photo etch would be pretty much invisible. The next steps were installing the photo etch for the cockpit. This ended up requiring part of the circular rear bulkhead being trimmed away so the open door would not look so weird. I wanted to use the injected control col
 umns as they looked more like the real thing, but I managed to lose one of them after the other was solidly installed so used one of the photo etch pieces. All this cockpit work will be very difficult to see once the fuselage halves are closed so it is up to you if you feel the additional work is worth it. I did it as it was part of the p.e. set.
  quite good though there is a bit of a gap on the upper wing root that was filled. Then I started applying the photo etch bits to the wings. P.e. easily triples or quadruples the build time for me due to the care needed to apply the bits. It is not hard work, just something that requires careful application. With all the fuselage and wing p.e. installed, I masked the cockpit transparencies and glued it in place. There are some gaps, but I'll live with them. It seemed like a good time to paint, so I headed for the paint booth.
 | COLORS & MARKINGS |
 In this case it meant installing the main gear well photo etch. Before that, I glued the main landing gear legs in place. For one side, I first installed the three bits that make up the 'floor' and forward bulkhead. But I had difficulty getting the side pieces in. On the other side, I did the side pieces first, but had trouble with the forward piece, so I guess that neither option is really easier than the other. With these bits in place, the rather fragile retraction strut section was installed (after breaking both of them in the same place) and the small p.e. bit glued on it. The tail gear was painted and glued in as well.
 | FINAL CONSTRUCTION |
 after decaling as well. Platz decals are excellent. They quickly come free of the backing and allow you plenty of working time. They do need setting solution to properly conform over all the lumps and bumps and to be sucked into the panel lines. The sheet includes the anti-icing boots as well as the wing walk areas. I was pleased to see that I properly aligned the fuel filler caps as these are on the wing walk decal. You are provided dark grey window decals that work well. This is also provided for the cockpit, but since I put all that work in the p.e. for there, I thought at least some of it should be visible. The nose and fuselage band should be florescent red/orange, but instead it is International Orange. This is not a bad thing as the nose decal needs to be touched up where it doesn't conform all the way over some protuberances. There are a lot of decals so it took well over a week to apply them all. You can pick any serial number you want, though two are shown. I wanted one of the planes with the yellow prop hubs and a look through the reference book found one that I liked.
  doors, but it took a brush to paint the lower nacelle. I then attached the nose which I had already painted white. The exhaust pipes were then glued in place. I then fumble fingered the plane and it fell to the floor, breaking off several antennas. I found three of them, but one was gone. Fortunately, I had a photo etch replacement for it so that was attached. Decals were applied to the props and the last stripe was added to the nose. Some touch up painting was done which included the formation and upper and lower position lights. The clear astrodome was attached and then the main gear doors. The last bit to be added were the props.
 | CONCLUSIONS |
 I have to say, that despite the very long time it took to complete this one, I am very pleased with how well it turned out. This is a superbly molded kit and if you are familiar with any of the Platz releases, you know how nice they are. This one opens up all sorts of possibilities from the aftermarket decal folks and it would be a real surprise if a bevy of alternate cargo liveries were not produced. Platz also does a nice etched detail set for this in case you wish the additional detail. I have to say that if I do another, I will use NO photo etch as this kit ended up taking about three months to build thanks to this material. The end result is a very colorful subject that should pique the interest of 1/144 modelers.
| REFERENCES |
Famous Aircraft of the World #122, Bunrin-do, November 1980
May 2013
Thanks to www.platz-hobby.com for the preview kit. Visit their site to get yours or ask your local hobby shop to order one in once they reach your country.
If you would like your product reviewed fairly and fairly quickly, please contact the editor or see other details in the