| KIT: | Anigrand 1/72 C-124 Globemaster |
| KIT #: | AA-2067 |
| PRICE: | $148.00 from www.NostalgicPlastic.com |
| DECALS: | One option |
| REVIEWER: | Scott Van Aken |
| NOTES: | Resin kit with vacuformed canopy |
| HISTORY |
After the end of the second World War, the USAAF found the C-74 Globemaster was a very capable and useful aircraft, and began to consider acquiring an improved version proposed by Douglas. It used the same wing, tail and engines from the C-74, but featured a new and enlarged fuselage, as well as clamshell doors in the nose. The result was the C-124 Globemaster II. The YC-124 prototype made its first flight in 1949. The first operational C-124 was delivered in 1950. It provided valuable service in the Korean war, but was deemed too slow in the Vietnam era, so it was earned nickname "Old Shakey". A total of 204 C-124A, and 243 C-124C were built, a turboprop-powered KC-124B tanker variant was considered. In 1970, most the C-124s were transferred to the Air Force Reserve and the Air National Guard. The C-124 was finally replaced by the C-5 Galaxy in 1974.
Just as an aside, the local Reserve unit at Scott AFB that was flying C-119s received C-124s around the late 1960s and flew them for a few years before getting rid of them and converting to an Army Reserve unit. They were eventually flying UH-60s before becoming an Army National Guard unit and moving to Decatur IL, where they are still flying their Blackhawks. Their hangar spaces are now occupied by the 108 ARS, IL ANG and flying KC-135Rs. Interestingly, the Army shop and office spaces were not deemed worthy of the USAF-ANG so in typical Air Force fashion, a huge, multi-million dollar complex of offices and shops were built just for ANG use, complete with expensive and totally needless contracted landscaping so it can look just as pretty as the rest of the base. Your tax dollars at work.
| THE KIT |
Many people, including me, were quite surprised when it was reported that Anigrand would be releasing a C-124. It is one of those planes that we always hoped would be kitted, but really didn't think anyone would do it. Well, do it they did and I have to say that I'm quite pleased that they did so.
The fuselage is divided into a fore and aft section with a solid interlock feature that worked so well with their XF-12 'Rainbow' kit. It makes for a very sturdy structure in a fuselage that is over 20 inches long. You'll also note that there are structural reinforcements in the fuselage halves as well. A radar nose is supplied for the C variant. The wings are an upper and lower half and my samples had no warping at all. These will make into a total wingspan of well over two feet. The wheel well detailing is typical of Anigrand in that it is just some Evergreen strips put in there to approximate wheel well detail. You have alternate wing tips depending on if you are doing an A or C version. The wing to fuselage fit is quite good and quite positive. You'll have to fill the resulting seam, but there will be no problem getting proper dihedral. I don't think that wing droop over time will be a problem as the wing is relatively thick.
The engine faces are very nicely molded, one of Anigrand's better efforts. The props have separate hubs into which you slot the blades. You still have to get the angles correct, but this method has worked quite well in the past. I'd still like to see one-piece props, but perhaps that is beyond Anigrand's current capabilities. Landing gear are quite sturdy and it may well be that these will hold up under all the weight. I highly recommend removing the axles for the main gear, drilling the space out and replacing them with short metal rods. The axles on my Rainbow kit were unable to hold up the model and snapped when I was moving it. This was as much due to the weight I had to use to keep it from tail sitting and the C-124 will be a major tail-sitter without a lot of weight. Fortunately there is a ton of space for it.
OK, so how about the resin quality. I've been told that Anigrand uses pressure molding with its resin. Well, if that was the case, then I should see few if any air bubbles and that is not the case. I think they are using low pressure casting which won't remove all the problems. Talking with others in the resin casting industry, they probably need to use higher pressures in the 60-80 psi range.
This means that most of the larger castings show air bubbles, some of them quite large. These are mostly in the tips of the fin, horizontal stabilizers and wings. I also found a number of pinholes alongside the engraved detail on the fuselage parts. The fuselage also suffered from 'divots' or small depressions in various areas along with some detritus on the outside of the parts as if someone had gouged sections of the mold.
None of these will be difficult to repair and anyone who has done Anigrand kits or those from other makers will have run into these and know how to fix them. It is a bit time consuming but not at all hard to do. The large ones can be dealt with using superglue followed by accelerator and then sanding before the superglue fully cures. Smaller ones can be filled with paint or Mr Surfacer 1000/500 then gently sanded. If you have read the recent XP-60 article, then you will see that this can be easily fixed. A set of clear bits are provided for the cockpit area and all those windows. I recommend getting a punch for the side windows or using some other method for doing them such as using clear decal film or white glue. Conversely, you could fill them with clear plastic rod or superglue and then sand the area flush.
Markings are for one aircraft, a C-124A (49-0258) in generic USAF markings that is now in the process of being restored at the AMC museum at Dover AFB, DE. Apparently it was brought up to near C-124C standards with the radar nose and wing tip heaters. It is in overall unpainted metal with black areas around the engines and in other standard areas. The sheet does not include wing walk areas so you'll have to deal with those from the spares bin or paint those on. The sheet also has some C-17 decals such as the serial and AMC badge.
| CONSTRUCTION |
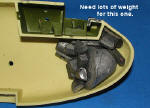
I guess the best place to start with something of this size is with the fuselage quarter halves. These were cleaned up to get the best fit possible and then, while carefully holding the halves and applying accelerator to the super glue, were glued in stages. The resin is a bit flexible and this allowed me to hold bits in place while letting the superglue set. It worked well and in about three gluings, the halves were complete. Test fitting the halves showed that while com![]() bining them together later will be a bit touchy, it should work quite well. I then started taking care of the myriad 'divots' and pin holes found on the halves. The half shown was the worst of the two and is shown after it has been sanded down.
bining them together later will be a bit touchy, it should work quite well. I then started taking care of the myriad 'divots' and pin holes found on the halves. The half shown was the worst of the two and is shown after it has been sanded down.
I then started on the wings. These fit quite well and again, were glued in stages. They are also plagued to some extent with these small 'divots' and all had rather largish air pockets on the tip. I had decided to do the A model aircraft without the tip pods (mainly because the pods suffered from 'mold slip' and attaching the plain tips made it much easier to fill and sand the holes on the tip), so those were added and sanded down. They were a bit longer than the wing tip to which it joined, but reducing the size is much easier than adding stuff. Though the alignment pins were short shot, there was enough to be helpful in aligning the part.
Now this all seems quite easy, but in reality, we are talking about several weeks of work (of course, it isn't straight work as I do build several kits at once so there were days when this one had nothing done to it). I also painted the cockpit section and seats with US Interior Green. The 'cushion' area of the seats were painted with US Olive Drab (though a Drab Green would have worked just as well). These seats are fairly nicely done with some side detail to them. The bases needed a lot of trimming to remove the resin pour stub lines and get them to fit into the slots in the floor. The center console and engineer's panel fit quite well. The top of the console and the face of the panel were painted matte black. To be honest, you probably won't see anything behind the engineer's panel as only a couple of small windows will light the area but I'll stick in the seats anyway. The seats and control sticks were glued in and now it was time to decide on the nose weight deal. Two options. One is to pack a ton of weight into the nose, tape on all the major bits and keep adding until it is DEFINITELY nose heavy. Option two is to put in no weight and use a tail stand. Photos of C-124s show that these items were routinely used when the aircraft was not being prepared for flight. Not having a display area big enough for the whole plane (as in the tail will have to stick out somewhere), I chose to pack in the weight.
I n order to do this, I had to tape on the major bits (wings, tail bits). Only thing that really works is Duct Tape. All the other stuff caused the bits to fall apart when I picked up the fuselage. I had some very large weights in form of some wheel weights but not enough so I used one of Terry Dean's weights for a C-130. That was enough to tip the balance, literally. This and the cut up bits of wheel weight were super glued in place. For those of you who want the easy way to determine if you have enough weight, with just the fuselage halves taped together, it should be nose heavy when you have the fulcrum (I used my fingers) in line with the first row of double windows.
When it was dry, I got a big hunk of A+B Epoxy putty and after mixing it (not an easy task with so much), basically covered the weights. This should be enough to keep the weighs from rattling about in case of a glue failure.
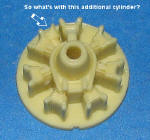
 While that was going on, I started on the engines. I had to clean each of the engine faces as there were resin glops in between some of the cylinders. I also notices that there was an extra half cylinder in there. Not sure where that came from and cutting it off wasn't in my plans so I left it there. (Actually, I found out later that these must have been copied from an Academy C-97 or B-50 kit as those kits have exactly the same glitch.) These were all painted with Aluminum as were the insides of the cowlings. The design of the cowlings is such that you have to put in the engine before cementing the halves together. I discovered that the backing plate in the cowlings wasn't the same on each half. Means that if you glue the engine in first, there is an excellent chance that you won't get the other cowling part to fit. Only cure for this is to put the engine in loose and then cement the cowlings. Later, you can glue the engine firm from the back.
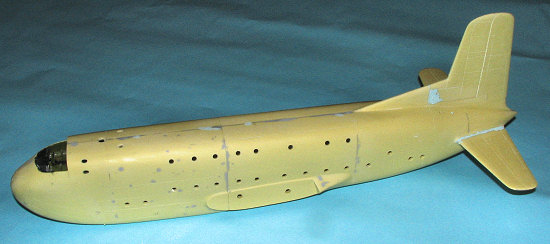
Back at the fuselage it was now time to glue the halves together. This is not a simple task as they just butt join to each other. What I did was to get one area flat as I could and as well aligned as possible. This was glued in the general area. I started with the nose gear well. I then moved a considerable distance from that area and did another section. I continued in this manner until all the parts were pretty well aligned and all the seams were filled. It was quite time consuming, especially as the fuselage was now quite heavy from all the weight. The seams were liberally filled in preparation for quite a bit of sanding! This took the better part of a week to get things as I liked them.
 I next added on the fin. There was a gap at the front of the fin that I filled with plastic card and then cut to shape and eventually filled and sanded smooth. The horizontal tail planes were also attached and the usual filler at the joins was added. These parts had all been prepped earlier in terms of filling in the air pockets at the tips. The fit was actually very good on these and the alignment pins were a big help. The holes into which they fit did have to be enlarged and/or drilled out more, but not a problem for those of us who do kits like this. The tail bumper was also glued in at this time.
Back at the wings, I gave the engines a go. These did take quite a bit of work to get smoothed out as the general fit wasn't as good as some other parts. The usual filler and sanding was done, then the engines glued in place. There wasn't a front view diagram to show exactly how these fit in terms of alignment of the lower intakes. So what I did was to glue the one over the main gear well first. This one had the intake centered on the well and so then once that cowling was smoothed into the nacelle, the outer one was glued in to match. It may not be 100% correct, but at least it will be consistent. During all this I came to realize that it would be easier to do the outer cowlings first. This is because the outer nacelle/engine join is closer to the wing and more difficult to smooth out as the inner engine gets a bit in the way.
With the engines in place, I added the flap hinges. I only installed the outer ones, leaving the two inner ones until after I attach and clean up the wing/fuselage join. Interestingly, there seem to be more hinges than space on the wings, though the instructions do show all the hinges supplied. There are two holes on the fuselage, but I can't believe those are for hinges. The instructions show nothing there so I'll have to hunt for photos on that.
I then carefully cut out the canopy. It was masked and attached first using white glue. Then superglue was added to several sections to provide a more firm attachment. Those areas that needed some filler (like the back section), got that added as well. I really wish that two canopies were supplied with these kits as they are so difficult to get right and I certainly could have used a spare.
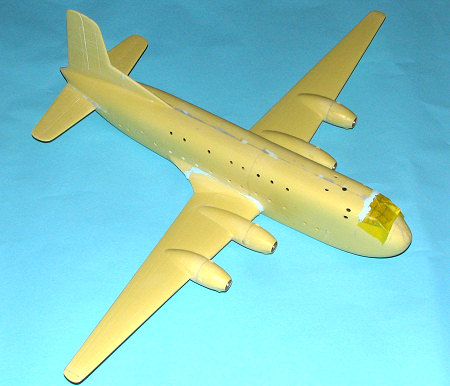
While this was drying, I determined that I had enough work room to deal with the filler on the canopy so glued on the right wing. Fit is pretty good, though there is a rather large gap on the leading edge section, so a piece of card was inserted to take care of that. To say that more filler was needed would be an understatement. I used quite a bit of super glue as filler and when sanded, standard fillers then Mr. Surfacer was used. During this, I attached the other wing and now had a very large and complete airframe. In all, just about all sanding jobs took a minimum of four applications; one super glue, and at least three others of standard fillers/Mr. Surfacer.
Meanwhile, I opened up the bag that contained the props and landing gear and started cleaning those up.
| COLORS & MARKINGS |
| FINAL CONSTRUCTION |
| CONCLUSIONS |
| REFERENCES |
Thanks to Nostalgic Plastic/Anigrand USAfor the review kit. Free shipping in the US.
If you would like your product reviewed fairly and quickly by asite that has nearly 350,000 visitors a month, please contactme or see other details in the