Hobbycraft 1/72 F-86F Sabre
| KIT #: | HC 1361 |
| PRICE: | $ Currently (2004) not in catalogues. Paid $4 at a swap meet. |
| DECALS: | Five options |
| REVIEWER: | Scott Van Aken |
| NOTES: | Looks a lot like the Fujimi kit. |
| BACKGROUND |
You know, everyone who is interested in aircraft, whether they are military or not, has a moment in their lives, when they have come into their realm of consciousness. It could be that your father owned a light plane and so there were planes around all the time. It could be the first time that you attended an air show and were amazed at the sights, and smells, and sounds of aircraft roaring around you. For some of us, we were introduced to aircraft by being in a military family and planes were part of where dad went to work.
 For me, the latter is the case. When my father was based at Wheelus AFB in the early 1950s, I was introduced to aircraft. As dad was a comm tech working around teletypes and long range communications networks, he wasn't attached to a squadron so some of the places we lived didn't have an airbase. But Wheelus did and what a base. It was basically a place where aircraft came to expend a bunch of ordnance in terms of bullets, rockets and bombs by blasting holes in the sand of the Sahara. It also had a large control line airplane club that had a spot to fly near the end of the active runway. On some Saturdays, my father took me to watch the control line planes and the real ones that thundered off the runway close by. The majority of aircraft were B-29s and F-86s. It is here that I learned to love aircraft in general, and the F-86 in particular.
In those days, USAF squadrons all had rather gaudily painted aircraft. No need to put on camouflage and hide as we do today. The US was top dog and we didn't care about such things as camouflage. Let others hide behind it as we didn't need to. While I don't remember any specific color schemes (heck, I still wasn't old enough to start kindergarten), I do remember the flood of color that was part of the aircraft of the time. Even the B-29s seem to have had color in them, and the F-86s were the best, taking off in groups of two or four then doing high speed passes down the runway. I loved it and have never really experienced the same since.
| THE KIT |
Pleasevisit the preview for a look at what comes in the box.
| CONSTRUCTION |
When the box is open, I'm greeted by a large sprue with most of the smaller bits on it. The fuselage halves and the wings come on different sprues. Obviously, Hobbycraft has separate wings for this kit as there are a pair of unused slats on the sprues.
 First job is to do the usual sub-assemblies. I glued the wings together for the first one. I recommend removing the alignment pins to improve the alignment. Before doing that, I drilled out the holes for the wing pylons. The wheel well insert was then glued in, test fitting the fuselage over it before it dried to make sure that it would fit properly. I then glued the intake halves together.
Turning to doing the cockpit (which sits atop the intake, I glued in the control stick and instrument panel. Then it came time to glue on the side consoles. There isn't any positive locater for these so I wasn't really sure just where to put them. There is a line for the rear bulkhead, but then again, nothing positive as to the correct angle. It seemed to me that the only way to get these parts to properly fit was to install the intake and then glue the consoles and rear bulkhead to them in situ. This would have worked great if I hadn't already glued on the instrument panel. Next time, leave it off until later. It made quick work of the aft bulkhead and after attaching the consoles, I mated the two halves of the fuselage so I could fudge them around a bit for a better fit before the glue dried.
Once all the interior bits had dried, I got out my handy ModelMaster Dark Gull Grey and a nice brush and painted the interior with this shade. I later found out that this is the wrong shade. At least Canadair-built Sabres used matte black for the interiors of their planes. The cockpit was repainted. Then, using Vallejo flat black, I painted the instrument panel and the upper side consoles. While that was drying I assembled the three piece seat. That will go in last and just before the canopy gets glued in. I located the exhaust and then glued it in place after painting the interior flat black using the Vallejo acrylic. With all that in place, I first dry brushed the flat black instrument sections with Dark  Gull Grey to bring out the detail. Then I added a bit of nose weight above the intake with one of my Walmart special conical fishing weights smashed down a bit. Later, I discovered that this was almost not enough so be sure to put in more weight than you think it will need just to be sure. The nose piece was glued on at this time, as I tried to get it to line up with the intake. Didn't do too bad a job of it. Out came the filler for all the seams once the glue had dried.
After the initial sand-down and panel line rescribing, the second filler application took care of what I missed and I also glued on the wing during this time. Fit on the sides is great. There is, however a bit of a gap at the front and an even smaller on to the rear that needed filler. If you have never read any of my kit reviews, you are undoubtedly wondering why all the filler? Is the kit that bad? No, but my construction leaves a lot to be desired and I end up with filler on just about every kit join that I do. It is just the way I am and why I'll probably never do well at the Nationals!
With the wings in place, it was time to attach the tailplanes. Fit is quite good, even though it pointed out that I got the wings a bit off. Typical. I then attached the instrument anti-glare shield (after trimming the bottom a bit for a good fit), and then glued in the clear gunsight part (which is really huge). Then the windscreen was glued in place. I masked it and the canopy. The windscreen has no frame lines on it so one just has to take a best guess. Rather odd, yes? I also cleaned up and glued on the drop tank pylons. Took a lot of trimming to get them to fit well. Then the cockpit was masked off and it was off to get some painting done.
| COLORS & MARKINGS |
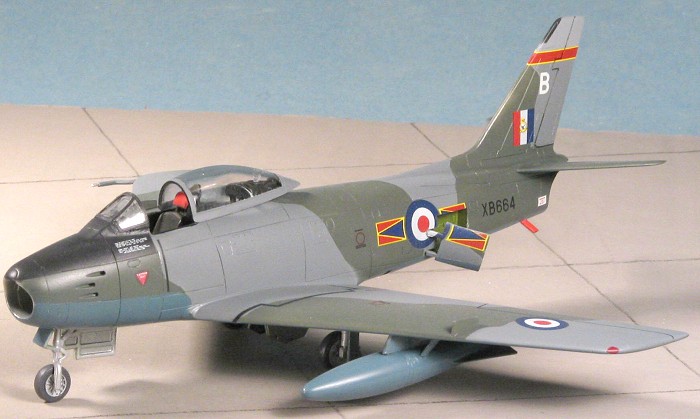
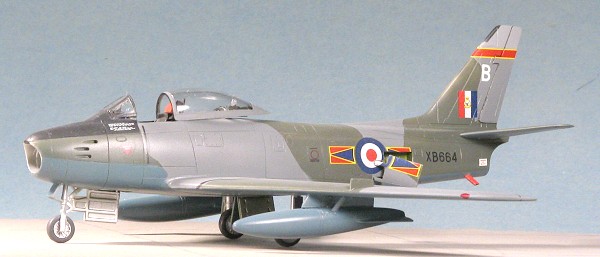
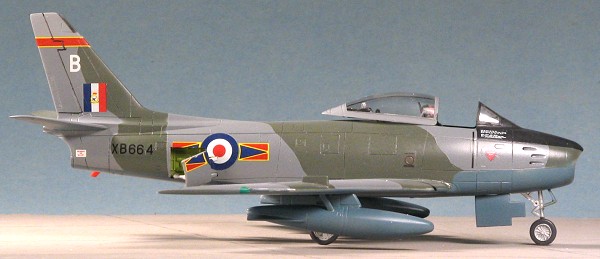
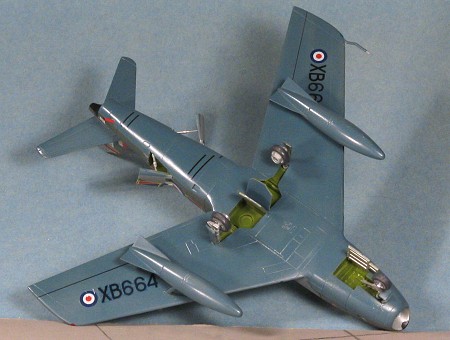
The instructions tell you to paint the wheel wells/speed brake in chromate green with the inside of the doors in bare metal. That seems to fit what I've done in the past. Then it was time to pick a color scheme. I've always liked camouflaged F-86s and I have a Modeldecal sheet (# 97 ) that is full of RAF Sabres. Most of these are PRU blue underside with Dark Green and Dark Sea Grey upper sides. I chose the markings of 'A' Flight, 67 squadron as it was a plane with a '6-3' wing. Others in there are 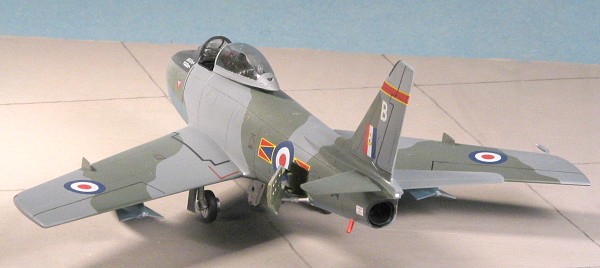 for planes with slatted wings as the RAF got a mixture of the wing types. Frankly, picking markings was quite difficult as there are lots of very nice ones to choose from. One could easily build a whole mass of Sabres from this sheet, especially since it is easy to find 'used' Hobbycraft kits!
I masked off the wells and intake, painting the underside with PRU Blue from an old bottle of Aeromaster Acrylics that I had. When that was dry, I masked off the underside and then painted the upper surface with Testors ModelMaster Dark Green enamel. I had some already mixed up that had turned to sludge, but a bit of Floquil lacquer thinner and heavy stirring took care of that and it sprayed just fine. When that dried, I masked over the Dark Green with Tamiya tape, cutting the pattern directly on the tape. A very sharp blade is a must when doing this. I then lightened up the Dark Sea Grey a bit with some white as it looked too dark to my eyes. This was then sprayed on and when dry, the tape was removed.
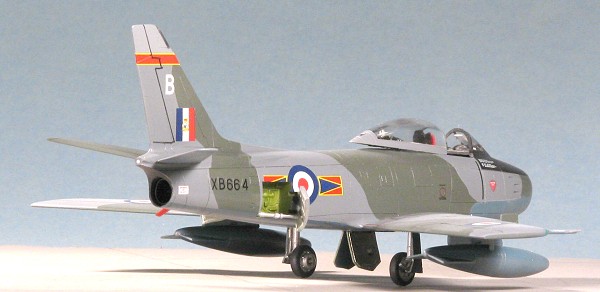
The fin tip was painted a lighter grey and I then brought the kit back to the work bench to have its landing gear glued on. These fit OK, but are not as crisply detailed as what you'll get with the Fujimi or even the Heller kit. With the gear in place, the kit was given a coat of Future in preparation for the decals. I also glued on the pitot tube. The instructions show it going on in reverse. The bend should be to the outside. Meanwhile, I tried to assemble the bits that go on the inside of the canopy. I say tried as the instructions are woefully inadequate in this regard. I'm not really sure if I've got the parts properly assembled or not, but they look the part. I also discovered from reading the ModelDecal painting guide that the interior of the Sabre should be matte black and not Dark Sea Grey. Fortunately, I'd not installed the seat so it was easy enough to repaint.
 With the kit nice and glossy, I broke out the flat black and painted the upper nose section and the fit tip antenna. Then, returning to the work area, it was time for the decals. Those of you who have worked with Modeldecals are aware that often they only give unique markings and perhaps a set of data decals. They require you to piece together serials from their various serial number sheets and to get insignia from similar sources. This makes things a bit more complicated than normal as it takes time to do a serial from individual letters and numbers; especially the smaller ones. Those who have not used Modeldecals before will find them to be a bit thicker than the norm. They also need to be trimmed as the clear film is a bit more than you'd find on the usual Aeromaster or Superscale sheet. They also are not quite a crisply printed. What I mean is that you can't read all the data stencils! They are somewhat setting solution resistant. By that I mean that when you use Solvaset, rather than immediately turning soft, you have plenty of time to move them around and may actually have to push them down into grooves and such.
| FINAL CONSTRUCTION |
Once the decals were on the airframe was given a coat of gloss clear acrylic (actually, it was Future), to seal in the decals. Then it was time to add the other bits and pieces. This meant the gear doors (you have to enlarge the attachment points for the outer main gear), and only the nose doors will be a challenge as they are separate and the instructions are vague about how they actually attach. The wheels went on without a fuss though the main gear axles are too long and all are quite spindly. The fuel dump tube was glued in place as were the drop tanks. The tank braces have no positive locators and the the instructions are really not very helpful in attaching these braces. I just put them where they looked like they belong, but I'm probably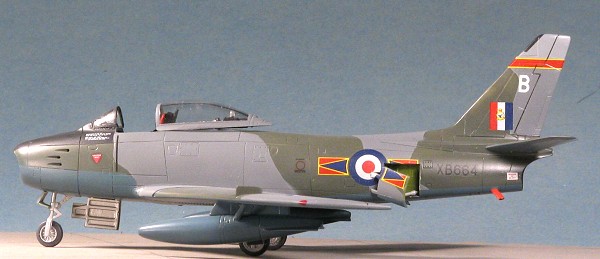 wrong. I had the devil's time getting the speed brakes out of the wells but once removed, I noted that, like probably 100% of all Sabre kits, they did not hang properly in the open position. You see, most of the kit makers assume that they go straight out, when in actuality, they drop down a considerable bit when open. To remedy this, I cut about 1/8 inch off the bottom brace and that pretty well took care of the proper sit of things. I did have to use super glue to sort of force the issue, but the end results are much better than stock.
I did the final touch-up painting on the kit and then gave the kit another gloss spray to match up the touch-up bits. The kit looked too glossy after this so after properly 'matting' the nose anti-glare panel, I misted the clear matte over the entire airframe to cut back on some of the shine. I know that these planes were normally a gloss, but cutting back on the shine really seemed to help. The last things I did were to remove the masking from the clear bits and glue on the canopy. The fit of the canopy, thanks to that miserable assembly that fits inside it, isn't that great so one has to be very careful when gluing it in place.
| CONCLUSIONS |
 Well, overall I have to say that the results turned out well. This is an example of cheap modeling at its best. I used a kit I bought for very little at a swap meet and was able to finally use decals from a sheet I've had for what has to be over ten years. The Hobbycraft kit is like most Hobbycraft models in that it has a few glitches, but the overall result is a very nice model. Things I'd fix is that this kit has the forward fin antenna mostly found on US and not Canadian built aircraft so that would have to be filled in if doing a Canadair-built Sabre (such as this one). The instructions are really inadequate in certain areas and though I seriously doubt if Hobbycraft will fix this, it is something you need to be aware of.
While others are plugging away with their $100 plus wunderkits, it is nice to know that you can build models to a pretty high level and spend less than $5 doing so!
Late note. Many have written to tell me that the nose gear door is on the wrong side. Sure enough, somehow Hobbycraft had a brain fade and molded it mirror to the actual door. You'll have to cut off the mounts and put it on the correct side.
November 2004
# 1337 in a series
Copyright ModelingMadness.com. All rights reserved. No reproduction in part or in whole without express permission.
If you would like your product reviewed fairly and fairly quickly, please contact the editor or see other details in the Note to Contributors.