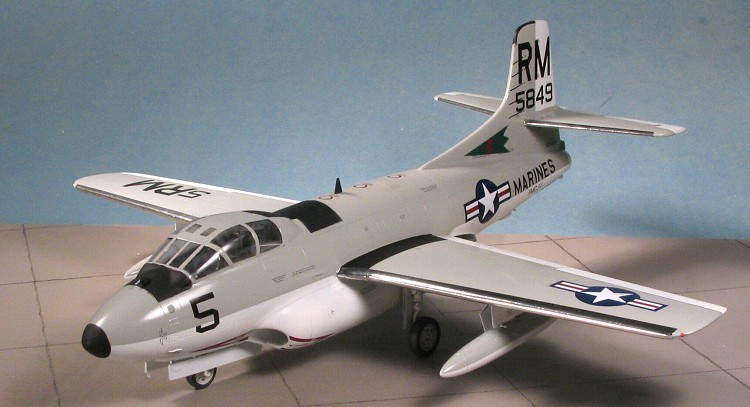
Czech Model 1/48 F3D-2 Skyknight
| KIT #: | 4814 |
| PRICE: | $49.95 (44.96 at Squadron) |
| DECALS: | Three options |
| REVIEWER: | Scott Van Aken |
| NOTES: | Short run with resin parts |
| BACKGROUND |
Follow this link for a brief history and a look at what comes in the box.
| CONSTRUCTION |
 Carefully studying the instructions. I decided to start by sawing off the resin blocks on the main wheel wells and the interior. You have to cut them off or the parts won't fit. As usual, I cut too close to the line on these items and sawed through the bottoms. While stewing about that, I glued the tail planes together after sanding down the ejector towers. I also cut the towers in the wings and fuselage halves. I removed the braces from where the engines fit as well as the stubs left over. This was a rather tedious job.
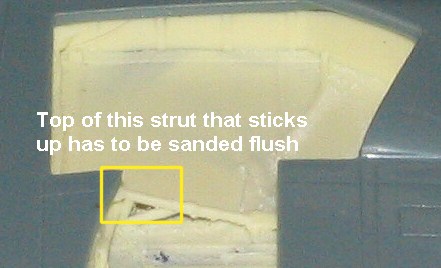 Moving back to the wings, I found I had to sand down a strut that sticks up out of the resin wells or they won't fit. Then, I placed them over the openings and while holding them firmly,
 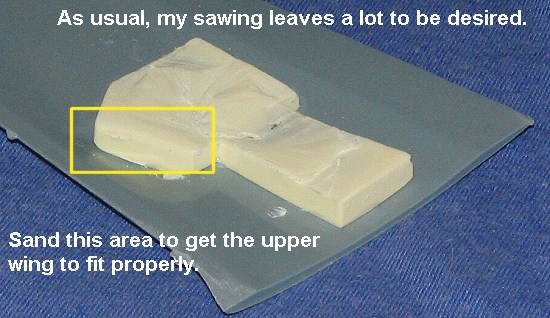 I ran super glue around the edges followed by accelerator. The upper wing was test fit and showed the need for the forward section of the wells to be sanded down a bit more for proper clearance. This was required on both wings. I then glue on the upper wing with lots of Ambroid Pro-Weld and squeezed the edges until the melted plastic oozed out. Even then, the tip of where the lower wing meets the upper needed filler. No holes to drill on these wings as the bits that fit there are butt joins.
 I then decided to test fit the right side engine nacelle and components to see how the fit was. It is OK, but not great. When I fit in the very forward section of the intake, I found that when it is properly in place, there is a goodly gap between it and the fuselage. Not sure if this is the norm, but from what I've seen in my references, this should be a smooth transition. Break out the filler!!
This is also the time to decide on a camouflage scheme. A bit early, but if you are doing the one in light gull grey and white, you need to paint the intakes, wheel wells and inner gear door with white. The cockpit needs to be dark gull grey instead of interior green, so you see, it is something that needs an early decision. I decided on the later scheme as I'm adding it to my 1/48 P-1 to F-117 collection and so needed it to be an F-10. Those bits mentioned were duly painted the appropriate color and I also painted the wheels white as I'd assembled and sanded them down as well.
 I then spent several days getting the intake to look decent. First of all, several applications of filler were needed on this and the engine nacelle to smooth things out. Next, the intake halves were painted white on the inside. I then glued them together and realized that the seam was very visible. The only cure to that was filler. To sand the filler, it was a simple matter to wrap sandpaper around the handle of a paint brush. It took several applications to get things relatively smooth. Then the inside was painted white
 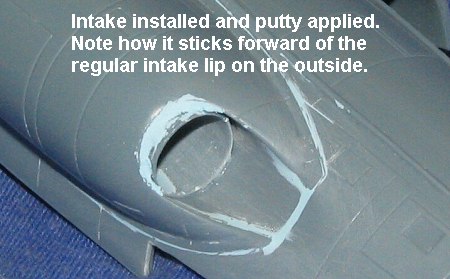 with Floquil Reefer White.
The next job was to install it. There are no positive guides for this an after looking at several photos I gl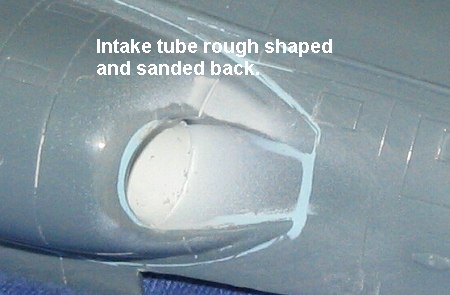 ued it just inside the intake. This resulted in the outer portion of the intake tube jutting past where the intake starts on the outside. In a perfect world, this intake half would have been molded in such a way as to prevent this from happening, but it wasn't. Now it could be that I was supposed to butt join this intake tube to the existing intake opening from the rear. However, it was too small to do that so I was left with this situation. Once the intake tube had dried, I applied filler and carved the outer edge. Smoothing all that out made a much more presentable appearance. The lip on the inner side I could really do little about so applied a bit of white glue to try to close the gap.
 Meanwhile, I spent some time on other parts of the kit. The exhaust pipes were assembled and painted with Alclad II's Jet Exhaust. I didn't bother to fill the seams on this one as the wouldn't be readily apparent. One thing I did notice is that they are much smaller than the exhaust opening on the nacelles. Not sure if this is prototypical or not, but my gut feeling is that they are supposed to be pretty much the same size.
I then installed the exhaust assemblies after having to so some sanding on the backings to get them to fit. I also took this time to glue in the nose gear well. This was done by taping the fuselage halves together and inserting the well from the![]() cockpit opening. Then, one side was tacked in place with super glue and when dry, the halves separated and more glue applied to the one side to make sure all fit. There is a blanking plate that fits over the back half of the well opening. This is supposed to fit flush with the bottom of the fuselage as well, but since the lower fuselage sections between the engines are rather badly warped, I glued it to the nose well itself. You can see how this all fits from the thumb-nail image.
cockpit opening. Then, one side was tacked in place with super glue and when dry, the halves separated and more glue applied to the one side to make sure all fit. There is a blanking plate that fits over the back half of the well opening. This is supposed to fit flush with the bottom of the fuselage as well, but since the lower fuselage sections between the engines are rather badly warped, I glued it to the nose well itself. You can see how this all fits from the thumb-nail image.
 The next step was to install the resin cockpit. First, I had to glue in the instrument panel (no problem) and the side panels (some problem). The side panels are supposed to fit inside the cut-aways in the cockpit sides. The situation is exacerbated by the fact that there is detail that goes all the way out to the outer lip of the consoles. This leaves no place for the side panels to fit as they should be slightly indented into the consoles. The shape of these side pieces is also not exactly the same as the cut-outs into which they need to fit and so trimming is needed. I just tacked the bottom of the panels and then forced the cockpit into place. This isn't exactly the way to go, but I didn't want to spend time grinding the fuselage sidewalls to get the panels to fit. Really, grinding on the sidewalls or carving out indentions from the console detail are the only proper way to do it. I got one side glued in well, making sure the back section was as flush as I could get it. I then added a bit of weight just in case it was needed to prevent tail sitting. I have the feeling I should have added more.
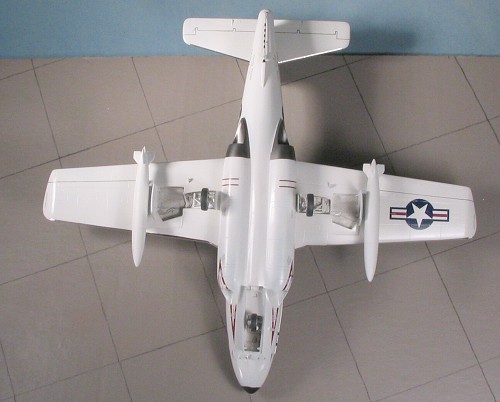
Moving along, it was time was to join the fuselage halves. Because things were a bit too wide in the front, I had to use super glue and accelerator to get the halves to mate. The upper spine, tail section and back half of the lower fuselage were glued in a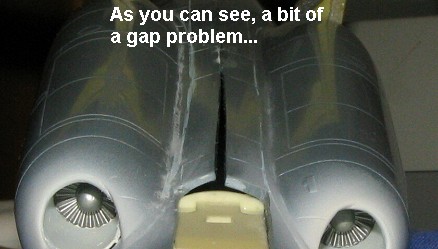 normal manner. These areas were filled and sanded as is usual on limited run kits. When it came to the section between the engines, it was obvious that more drastic measures were needed. Probably due to the molding process, the rather small section of plastic there was not properly aligned. Sort of like they took it out of the mold and set something heavy on that area, it was jutting out at the wrong angles on both sides as you can see in the image.
In a case like this, it is time to break out the big guns. This includes liberal amounts of super glue, the use of epoxy filler and the required BAF (Big A** File). First step was to dump super glue into the crevasse and then hit it with accelerator. Then , the gaps that were still there (and there were quite a few) were filled with epoxy putty. Things were left to dry for a good long time to let the putty dry. Then the BAF was brought out to g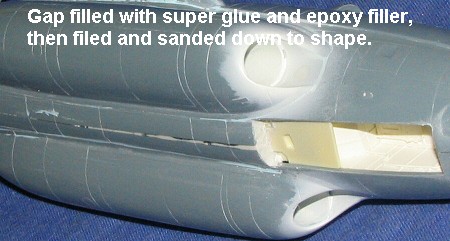 et rid of the ridge and bring things back down to something similar to what it should look like. Several sandings later, the panel lines were restored and the lower section looked pretty normal. Now I'm not going to whine and fuss about this happening. Short run kits have these kinds of problems all the time and I'd be interested in hearing from anyone else who is working on or built this kit to see if their experiences are similar. One just fixes the problem and carries on to the next step. Fortunately, the plastic in this kit is quite thick so you have lots of 'fudge' room.
Next adventure was getting the tail plane installed. I thought it would help square up things when it came time for the wings. I had to break out the sanding sticks again for this. The opening in the fin is a wedge that is too wide at the back and too narrow at the forward section. This meant that I had to sand the opening until I could squeeze the tail plane in place. Then I used super glue and accelerator to fill the corresponding gap at the top, which was then given several coats of normal filler to smooth out.
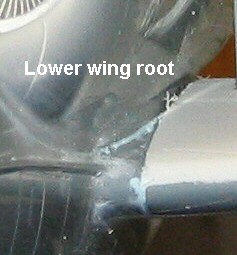 Next move was the wings. I found that the wing root on the fuselage was narrower than the wings. This provides several options. One is to match up the bottom and use gobs of filler to build up the top to
 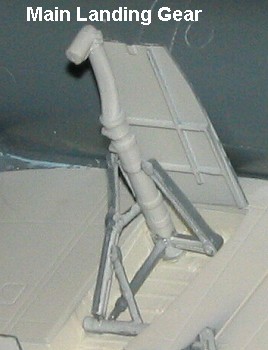 where it is level. The other is to do the same but with all the filler used on the bottom (where there are two nice engine pods to get in the way of things. The third is to match up the top surface as best as can be done and leave the bottom as it is. I chose the third method. It still took a bit of filler, but nothing like what I envisioned with the other methods.
With the wings firmly in place I went to the landing gear. First there need to be holes drilled for the gear legs to fit. Simply drill out the little posts that are in there. Then the main gear were tackled. Each main gear consists of five (poorly molded) parts, four of which attach to each other and then the strut. Once in place, it looks very convincing, but it takes a bit of fiddling to get them all in place. Nose gear has but a single strut brace and the nose wheel steering potentiometers. These will have all the detail on the top of them removed as that is where the large sprue gate attaches. It would have made more sense to have the gate attached on the mounting plate so that detail wouldn't have to be ruined. With the gear firmly attached, I tested it out and found that I barely put in enough nose weight. The addition of the wheels will have the back sit up a bit higher and will help.
 I then attached the tail bumper. Normally, this is deployed (lowered) when the plane is on the ground. It is molded in the raised position and no hinge mechanism is provided. It also has two large sink areas to be filled.
Moving to the front, I put in a few more cockpit bits and did some touchup painting in the cockpit before tackling the canopy. This is three pieces of very thick plastic; each piece a different thickness. The center section takes two resin braces. One of these had broken during shipment and the small bit was gone. The instructions are vague about where these (and a few other interior bits) are to be attached. An 'after' drawing would be most helpful as we all don't have references when we build a kit.
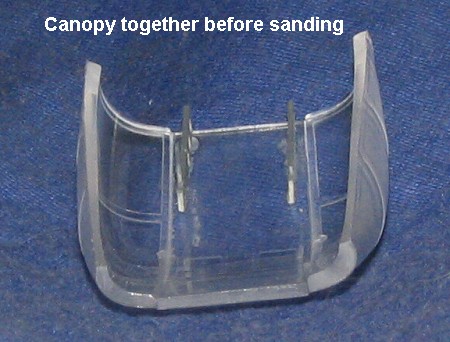 I glued all the transparencies together and then started to test fit them. It was obvious that the canopy bits are a bit too large. I sanded down the front of them so that the fore/aft distance was good. They were still too high. This was fixed by sanding on the lower surfaces until I'd sanded away all the lower framework. A bit of filing on the cockpit sill was also done to bring things down even lower. Then I flooded the join areas with glue and allowed the melting of the surrounding area and some clamps to bring things pretty much in line with where they need to be.
I also had to polish the canopy afterwards. Two reasons. One is that the sprue attachment points are large and invade the clear part of the canopy. Second is that I got some cement on the clear bits and had to remove them. A short sessions with various grades of sandpaper and a polish with a T-shirt brought back the clarity that was there before.
With the canopy in place, it was masked and the lower antennas were glued in place according to the instructions. Then it was time for painting.
| COLORS & MARKINGS |
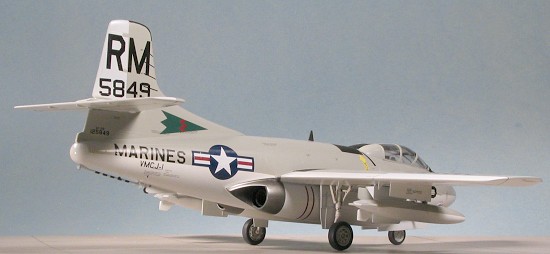
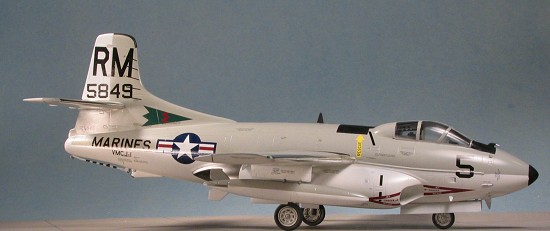
 Czech Models provides three schemes, each with a greater (or lesser if you want to look at it that way) degree of effort to get you the end result. In terms of painting, the easiest is the overall Sea Blue VF-14 aircraft. No real masking other than the exhaust. Of course, this one is has a lot of stencil decals so you'd be spending more time decaling. Next would be the USMC VMF-513 aircraft. For that, the gear wells and landing gear and inner gear doors would be gloss Sea Blue and the rest of the airframe black. Since all the stencils were over-painted, this is basically insignia and unit markings. Interestingly, the decal guide does show white stencils being applied to this scheme. I'm not 100% sure that is accurate. The most difficult (or less easy) of the three is the gloss Light Gull Grey over White scheme. It has lots of masking and it also has a lot of decaling to do as there are a ton of stencils. Preliminary painting consisted of Alclad II Steel on the exhaust area and flat black for the tip of the radome (I could have painted the whole radome flat black as shown on the box art plane), the upper walkway and the wing walkway. These areas were left to dry overnight and then masked. Then the entire underside of the kit was painted white along with the wheels, and gear doors. The rudder was also painted white at this time. Again, a good 8 hours of drying (Floquil Reefer White dries to where you can handle it in a few hours, but I like to give it more time) and it was back for some more masking.
This time, the rudder was masked, the black bits masked as was the whole lower side of the aircraft. It seems that there were a number of variations on the light gull grey and white scheme, with some being soft edged and others hard edged. The few photos I have of USMC Skyknights of this era show a hard edged paint line that runs right down the middle of the fuselage. Once masked, the upper surface was 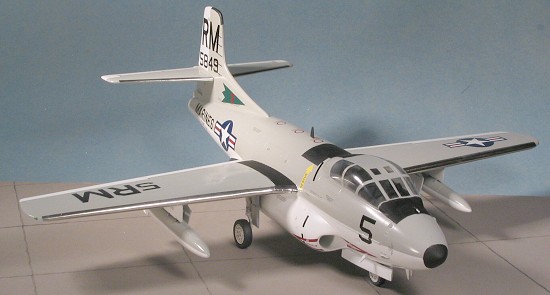 painted light gull grey using Testors ModelMaster enamels. It was dry to the touch in about 2 hours (because I use Floquil's lacquer thinner), but again, I gave it overnight just to be sure.
Then it was on to decaling. The decals are not printed by Microscale, as you can tell that as soon as you use one. They are well printed (though the red is off-register) and those that are a single color are extremely thin. So much so that I had trouble with the long, skinny ones tearing. Once a second color was added, it seemed to stiffen them up a tad and made them easier to handle. The white is semi-transparent and you can see color changes under it on the insignia where it overlaps the upper and lower colors. I used Microsol and that seemed to take care of any conformity problems.
Fortunately, there is a stencil guide provided and while one generally has to look at all three of the profiles given, one can generally find out where most of them go. Thanks to all the stencils, it took a goodly period of time to put these all on. I put on all the stencils and insignia before applying the specific unit markings and codes. That way, it would look normal if any of the data markings were covered with unit stuff.
| FINAL CONSTRUCTION |
Meanwhile, I painted the tires using Floquil Weathered Black, then assembled the drop tanks. There are two slots for fins in the tank body. On one half. this slot is nearly completely filled in with plastic. Fortunately, my dear sister, who is as big a tool-a-holic as I, bought me a set of dental tools for Christmas (bless her). These came in very handy in cleaning out the plastic from these slots. Then the fins had to be sanded down as they were too thick to fit into the slots. Once that was done, the tanks had the usual filler work done and were painted white. Then the tanks were masked off and the upper surface painted Light Gull Grey.
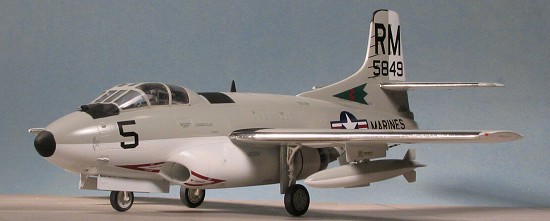 Back at the airframe, I covered the leading edges of the wings and horizontal stabilizers with Bare Metal Foil Chrome and then started attaching the final bits. There were quite a few of these including the gear doors, wheels (for which you have to trim the axles on the main gear) a few antennas and the pitot tube. The tail hook was painted white with black stripes and glued in place. Thanks to the mold mis-match on that sprue, quite a bit of re-shaping has to be done on the hook. I then removed the masking from the canopy (only to see little bits of 'stuff' clinging to the inside of the canopy), glued on the drop tanks and did the final touch-up painting. I then sat it on its gear and was quite pleased to note that it did not tail-sit! One thing that I did note is that the aircraft sits a bit too high in the tail as the fuselage should be level with the ground. Trimming the main gear by about an eighth inch should take care of this as the nose gear does sit at the right height. Oh yes, I never did get around to using the oleo scissors that were supplied. The thought of having to carve all that plastic out of the inside of them meant that I blew it off. Besides, few will see that they are not installed and this, as with many of the limited run kits I build, will never see the light of the competition table!
| CONCLUSIONS |
I've wanted a 1/48 kit of this for quite some time and though it really was more work than I'd thought, the result is, to me, well worth the effort put into it. It would have been nice if there wasn't the mold mis-match problem as that caused quite a bit of additional work, and I also found the glitches with the cockpit resin fit that I mentioned to be annoying, though overall, I have to say that the end result is quite pleasing. The box does say that this kit is for experienced builders only and I found that to be quite true.
January 2005
# 1348 in a series
You can find this kit and many others at
If you would like your product reviewed fairly and fairly quickly, please contact the editor or see other details in the Note to Contributors.