| KIT #: | PM003 |
| PRICE: | $150.00 from DMC Models |
| DECALS: | options |
| REVIEWER: | Scott Van Aken |
| NOTES: | Vacuform/Resin/white metal kit |
| HISTORY |
Often times an airplane comes at the
right time in the scheme of things, and so it was with Convair's
short/medium haul airliner. Developed in the late 40's in time for the
airlines to be looking for a replacement for their old DC-3s, the Convair
240 was developed into a bewildering number of variants for civil use as
the 340, 440, 580 and others. The USAF also got involved in the deal when
it went seeking a nav trainer and bought the aircraft as the T-29. There
followed severa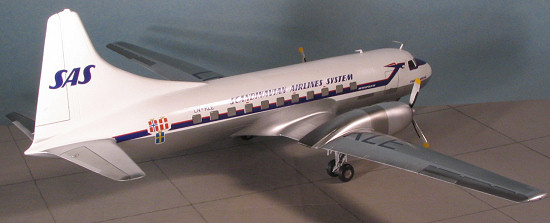 l variants of this aircraft and a purchase of a transport
version called the C-131, which also went through its own mass of
designations and upgrades. Even the Navy and Marines had their Convair twin
in the R4Y variations. These planes served faithfully in a plethora of
jobs, many becoming hacks for ANG units. The last ones were not
retired from the USAF until the late 1980s.
l variants of this aircraft and a purchase of a transport
version called the C-131, which also went through its own mass of
designations and upgrades. Even the Navy and Marines had their Convair twin
in the R4Y variations. These planes served faithfully in a plethora of
jobs, many becoming hacks for ANG units. The last ones were not
retired from the USAF until the late 1980s.
For the civil side, these were the first real replacements for the DC-3. They were modern, fast, comfortable and reliable. Many airlines world wide operated the Convair twins. It was a brilliant piece of engineering to make the 440 capable of handling turboprop engines, even before these engines were reliable enough for passenger operations. Thanks to that foresight, and the toughness of the airframe, there are turboprop Convairliners still plying the skies 50 years after the first 240 prototype took to the skies.
| THE KIT |
 Proteus Models seems to be a division
of Welsh models in the UK. I say this as the addy in the instruction sheet
is Welsh Models. A multimedia kit with a vacuformed fuselage, resin flight
surfaces, and white metal
Proteus Models seems to be a division
of Welsh models in the UK. I say this as the addy in the instruction sheet
is Welsh Models. A multimedia kit with a vacuformed fuselage, resin flight
surfaces, and white metal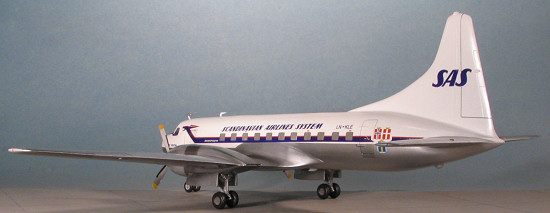 detail
bits, the kit comes in a very sturdy box.
detail
bits, the kit comes in a very sturdy box.
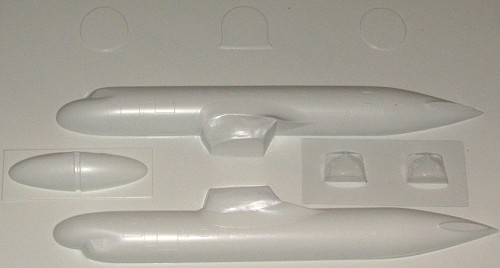
The vacuformed parts are well molded and quite thick. They consist of the fuselage halves, bulkheads and a pair of vacuformed cockpit sections. Now if you want, you can build the kit without installing the cockpit section. Your options in this regard are to cut out the windows and replace them with acetate, or simply use the windscreen decals that are on the decal sheet. The cabin windows have decals and those doing the airliner version may want to consider this as a viable option. I say this as often times, airliner builders will use decals vice clear bits in other scales. My kit came with a spare clear cockpit section, which is greatly appreciated as I tend to really mess things up when only one is supplied! An optional longer nose section is provided as several CV440s had this option.
 The
resin parts consist of the flight control surfaces, engines and the main
pieces that make up the interior. The casting is superb and you'll find
none better anywhere. No air bubbles, no crud on the surface, no misformed
parts, no flash. Only thing I noticed was that one of the wings was
slightly warped, but a session with some hot water will take care of that.
The
resin parts consist of the flight control surfaces, engines and the main
pieces that make up the interior. The casting is superb and you'll find
none better anywhere. No air bubbles, no crud on the surface, no misformed
parts, no flash. Only thing I noticed was that one of the wings was
slightly warped, but a session with some hot water will take care of that.
 All
of the detail bits are in cast metal. These are also superbly formed. It
includes all the landing gear bits and doors as well as the nose gear well.
You have two options when it comes to nose wheels. There are seats and
control sticks for the interior with the rest of the pieces being props and
the usual myriad of radio antennas. I should point out that there is no
instrument panel, per se. That part is molded on the forward resin cockpit
bulkhead and is devoid of detail so you are on your own when it comes to
detailing this.
All
of the detail bits are in cast metal. These are also superbly formed. It
includes all the landing gear bits and doors as well as the nose gear well.
You have two options when it comes to nose wheels. There are seats and
control sticks for the interior with the rest of the pieces being props and
the usual myriad of radio antennas. I should point out that there is no
instrument panel, per se. That part is molded on the forward resin cockpit
bulkhead and is devoid of detail so you are on your own when it comes to
detailing this.
 The
instructions, as they are, is a written sequence of parts. None all that
helpful as the commentary is pretty generic (cut out the vacuformed pieces,
sand off the stubs on the resin bits, assemble with super glue, use filler
where needed....). However, you are given two excellent scale side views of
both the airliner and the USAF version that are kitted. Detail shots of the
wheel wells show how all the bits are to be assembled. There are two
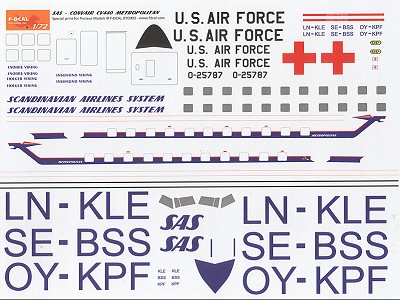
marking options with this kit. One is for an SAS airliner. The huge decal
sheet has much of its space given to this version. You can do one from
Sweden, Denmark or Norway as it has registrations from all three countries.
The USAF one is a medevac aircraft, similar to the ones based near my home
in the 1950s/60s. A separate sheet (not shown) provided insignia and the
three flags of the SAS home countries. The decals are superbly printed and
should work beautifully.
The
instructions, as they are, is a written sequence of parts. None all that
helpful as the commentary is pretty generic (cut out the vacuformed pieces,
sand off the stubs on the resin bits, assemble with super glue, use filler
where needed....). However, you are given two excellent scale side views of
both the airliner and the USAF version that are kitted. Detail shots of the
wheel wells show how all the bits are to be assembled. There are two
marking options with this kit. One is for an SAS airliner. The huge decal
sheet has much of its space given to this version. You can do one from
Sweden, Denmark or Norway as it has registrations from all three countries.
The USAF one is a medevac aircraft, similar to the ones based near my home
in the 1950s/60s. A separate sheet (not shown) provided insignia and the
three flags of the SAS home countries. The decals are superbly printed and
should work beautifully.
| CONSTRUCTION |
Thanks to the Ginter book on the T-29/C-131 family of
aircraft, I discovered that one cannot do one of the two marking options given
in the kit. At least not and be accurate. The USAF C-131 variant is a C-131A and
it differs from the Convair 440 in that it is based on the Convair 240. As such,
the kit will have to be modified by removing a 3 scale foot section from the
fuselage in front of and behind the wings, the exhaust will have to be changed
from the rectangular one in the kit to a pair of round pipes, and the engine
nacelles will have to be shortened as well. Not an u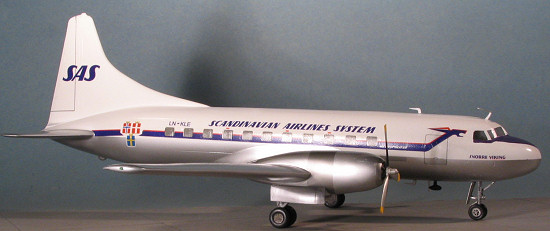 ndaunting task so it is with
a heavy heart that I have to eliminate that particular option from the build.
ndaunting task so it is with
a heavy heart that I have to eliminate that particular option from the build.
This really goes to prove that a bit of knowledge can take a bit of the fun out of model building! However, that does leave open the doors to doing a C-131D, which was widely used in standard transport squadrons and as hacks by a huge number of USAF units. One does have to check references as some 131Ds had the earlier exhaust system, though most were retrofitted with the later one as given in the kit. Of course, the SAS option is still a viable choice as well.
Step one is to remove the fuselage halves and any other bits one wants to use for the kit. Since it seems as if these kits are pretty much identical (Aside from engines) with little more than decal changes between them, there are optional bits that one may or may not be using. I've always liked the 'pug nose' 131/440 so will not be using the optional replacement nose that is provided.
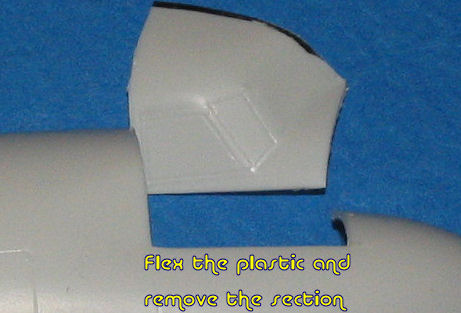
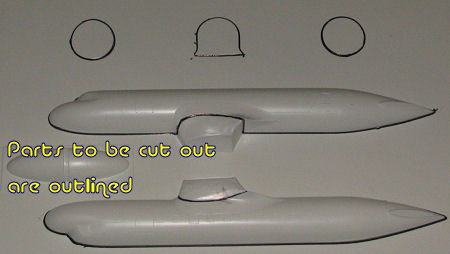 Removing vacuformed components is really easy. I first
marked around the parts with a felt tip, though you can use an ink pen or
pencil. This shows basically where to cut. Putting a sharp hobby knife at a 45
degree angle at the transition areas, I scribed all around the various parts two
times. Then, by simpl
Removing vacuformed components is really easy. I first
marked around the parts with a felt tip, though you can use an ink pen or
pencil. This shows basically where to cut. Putting a sharp hobby knife at a 45
degree angle at the transition areas, I scribed all around the various parts two
times. Then, by simpl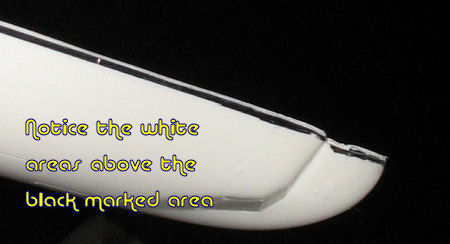 y flexing the vac
sheet, I was able to 'snap' out the pieces. It took all of about 20 minutes. The
next step is to sand down the join areas until they are flat. By marking the
original edges, I was able to see about how much to sand down. By scribing at a
45 degree angle, there was less material to remove.
y flexing the vac
sheet, I was able to 'snap' out the pieces. It took all of about 20 minutes. The
next step is to sand down the join areas until they are flat. By marking the
original edges, I was able to see about how much to sand down. By scribing at a
45 degree angle, there was less material to remove.
Now normally, one will secure a sheet of sandpaper to a flat surface (like a piece of Plexiglas) and, under running water, gentry remove the excess plastic. Well, this isn't possible with such a large piece as the fuselage so I used a sanding stick and a lot of care. I could tell when I'd gone far enough as when I looked at the piece from the side, I could see no more of the white plastic sticking up from a black foreground. I generally remove too much during this process and I'm sure I did so this time as well! The only other vacuformed pieces are some bulkheads to stiffen up the fuselage. These will be trimmed as needed when it comes time to assemble the fuselage.
 The
next step was to remove the cockpit section. Proteus originally would have the
builder cut out all the cockpit windows and replace them with little pieces of
clear acetate. Not an easy task even for experienced modelers. The other option
was to use the window decals for the cockpit, but then one wouldn't be able to
use the nice resin/metal cockpit bits provided. First thing I did was to
The
next step was to remove the cockpit section. Proteus originally would have the
builder cut out all the cockpit windows and replace them with little pieces of
clear acetate. Not an easy task even for experienced modelers. The other option
was to use the window decals for the cockpit, but then one wouldn't be able to
use the nice resin/metal cockpit bits provided. First thing I did was to
 mask
one of the transparencies provided and remove it from its backing. It was set
aside. Proteus provides a large piece that includes the cockpit windows for the
transparency, making it easier to fair it in place. I then scribed an area to
remove. The back section is a panel line, but the lower and front pieces are not
delineated on the kit, so I cut shallower than needed. After scribing, a few
flexes removed the cockpit section.
mask
one of the transparencies provided and remove it from its backing. It was set
aside. Proteus provides a large piece that includes the cockpit windows for the
transparency, making it easier to fair it in place. I then scribed an area to
remove. The back section is a panel line, but the lower and front pieces are not
delineated on the kit, so I cut shallower than needed. After scribing, a few
flexes removed the cockpit section.
Having congratulated myself on not making any horrid
mistakes, I moved to the resin parts. These all have some form of pour stub to
remove. Starting with the wings, I sawed off the root stubs and the ones on the
engine nacelle. I also removed those from the engines and sanded those flat.
Next were the three cockpit sections. I left the tail bits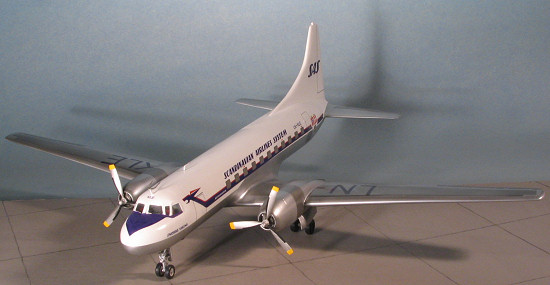 for later as I wanted to get things somewhat together before tackling those. I
test fit the two wings together and was satisfied that they were close. I also
test fit the engines onto the nacelles and noted that one fit quite well and the
other seemed to be too small. I can see much filler in my future.
for later as I wanted to get things somewhat together before tackling those. I
test fit the two wings together and was satisfied that they were close. I also
test fit the engines onto the nacelles and noted that one fit quite well and the
other seemed to be too small. I can see much filler in my future.
I then started on the cockpit. There are no instructions on assembling it, but it is pretty intuitive. You get a forward and aft bulkheads as well as a floor. There are two cast metal seats and control sticks. The instrument panel is molded into the forward bulkhead and the center console into the floor. There is a notch in the center console that fit to the lower section of the molded in instrument panel so that one has no problems with the forward bulkhead. It would have been nice to have at least a decal for the instruments and console, but the modeler is left to their own devices in this area. There is no real detail in any of the resin parts so throttles and other knobs and switches are totally to the whims of the builder.
 Meanwhile, I installed the three bulkheads in one of the
fuselage halves. Be sure to test fit these repeatedly. I eventually had to
reduce the circumference of the front one to get a proper fuselage fit. There is a straight line on each that shows the alignment of
the parts, though there is no exact indication of exactly where these are
attached. I also cut out the nose gear opening and glued the metal 'wheel well'
into one half. I then glued small plastic tabs all around the fuselage halves
and on the inside
Meanwhile, I installed the three bulkheads in one of the
fuselage halves. Be sure to test fit these repeatedly. I eventually had to
reduce the circumference of the front one to get a proper fuselage fit. There is a straight line on each that shows the alignment of
the parts, though there is no exact indication of exactly where these are
attached. I also cut out the nose gear opening and glued the metal 'wheel well'
into one half. I then glued small plastic tabs all around the fuselage halves
and on the inside
 of
the cockpit sections to help hold on the vac canopy. With all this in place, I
installed the cockpit section and then filled the nose with as much weight as I
could. Then I glued the fuselage halves together. Fit was not bad and I'd only
over-sanded one area! I used standard liquid cement for all the joins,
reinforcing several stubborn areas with super glue. Eventually, I got it all
done and went over the seams with super glue. When that dried, I applied
standard filler. One it dried I began sanding. I sanded the entire fuselage so
that I could get rid of the small 'pips' that are standard remnants of the
vacuforming process.
of
the cockpit sections to help hold on the vac canopy. With all this in place, I
installed the cockpit section and then filled the nose with as much weight as I
could. Then I glued the fuselage halves together. Fit was not bad and I'd only
over-sanded one area! I used standard liquid cement for all the joins,
reinforcing several stubborn areas with super glue. Eventually, I got it all
done and went over the seams with super glue. When that dried, I applied
standard filler. One it dried I began sanding. I sanded the entire fuselage so
that I could get rid of the small 'pips' that are standard remnants of the
vacuforming process.
 After
this initial sanding sequence, I glued on the fin and stabilizers. I'd thought
about drilling mounting holes, but in the end just butt glued them
After
this initial sanding sequence, I glued on the fin and stabilizers. I'd thought
about drilling mounting holes, but in the end just butt glued them in place. I did find that the stab roots on the fuselage were thicker than the
roots of the stabilizers, but the eventual filler applications took care of
that. Back at the wings, I glued on the engines. Though I'd have thought they'd
be from the same mold, one of them fit either nacelle beautifully, while the
other was too short. I used the upper surface for alignment and glued them in
place with super glue. I then mixed up some epoxy filler and pushed it into the
various seams and where there was a step. The next day, this was sanded down,
and normal filler was applied. After this was done, I had two well mated engine
pods, though I fear that I lost some detail on the one where I sanded and used a
lot more filler. I then grabbed a hair dryer and took the minor warp out of the
wings.
in place. I did find that the stab roots on the fuselage were thicker than the
roots of the stabilizers, but the eventual filler applications took care of
that. Back at the wings, I glued on the engines. Though I'd have thought they'd
be from the same mold, one of them fit either nacelle beautifully, while the
other was too short. I used the upper surface for alignment and glued them in
place with super glue. I then mixed up some epoxy filler and pushed it into the
various seams and where there was a step. The next day, this was sanded down,
and normal filler was applied. After this was done, I had two well mated engine
pods, though I fear that I lost some detail on the one where I sanded and used a
lot more filler. I then grabbed a hair dryer and took the minor warp out of the
wings.
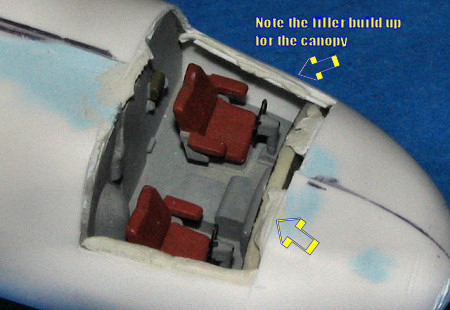
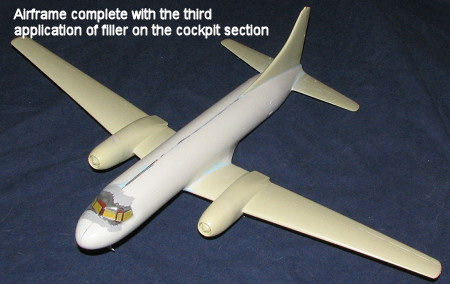
Returning to the fuselage, I tried to fit in the
 clear
cockpit section. Even with the little tabs, it sank down below fuselage level.
Mixing up some more epoxy filler, I put sections of it around the cockpit
opening atop the tabs. Then I carefully place the clear bit into it and ensured
it was flush with the outside. It then was left to dry. Once that was done, the
canopy was removed and the additional filler was trimmed. Though these areas
should be invisible when the model is done, I painted them the same color as the
interior, just to be sure. It was then on to the biggie, the wings.
clear
cockpit section. Even with the little tabs, it sank down below fuselage level.
Mixing up some more epoxy filler, I put sections of it around the cockpit
opening atop the tabs. Then I carefully place the clear bit into it and ensured
it was flush with the outside. It then was left to dry. Once that was done, the
canopy was removed and the additional filler was trimmed. Though these areas
should be invisible when the model is done, I painted them the same color as the
interior, just to be sure. It was then on to the biggie, the wings.
The wings had already had the pour stubs removed and
the remaining join was relatively flat, but not really pretty. No problem as
filler would take care of that. I drilled a couple of holes in one wing root and
inserted a section of paper clip. It was then mated with the other wing, the
scratches of the clip ends noted and holes drilled in the other wing. A paper
clip is the same size as a #64 drill bit. I then attached the wings to each
other via the paper clips and then started to mate the wings to the fuselage. To
be sure that 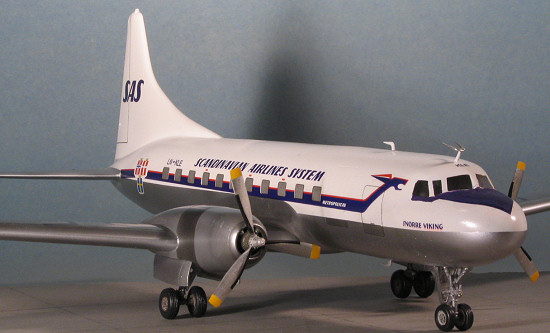 I'd get the wings at least close to level, after several test fits,
I took the wing that would be the least hassle and glued it to one side of the
root and fuselage. I flooded the root exterior with super glue. When that had
dried (and the other wing was attached the whole time, though not cemented), I
glued the other wing in place while adjusting it to have everything as level as
I could get it. I'm sure I screwed it up somehow, but it looks fine at the
moment. I flooded the join areas on the other wing with more super glue and when
it had dried, I used epoxy filler for all the joins. This was followed by a
couple of applications of standard filler to smooth things out even more.
I'd get the wings at least close to level, after several test fits,
I took the wing that would be the least hassle and glued it to one side of the
root and fuselage. I flooded the root exterior with super glue. When that had
dried (and the other wing was attached the whole time, though not cemented), I
glued the other wing in place while adjusting it to have everything as level as
I could get it. I'm sure I screwed it up somehow, but it looks fine at the
moment. I flooded the join areas on the other wing with more super glue and when
it had dried, I used epoxy filler for all the joins. This was followed by a
couple of applications of standard filler to smooth things out even more.
The underside was the biggest area of concern and I managed to sand through the vac plastic in a couple of areas. That was later filled with epoxy filler and more standard filler. For me, it is a constant struggle to get thing smooth on kits like this, and I tend to go overboard from time to time. Eventually, things got to a stage where I could concentrate on other parts of the kit. This meant installing the clear cockpit section.
 Thanks
to the work I'd done earlier to build up a shelf for this to sit on, I was able
to install this piece with little fuss. I used superglue on it and was rewarded
with no fogging. Once the superglue had dried, I filled some of the remaining
seams with more superglue, followed by regular one part filler. This took a
couple of applications to get rid of all the little areas I missed, but it was
enough to have a complete airframe. Though not dry, I managed a few test flights
through the house to make sure things were airworthy. Despite the fact that the
one wing had returned to its slightly warped condition (I need to use really hot
water to fix this), all went well.
Thanks
to the work I'd done earlier to build up a shelf for this to sit on, I was able
to install this piece with little fuss. I used superglue on it and was rewarded
with no fogging. Once the superglue had dried, I filled some of the remaining
seams with more superglue, followed by regular one part filler. This took a
couple of applications to get rid of all the little areas I missed, but it was
enough to have a complete airframe. Though not dry, I managed a few test flights
through the house to make sure things were airworthy. Despite the fact that the
one wing had returned to its slightly warped condition (I need to use really hot
water to fix this), all went well.
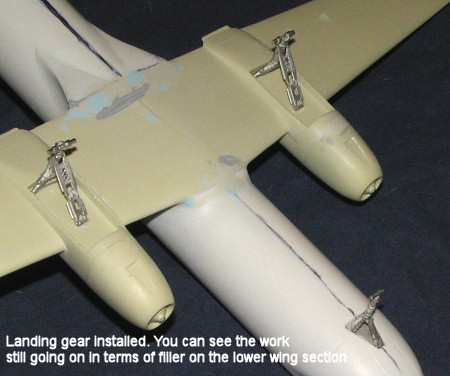 It
was then time to attach the landing gear and see if I needed more nose weight.
Actually, I should have put in more, but once the gear was on, much to my
surprise, it actually stayed on all three landing gear. The gear is very nicely
done cast metal. There are some casting stubs that need to be cleaned up, as
well as some of the mold lines (since gear legs are cast parts anyway, it isn't
horrible to leave these on). I used files to handle this. Anyway, it will sit on
its butt with the least little nudge, but the addition of props and stuff should
decrease this tendency.
It
was then time to attach the landing gear and see if I needed more nose weight.
Actually, I should have put in more, but once the gear was on, much to my
surprise, it actually stayed on all three landing gear. The gear is very nicely
done cast metal. There are some casting stubs that need to be cleaned up, as
well as some of the mold lines (since gear legs are cast parts anyway, it isn't
horrible to leave these on). I used files to handle this. Anyway, it will sit on
its butt with the least little nudge, but the addition of props and stuff should
decrease this tendency.
| COLORS & MARKINGS |
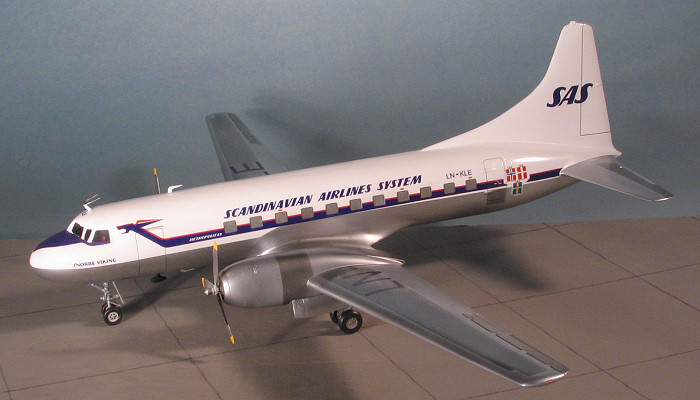
The entire fuselage and fin/rudder assembly were painted with Floquil Reefer White. This was then followed by Testors Gloss White. Thanks to the size of the model, it took nearly two weeks of painting just to get the white bits on properly. I didn't want to mess things up (though rarely does this plan reach fruition), so gave each coat two-tree days to cure before the next.
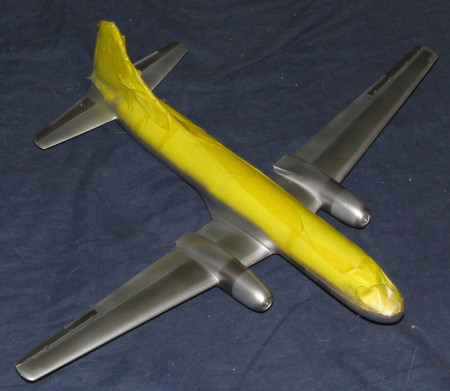 Once
fully dry, the upper white areas were masked off and the rest of the airframe
was sprayed with Alclad II Aluminum. I went through a bottle of the stuff doing
the base Aluminum coat. When it was completely dry, I broke out the tape and
started masking off areas of the airframe for other Alclad II metallics. I used
Dark Aluminum, Airframe Aluminum, Duralumin and Polished Aluminum to add some
interest to things. The exhaust areas were painted Jet Exhaust and then had
Aluminum misted over them as this area seemed to dark after the initial
application.
Once
fully dry, the upper white areas were masked off and the rest of the airframe
was sprayed with Alclad II Aluminum. I went through a bottle of the stuff doing
the base Aluminum coat. When it was completely dry, I broke out the tape and
started masking off areas of the airframe for other Alclad II metallics. I used
Dark Aluminum, Airframe Aluminum, Duralumin and Polished Aluminum to add some
interest to things. The exhaust areas were painted Jet Exhaust and then had
Aluminum misted over them as this area seemed to dark after the initial
application.
With all that dry it was time for the decals. Since I
couldn't use the USAF markings (as I stated at the beginning of the construction
process), that left those of SAS. These are on a solid sheet and need to be cut
out individually. first thing I discovered were that they were quite thin and
easily torn. Not a promising thing when one has to put down long, thin decals as
are on an airliner. I also discovered that they do not like any setting
solutions. They 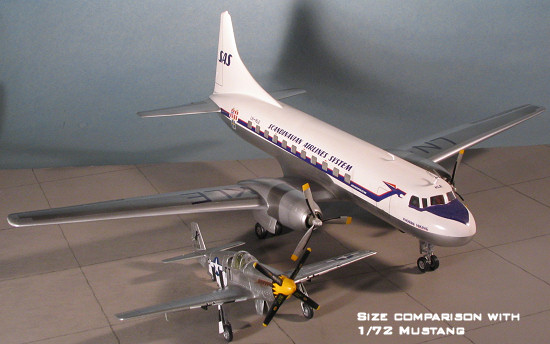 crinkle up and pretty much stay that way. They also easily
silver and I have some problems in that area. When put on without any solutions,
they silver even more. Basically, the decals are not that good when one is used
to Aeromaster, Superscale or other major brands. A pity as it somewhat ruins all
the previous work. I should also point out that the SAS markings provided are
basically purple in color, though I'd thought that SAS livery was dark blue. (I
could be wrong about this as I'm not that much up on airlines as others.)
crinkle up and pretty much stay that way. They also easily
silver and I have some problems in that area. When put on without any solutions,
they silver even more. Basically, the decals are not that good when one is used
to Aeromaster, Superscale or other major brands. A pity as it somewhat ruins all
the previous work. I should also point out that the SAS markings provided are
basically purple in color, though I'd thought that SAS livery was dark blue. (I
could be wrong about this as I'm not that much up on airlines as others.)
I discovered that the window decals do not match the window engravings on the fuselage and had I known that at the beginning, I'd have filled them in. In fact, I highly recommend that the builder fill in all the various door and window engravings on the fuselage and none of the decals exactly matched these features. The instructions also do not specifically tell you which of the aircraft names go with which of the various registration numbers. At least I missed that part. While it does show the LN-xxx aircraft in the drawings, the OY-xxx and SE-xxx names are a toss-up. I eventually tossed in the towel and did the aircraft shown in the drawings. I also discovered along the way that the stick of the decals is questionable as one of the smaller ones came up in my hand as I was holding the plane over it a few days after the decal had dried. I put it back in place and then gave the model a coating or two of Testors Metallizer Sealer as it doesn't dull the Alclad as much as other clears. This coating is a necessity to prevent any more problems with the decals. Of course, they all silvered to some degree, but with no aftermarket on the horizon, I'll have to put up with it.
| FINAL CONSTRUCTION |
 With the decals on, I went about and added on the final
bits. First, I highlighted the control surfaces with a drafting pen. I next
glued on the landing gear oleo scissors. These are a bit fiddly, but being
metal, can be adjusted. I also glued on the main gear doors. There are small
notches in the insides of the wheel wells for these to fit into and that was a
huge help.
With the decals on, I went about and added on the final
bits. First, I highlighted the control surfaces with a drafting pen. I next
glued on the landing gear oleo scissors. These are a bit fiddly, but being
metal, can be adjusted. I also glued on the main gear doors. There are small
notches in the insides of the wheel wells for these to fit into and that was a
huge help.
I next glued on the brace for the nose gear door and then glued on the door itself. It fits quite well, despite all the glue I had in that area from attaching the strut. I also found an appropriately sized MV lens and glued that in place using white glue.
Not many bits left in the box at this stage. I masked and painted the prop tips using Aeromaster Yellow acrylic over a base of Floquil Reefer white. I also cleaned up some of the metal antennas and attached them to various places on the airframe. I had lost the nose ILS antenna somewhere so started a hunt for it in hopes it had just wandered off a short distance. No early luck. These antennas were attached using super glue and I brush painted those that needed it. I also removed the masking from the windscreen at this time. Can't see much in there, but at least you can tell an interior has been installed!
The very last bits were to do some touch-up painting and to install the props.
| CONCLUSIONS |
Those of you used to two day builds and 10 hours from start to display shelf will have to think twice about this one. I found that the vac fuselage and resin flying surfaces worked very well. The engineering was well done and I'm sure that Proteus is selling every one they make. It isn't so huge as to overwhelm the display shelf, but is still an attention getter.
To me, there are a few areas that need some
improvement. It would have been so nice to have some sort of color information
regarding props, blade tips, wheel wells and some other specific items.
Since specific planes were being modeled, it shouldn't have been difficult to
provide definitive antenna types and placement for each decal option. Same goes
for the connection of registration with aircraft name. If it was there in the
instructions, I missed it somehow. I'd also do it w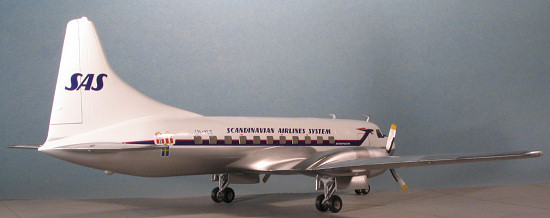 ithout
the interior as the clear cockpit section just doesn't look right when done.
There is a thick section in the center of the transparency that shouldn't be
there and it just looks odd when one is done. This was the same on the other
transparency that was provided.
ithout
the interior as the clear cockpit section just doesn't look right when done.
There is a thick section in the center of the transparency that shouldn't be
there and it just looks odd when one is done. This was the same on the other
transparency that was provided.
The decals, though nicely printed are not up to modern standards. I found them to be brittle and probably the wrong color. The few color photos I have of more recent SAS aircraft show the main color to be a dark blue and the kit decals are distinctly purple. Their lack of response to setting solutions is also not good as several of the decals had to fit over compound curves and need the assistance of these solvents. I can only hope that Proteus finds another decal provider for its newer kits.
Finally, doing the 'one fuselage fits all' thing may be great for the bottom line, but it cheats the buyer out of one of the kit's options. In this case the C-131A has a shorter fuselage, slightly shorter engine nacelles and has a different exhaust arrangement to the CV-440. I was quite disappointed that I couldn't do the USAF version because the differences were so great as that is why I'd asked for this particular boxing.
Despite these areas of concern, most of which can be fixed by the manufacturer, I thoroughly enjoyed the build. It allowed me to use some of those modeling skills I've picked up over the years and gave me enough of a challenge to be fun and not frustrating. It makes into a very nice model that I'm pleased to add to my small collection of 1/72 airliners. In fact, it dwarfs the Heron II, He-70 and Boeing 247 that are the others I have in this scale.
| REFERENCES |
Convair T-29, R4Y/C-131 Samaritan & CC-109 Cosmopolitan by Steve Ginter
Airliner Tech #12; Convair Twins, by Nichoals Veronico & William T Larkins, Specialty Press.
March 2006
#1405 in a series
Copyright ModelingMadness.com. All rights reserved. My thanks to Coopers
Models for the opportunity to build this kit. You can get others in this
series direct from the provided hyperlink above. If you would like your product reviewed fairly and fairly quickly, please
contact the editor or see other details in the
Note to
Contributors.