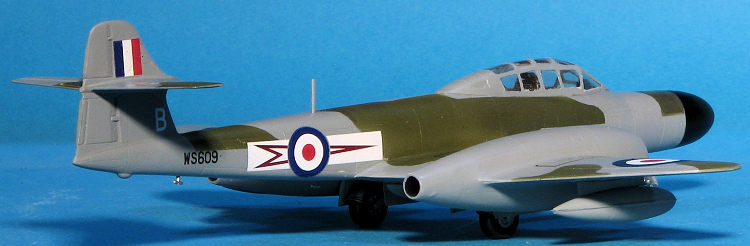
Special Hobby 1/72 Meteor NF.12
| KIT #: | SH72360 |
| PRICE: | $24.30 plus shipping |
| DECALS: | Three options |
| REVIEWER: | Scott Van Aken |
| NOTES: | 2021 tooling. 'Defending the UK's Skies' boxing |
| HISTORY |
 To replace the increasingly obsolete de Havilland Mosquito as
a night fighter, the Meteor was adapted to serve in the role as an
interim aircraft. Gloster had initially proposed a night fighter design
to meet the Air Ministry specification for the Mosquito replacement,
based on the two seater trainer variant of the Meteor, with the pilot in
the front seat and the navigator in the rear. Once accepted however,
work on the project was swiftly transferred to Armstrong Whitworth to
perform both the detailed design process and production of the type; the
first prototype flew on 31 May 1950. Although based on the T.7 twin
seater, it used the fuselage and tail of the F.8, and the longer wings
of the F.3. An extended nose contained the AI Mk 10 (the 1940s
Westinghouse SCR-720) Air Intercept radar. As a consequence the 20 mm
cannons were moved into the wings, outboard of the engines. A ventral
fuel tank and wing mounted drop tanks completed the Armstrong Whitworth
Meteor NF.11.
To replace the increasingly obsolete de Havilland Mosquito as
a night fighter, the Meteor was adapted to serve in the role as an
interim aircraft. Gloster had initially proposed a night fighter design
to meet the Air Ministry specification for the Mosquito replacement,
based on the two seater trainer variant of the Meteor, with the pilot in
the front seat and the navigator in the rear. Once accepted however,
work on the project was swiftly transferred to Armstrong Whitworth to
perform both the detailed design process and production of the type; the
first prototype flew on 31 May 1950. Although based on the T.7 twin
seater, it used the fuselage and tail of the F.8, and the longer wings
of the F.3. An extended nose contained the AI Mk 10 (the 1940s
Westinghouse SCR-720) Air Intercept radar. As a consequence the 20 mm
cannons were moved into the wings, outboard of the engines. A ventral
fuel tank and wing mounted drop tanks completed the Armstrong Whitworth
Meteor NF.11.
The NF.12 was a longer nosed version of the NF.11 with American AN/APS-21 radar, this was balanced by a slightly larger fin, first flown on 21 April 1953, 100 built by Armstrong Whitworth. All examples were operated by the RAF.
| THE KIT |
 Prior
to the release of this kit, the Meteor Night Fighter in 1/72 was only
available in injected plastic from Matchbox. This kit was one of their later
kits and aside from the need to fill multiple sink marks and the very
Spartan interior detail, built into a very nice model. However, the hobby
moves on and detailing increases. Special Hobby has already had a lot of
experience doing 1/72 Meteor kits having released the variety of single-seat
versions from the F.4 to F.8 as well as the T.7 trainer (and variations on
these themes).
Prior
to the release of this kit, the Meteor Night Fighter in 1/72 was only
available in injected plastic from Matchbox. This kit was one of their later
kits and aside from the need to fill multiple sink marks and the very
Spartan interior detail, built into a very nice model. However, the hobby
moves on and detailing increases. Special Hobby has already had a lot of
experience doing 1/72 Meteor kits having released the variety of single-seat
versions from the F.4 to F.8 as well as the T.7 trainer (and variations on
these themes).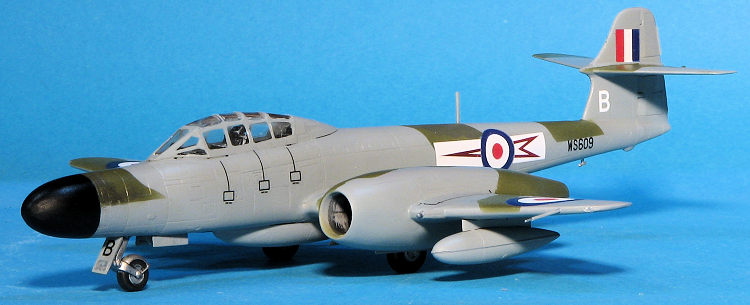 also a single piece, the forward wing/fuselage section has to be cut more
open to fit. When done, the main gear wells are built up and installed and
then the wing halves are closed. Intakes and exhaust are added and
then attached to the fuselage.
also a single piece, the forward wing/fuselage section has to be cut more
open to fit. When done, the main gear wells are built up and installed and
then the wing halves are closed. Intakes and exhaust are added and
then attached to the fuselage. | CONSTRUCTION |
Looking over the instructions, I decided to follow them as there are a LOT of quite small parts. Indeed, the interior seems to harbor 30-40 of these things. Building it up doesn't help when SH decides that we need to have a number of the black parts (the interior is supposed to be black) printed in solid black so there is NO detail shown on just how the bits assemble. One has to look ahead at other steps where there is a line drawing to help us out. Eventually, I got all the parts in place and after adding a bit of nose weight and doing some sanding on the cockpit assembley, Trapped the cockpit within the fuselage halves. I did not get the front instrument panel assembly attached before closing the fuselage and that was a major mistake as it was a real chore to install later.
 Next I built up the engine items. In hindsight, you can
leave off pretty much all the parts aft of the front engine pieces as you
won't be able to see them unless you shove a flashlight in the exhaust and
it will help the other pieces fit better. Note also that the diameter of the
piece you do keep should be thinned down to help the wing halves fit better.
When attaching the intake pieces D5/6, ensure that they are slightly
recessed or you won't get the intake rings to fit. I didn't do any of these
and getting the wings done was a bit of a nightmare that was only 'solved'
with filler and a lot of sanding.
Next I built up the engine items. In hindsight, you can
leave off pretty much all the parts aft of the front engine pieces as you
won't be able to see them unless you shove a flashlight in the exhaust and
it will help the other pieces fit better. Note also that the diameter of the
piece you do keep should be thinned down to help the wing halves fit better.
When attaching the intake pieces D5/6, ensure that they are slightly
recessed or you won't get the intake rings to fit. I didn't do any of these
and getting the wings done was a bit of a nightmare that was only 'solved'
with filler and a lot of sanding.
Another note is that the upper wing center section opening has to be widened and made deeper so that the interior will properly fit. The fit of the four piece wheel well was not good and it was fussy to get it assembled in the first place. This is because there is no positive locator for the gear well. Once the wing was done, it, along with the horizontal stabs were attached. Then followed the usual filler/sanding routine for the wing as the forward attachment area was quite poor. Next, the canopy was masked using Special Mask 72031 and the canopy was attached., Fit is not good and I had to use Cemendine to help fill some of the gaps.
| COLORS & MARKINGS |
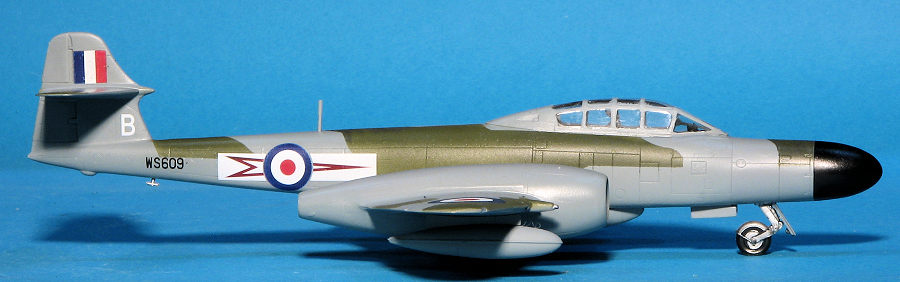
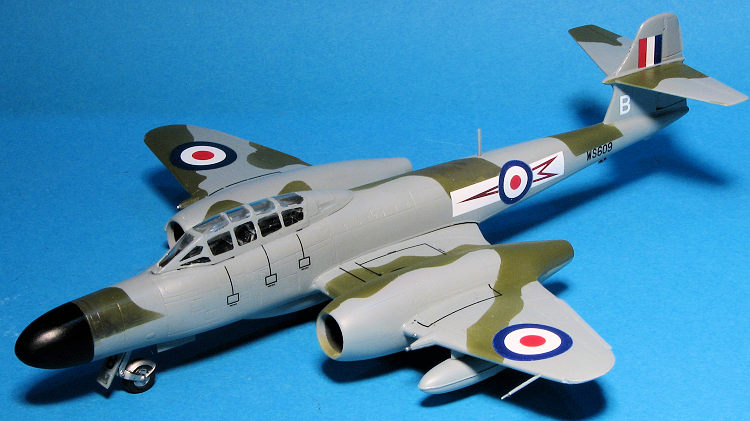
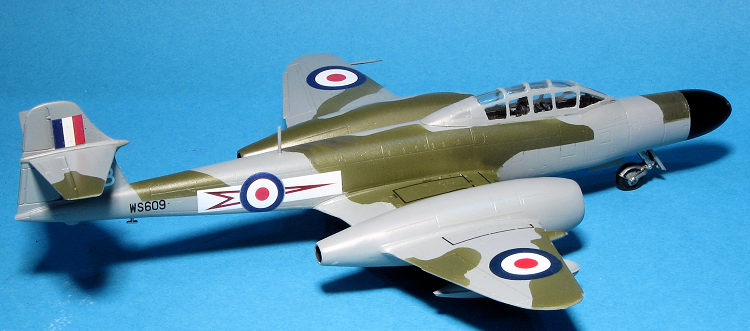
At this juncture, it was off to the paint shop. This plane was in dark green and medium sea grey. For the two shades I used Model Master enamels. I first did the grey as it covered most of the airframe. Next a massive amount of masking was done and the dark green sprayed on. When dry, the radome area was masked around and that was painted black.
 Meanwhile the landing gear was taken care of. The fit of
the main gear isn't very good. The issue is the placement of the gear wells.
When these are installed, they need to be installed onto the upper wing
sections with the gear attachment points so positioned that they are a fair
distance from the edge of the well on the lower wing. Not doing so will
result in insufficient room to attach the inner door. I'll have to remember
this for future builds.
Interestingly the gear wells were in the underside color, but the gear was
aluminum.
Meanwhile the landing gear was taken care of. The fit of
the main gear isn't very good. The issue is the placement of the gear wells.
When these are installed, they need to be installed onto the upper wing
sections with the gear attachment points so positioned that they are a fair
distance from the edge of the well on the lower wing. Not doing so will
result in insufficient room to attach the inner door. I'll have to remember
this for future builds.
Interestingly the gear wells were in the underside color, but the gear was
aluminum.
With the gear in place, the airframe was given a coat of clear gloss acrylic in preparation for decals. Generally, I found the decals to be rather brittle. I had issues with several of the insignia and other color decals chipping while moving them in place. I was able to replace the damaged insignia from an ancient Microscale sheet(72-18) that I recoated with Microscale Decal Film prior to using. The others are very thin and I had issues with them folding on the larger markings.
Once the decals were on, I sprayed on a semi-gloss clear coat as these planes came glossy from the factory and weathered a bit in service. Then a myriad of smaller bits were attached like the gear doors, gun barrels, pitot tube, upper and lower antennas and a rather poor fitting centerline fuel tank. The wing tanks were attached and the impossible-to-attach wingtip lights were replaced with Cemendine clear glue. Finally, the masking was removed and the inevitable bleed under was scraped clear best I could.
| CONCLUSIONS |
As I initially guessed, this was a fairly fiddly build. Fit was problematic is several areas, the worst being the canopy, lower fuel tank, interior, and the engine interior components. Little can be seen in the interior so next SH Meteor NF I build will be 'missing' several bits. I have to say that despite the sink marks in the Matchbox kit, it is an overall easier kit to build, though it has a very basic interior. As often happens, I'm fairly pleased with the results and know what to do better when building the next SH Meteor.
| REFERENCES |
https://en.wikipedia.org/wiki/Gloster_Meteor#Night_fighter
8 April 2022
Copyright ModelingMadness.com. All rights reserved. No reproduction in part or in whole without express permission from the editor.
If you would like your product reviewed fairly and fairly quickly, please contact the editor or see other details in the Note to Contributors.