Airfix 1/72 Jet Provost T.3
| KIT #: | A02103 |
| PRICE: | $10.00 or so |
| DECALS: | Two options |
| REVIEWER: | Scott Van Aken |
| NOTES: | 2016 tooling |
| HISTORY |
The BAC Jet Provost was a British jet-powered trainer aircraft that
was in use with the Royal Air Force (RAF) from 1955 to 1993, when it was
replaced by the Tucano. It was originally developed by Hunting Percival from
the earlier piston engine-powered Percival Provost basic trainer, and later
produced by the Bri tish Aircraft Corporation (BAC). In addition to the
multiple orders that were placed for the RAF, the Jet Provost also attained
several export deals with overseas operators, resulting in the type serving
in many air forces worldwide. The design was also further developed into a
more heavily-armed variant for ground attack mission, which was marketed as
the BAC Strikemaster.
tish Aircraft Corporation (BAC). In addition to the
multiple orders that were placed for the RAF, the Jet Provost also attained
several export deals with overseas operators, resulting in the type serving
in many air forces worldwide. The design was also further developed into a
more heavily-armed variant for ground attack mission, which was marketed as
the BAC Strikemaster.
The Jet Provost T.1 was a pre-production aircraft and ten were built for
trials. Experience from these trials resulted in the T.2, of which less than
a handful were built, again being used for trials. The first real production
aircraft was the T.3. In June 1957, an production order was placed for the
first 40 of the developed Jet Provost T3, featuring a more powerful
Armstrong Siddeley Viper jet engine, ejector seats, a redesign of the
airframe, and a shortened and strengthened version of the retractable
tricycle undercarriage. Percival built a single example, which was used
purely for structural tests throughout the development stages, giving the
designers valuable research into what could be achieved with the basic
design. On 22 June 1958, the first Jet Provost T.3 conducted its first
flight. In total, 201 T3s were delivered between 1958 and 1962.
| THE KIT |
Molding is what we have come to expect from a modern Airfix kit and sure beats the original in every way. The cockpit contains the usual control sticks with a center console. Each of the seats is made up of four parts (three if you are installing the crew figures), and has molded on seat harness. There is a decal for the instrument panel.
When trapping this in the fuselage halves, be sure to
add nose weight. Much of the nose gear well is molded to
 the bottom of the
cockpit section. Wings are a single lower piece with upper halves. Tip tanks are
molded onto the halves so modeling this one without them will require some work. Tailplanes are a single piece that slot into the rear fuselage followed by the
jet pipe and rudder.
the bottom of the
cockpit section. Wings are a single lower piece with upper halves. Tip tanks are
molded onto the halves so modeling this one without them will require some work. Tailplanes are a single piece that slot into the rear fuselage followed by the
jet pipe and rudder.
Intakes are nicely done with a section that slides into the housing part way followed by the outer piece. You can build this kit gear up if you so wish and separate gear doors are provided for this. Because the main gear would be a bit wobbly, they are molded in with the gear doors. Airfix provides two canopy pieces. One is for the closed position and the other for the open. I like that Airfix and others provide this feature.
Instructions are 3D style and as usual only provide Humbrol paint numbers during construction. When doing the external schemes, names are also provided. Two schemes are given. One is with 2FTS in 1967. This is silver with lots of da-glo and though you cannot tell from the sheet scan, the da-glo is superbly done. The other is in a scheme some surviving aircraft wore before replacement in red, white, and light aircraft grey. This scheme being with 1FTS in 1984. The black nose areas will need to be painted regardless of the scheme you choose. There are aftermarket sheets out there if you so wish to go that route.
| CONSTRUCTION |
I built one of the original T.3 kits back many years ago. I recall a typical Airfix kit of the time, with dodgy fit and the need for filler just about everywhere. Sprint ahead to the 21st century and the difference is like day and night.
I started this one by actually following the instructions. At least to a
point. I installed all of the interior bits save the inside of the seats and the
instrument panel. This was then given a coat of matte black as was the inside of
the fuselage. This was then drybrushed with white so you could see there was
som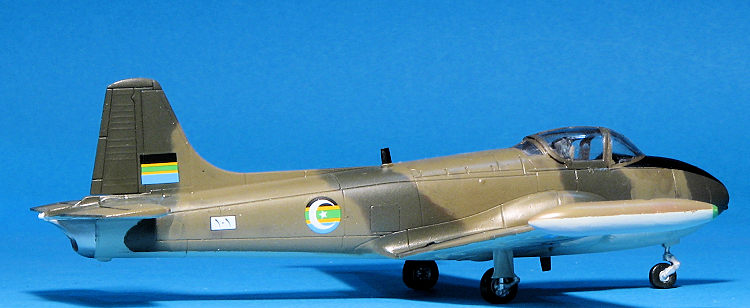 ething in there. The instrument panel was painted ocean grey and when dry,
the very nice instrument panel decal was attached. I also painted the seat
inserts using various Vallejo shades as I did not have the specific Humbrol
paints.
ething in there. The instrument panel was painted ocean grey and when dry,
the very nice instrument panel decal was attached. I also painted the seat
inserts using various Vallejo shades as I did not have the specific Humbrol
paints.
Meanwhile, I assembled the wings. Let me take this opportunity to let you know that the fit on everything is excellent. For me, nothing is filler free, but the only places on the kit I used any was the lower wing/fuselage attachment areas and the underside of the intakes. More on that in a bit. One does have to be somewhat cautious when sanding as the softish plastic will grind away very easily.
Back at the cockpit, it was installed in the fuselage after attaching the instrument panel. I cut up various pieces of lead to fill in the nose in order to get at least 2.5 grams. With that in place, I closed the fuselage halves. Then the wings were attached. The fit is excellent save for the areas mentioned earlier and that was simply because I could not keep the areas flush with the surrounding fuselage as the glue dried. The tailplanes slotted in place well and the gaps there were dealt with followed by attaching the exhaust. There is no final compressor stage or blocking plate, but once you get everything together, you can see nothing through the fuselage. I like that the rudder is separate and that fits well.
 Back near the front, the intakes were installed. I did have to do a bit of
trimming at the lower opening so the outer intake piece would fit flush. I also
noticed that this outer piece is a tad shorter in the vertical than the space it
has to fill. I chose to have the upper section of this properly aligned and used
filler and sanding to smooth out the lower part. I am sure that had I been able
to get the forward lower wing piece more flush with the fuselage, I'd not have
the step there. Once that was cleaned up, I balanced the model on the points of
a pair of scissors to ensure I had enough nose weight and then attached the nose
gear well piece. The seat interiors and upper sections of the seat were then
glued on.
Back near the front, the intakes were installed. I did have to do a bit of
trimming at the lower opening so the outer intake piece would fit flush. I also
noticed that this outer piece is a tad shorter in the vertical than the space it
has to fill. I chose to have the upper section of this properly aligned and used
filler and sanding to smooth out the lower part. I am sure that had I been able
to get the forward lower wing piece more flush with the fuselage, I'd not have
the step there. Once that was cleaned up, I balanced the model on the points of
a pair of scissors to ensure I had enough nose weight and then attached the nose
gear well piece. The seat interiors and upper sections of the seat were then
glued on.
I then attached the clear bits. As I was going to model this with the canopy closed, I used the narrower of the two canopy pieces. I found that the canopy did not fit well between the windscreen and rear section. I had to liberally glue the joins and press down on it to get a decent fit and there are still some gaps.
| COLORS & MARKINGS |
At this point, it seemed like a good time to consider some painting. First I
painted the wheels and struts with Alclad II aluminum. Then I took a look
through a recent Xtradecal sheet for the scheme I wanted. Nothing wrong with the
ones in the kit, but I w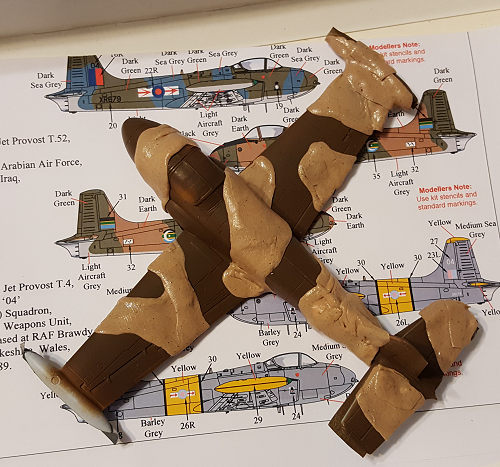 anted something different. The aftermarket sheet has a
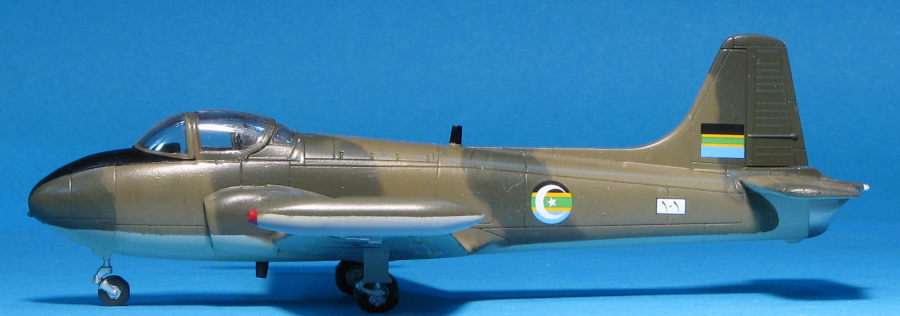
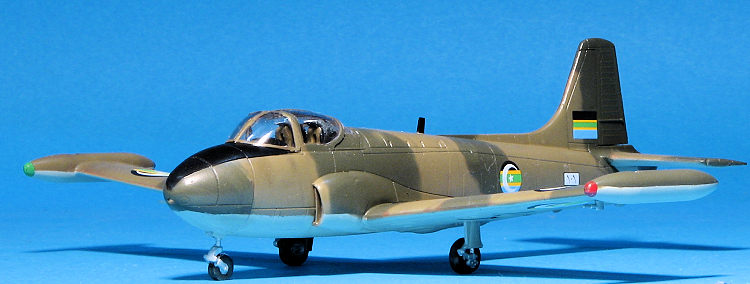
bunch of really pleasing options, but for this one, I keyed on the South Arabian
one with a dark green/dark earth/light aircraft grey scheme.
anted something different. The aftermarket sheet has a
bunch of really pleasing options, but for this one, I keyed on the South Arabian
one with a dark green/dark earth/light aircraft grey scheme.
I started as I usually do, with the underside, for which I used Testors ADC Grey (now marketed as light aircraft grey). I then masked that when dry and painted the upper surface in some already mixed dark earth. When that was dry, I masked it using Silly Putty and sprayed on some dark green. Removing the putty, I saw that the dark earth was far too dark. I then used some Xtracolor dark earth, which was closer to what the instructions showed and hand sprayed that on, being too lazy to repeat the application of the Silly Putty. The nose was masked and the black area painted on using X-18 from the Tamiya range. It was then gloss coated with what currently passes for Future.
I'm not sure just how many of the stencil decals needed to be applied to this markings option so I only used the wing walk areas from the kit decals. These went on with no problems, but they took an age to come free from the backing. Not so the Xtradecals. These are crisply done and in register. The panel lines in the instructions do not match what is provided on the kit, but they are close enough to help with placement. I used Microsol to help them conform a bit better to the panel lines.
Once those were on, there wasn't much left to add. Landing gear and wheels along with some radio antennas. One of my nose gear pieces was short shot so the fork doesn't reach the rest of the leg. I then put on a semi-matte clear coat. A bit of painting for the antennas and removal of the masking finished things up.
| CONCLUSIONS |
 This an excellent little kit. Fit is superb for the most part and it
has a lot of interesting optional markings if one goes aftermarket. I'm not sure
how well this has been accepted in the US, but it deserves more than just
sitting on the shelves. I am sure that Airfix will be doing a T.5/Strikemaster
as they can use the extant CAD work for most of the kit. Meanwhile, treat
yourself to something neat and pick this one up when you get the opportunity.
This an excellent little kit. Fit is superb for the most part and it
has a lot of interesting optional markings if one goes aftermarket. I'm not sure
how well this has been accepted in the US, but it deserves more than just
sitting on the shelves. I am sure that Airfix will be doing a T.5/Strikemaster
as they can use the extant CAD work for most of the kit. Meanwhile, treat
yourself to something neat and pick this one up when you get the opportunity.
| REFERENCES |
24 March 2017
Copyright ModelingMadness.com. All rights reserved.
If you would like your product reviewed fairly and fairly quickly, please contact the editor or see other details in the Note to Contributors.
Back to the Main Page Back to the Previews Index Page Back to the Review Index Page