| KIT #: | 03908 |
| PRICE: | £ |
| DECALS: | Two options |
| REVIEWER: | Scott Van Aken |
| NOTES: |
2018 release |
| HISTORY |
The Hawker Hunter is a transonic British jet-powered fighter aircraft that was developed by Hawker Aircraft for the Royal Air Force (RAF) during the late 1940s and early 1950s. It was designed to take advantage of the newly developed Rolls-Royce Avon turbojet engine and the swept wing, and was the first jet-powered aircraft produced by Hawker to be procured by the RAF. On 7 September 1953, the modified first prototype broke the world air speed record for aircraft, achieving a speed of 727.63 mph (1,171.01 km/h; 632.29 kn).
The single-seat Hunter was introduced to service in 1954 as a
maneuverable day interceptor aircraft, quickly succeeding first-generation jet
fighters in RAF service such as the Gloster Meteor and the de Havilland Venom.
The all-weather/night fighter role was filled by the Gloster Javelin.
Successively improved variants of the type were produced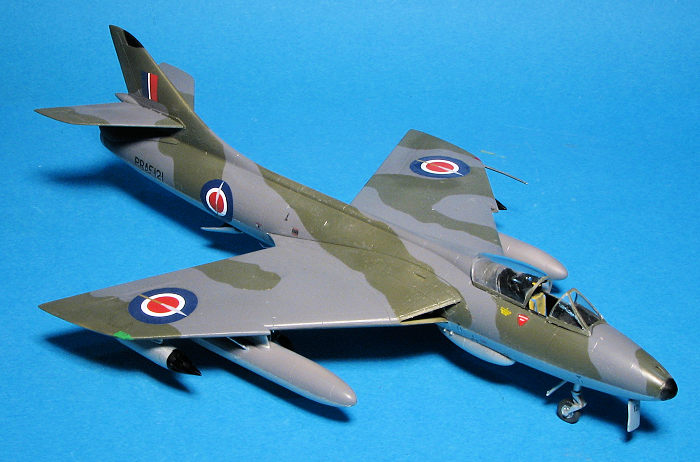 , adopting increasingly
more capable engine models and expanding its fuel capacity amongst other
modifications being implemented. Hunters were also used by two RAF display
teams: the "Black Arrows", who on one occasion looped a record-breaking 22
Hunters in formation, and later the "Blue Diamonds", who flew 16 aircraft. The
Hunter was also widely exported, serving with a total of 21 overseas air forces.
, adopting increasingly
more capable engine models and expanding its fuel capacity amongst other
modifications being implemented. Hunters were also used by two RAF display
teams: the "Black Arrows", who on one occasion looped a record-breaking 22
Hunters in formation, and later the "Blue Diamonds", who flew 16 aircraft. The
Hunter was also widely exported, serving with a total of 21 overseas air forces.
During the 1960s, following the introduction of the supersonic English Electric Lightning in the interceptor role, the Hunter transitioned to being operated as a fighter-bomber and for aerial reconnaissance missions, using dedicated variants for these purposes. Two-seat variants remained in use for training and secondary roles with the RAF and the Royal Navy until the early 1990s. Sixty years after its original introduction it was still in active service, being operated by the Lebanese Air Force until 2014.
The Hunter saw combat service in a range of conflicts with several operators, including the Suez Crisis, the Aden Emergency, the Sino-Indian War, the Indo-Pakistani War of 1965, the Indo-Pakistani War of 1971, the Rhodesian Bush War, the Second Congo War, the Six-Day War, the War of Attrition and the Yom Kippur War. Overall, 1,972 Hunters were manufactured by Hawker Aircraft and its successor, Hawker Siddeley, as well as being produced under licence overseas. In British service, the Hunter was replaced in its principal roles by the Lightning, the Hawker Siddeley Harrier and the McDonnell Douglas F-4 Phantom II.
As a point of interest, all Hunter FGA.9s were rebuilds of earlier F.6 airframes.
| THE KIT |
Previous kits in this scale by Frog, Matchbox and Airfix were fine for their times, but had been overtaken by technology. Today's modelers really want more detail and fidelity to form than what we wanted in the past. All the previous kits were deficient in some way or another in the fidelity to form part of things and this one seems to have corrected all of those. The earlier release of the Mk.6 sold very well indeed, so it was not surprising that a year or so later, the FGA.9 was released. After a very long absence, this variant is now back on the market.
You get pretty much the same kit as the F.6, which was released in 2005, however, there is are additional parts compared to the F.6 and some that were included in the initial boxing of the FGA.9 that are not in this kit. One thing the F.6 kit had that this does not are Sidewinders and their rails. I guess the RAF FGA.9s did not have this system installed. Everything else is about the same.
 Some parts have flash, but not as bad as the initial boxing. There are no sink
areas and no issues with ejector pin marks. The kit is quite modular with
separate exhaust and outer forward wings to handle the FGA.9 bits. The nose and
gun area are also modular as if they were thinking of the recon version, though
one has not been released. On the outer upper wings are some antennas with
questions beside them. I guess you will need to find a photo to see if these
were used or not.
Some parts have flash, but not as bad as the initial boxing. There are no sink
areas and no issues with ejector pin marks. The kit is quite modular with
separate exhaust and outer forward wings to handle the FGA.9 bits. The nose and
gun area are also modular as if they were thinking of the recon version, though
one has not been released. On the outer upper wings are some antennas with
questions beside them. I guess you will need to find a photo to see if these
were used or not.
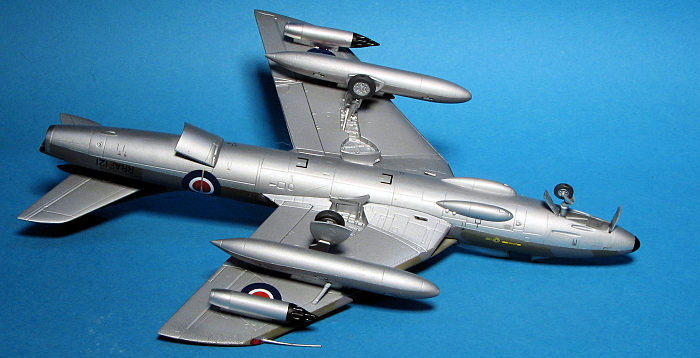
Cockpit is fairly well done and decals are supplied for instruments. Canopy can be posed open or closed, same with the speed brake and the flaps. Thanks to this variant's ability to carry larger fuel tanks, the builder will need to cut sections from them for clearance. For things under wings you have 230 gallon tanks inboard and outboard either 100 gallon tanks or rocket pods. Landing gear is well done and you can build this gear up though a stand will need to be obtained from some other source.
Instructions are well done and provide only Revell paint references. One option is as shown on the box art in green and dark grey with light grey undersides. This light grey will need to be mixed if using Revell paints. The plane is from 54 squadron in 1968. The other is from 1963 and 8 Squadron. This has a silver underside as that was standard for years so be sure to check your references regarding underside colors. Decals are typical of Revell and are fairly matte. Revell also did not bother cutting the underwing serials for the gear down option so that will be a pain to get right. They also supply all the stencils you will need. If you don't like the options, you can use one of the myriad aftermarket sheets to take care of this.
| CONSTRUCTION |
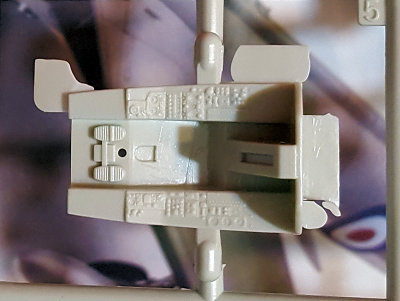 As I mentioned in the
kit description, this one suffers a bit from flash. It also has issues with
sink areas around some of the alignment pins/sockets. The flash was worse on
the cockpit tub than any other part of the kit. Perversely (for me), I
actually started with the cockpit. I initially painted all the cockpit bits
with Tamiya tire black along with the inner fuselage. The four piece seat
was next with the control column then glued in place. You really need to
attach the seat before the control column or you might break the latter
during installation. Decals are provided for the instrument panel and side
consoles so I used them. They conformed nicely after an application of
Mr.Mark Softer.
As I mentioned in the
kit description, this one suffers a bit from flash. It also has issues with
sink areas around some of the alignment pins/sockets. The flash was worse on
the cockpit tub than any other part of the kit. Perversely (for me), I
actually started with the cockpit. I initially painted all the cockpit bits
with Tamiya tire black along with the inner fuselage. The four piece seat
was next with the control column then glued in place. You really need to
attach the seat before the control column or you might break the latter
during installation. Decals are provided for the instrument panel and side
consoles so I used them. They conformed nicely after an application of
Mr.Mark Softer. I then glued on the tail planes, but later had to remove them when it came time to apply the camo masks. Fortunately, when one doesn't use a lot of glue, it is easier to remove things like this though they didn't just fall off. I then attached the clear bits and then masked them. Fit on these isn't the greatest.
As I was going to paint the underside silver, I went ahead and glued the main and nose gear in place. This was followed by the main gear doors. Since the kit also has a wheels up option, some of the gear doors needed to be cut apart.
| COLORS and MARKINGS |
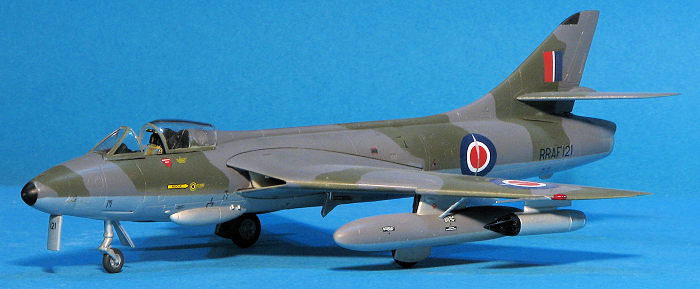
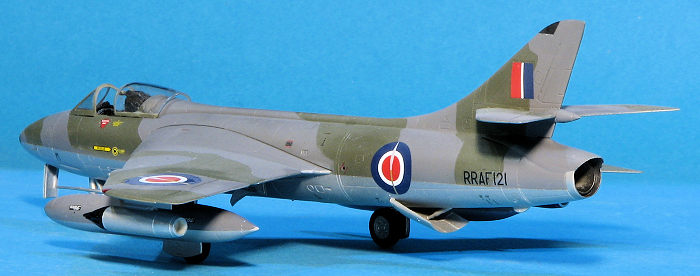
 Now it was time for some paint. I went with the scheme that was dark
green/dark sea grey upper with silver undersides. For this kit, I used
Aeromasks for the hard edge camouflage. This requires the dark green to be
painted first. Before that, I primed the kit with Tamiya grey primer then
used Hataka dark green lacquer. Giving it a couple of days to cure, I
applied the masks. These stick very well and I had no issues with paint
bleeding under the masks. The dark sea grey was next, also from Hataka. Then
I removed the masks. These had to be very slowly removed or they left
residue. The little residue that was there was easily picked off using
standard tape. The masking also pulled up most of the Tamiya tape I used on
the clear bits.
Now it was time for some paint. I went with the scheme that was dark
green/dark sea grey upper with silver undersides. For this kit, I used
Aeromasks for the hard edge camouflage. This requires the dark green to be
painted first. Before that, I primed the kit with Tamiya grey primer then
used Hataka dark green lacquer. Giving it a couple of days to cure, I
applied the masks. These stick very well and I had no issues with paint
bleeding under the masks. The dark sea grey was next, also from Hataka. Then
I removed the masks. These had to be very slowly removed or they left
residue. The little residue that was there was easily picked off using
standard tape. The masking also pulled up most of the Tamiya tape I used on
the clear bits.
With that done, the was some more masking and the underside was painted with Tamiya AS-12 from a rattle can. I find this duplicates silver lacquer better that just about anything else. The airframe was then given a clear gloss and the wing pylons attached. The attachment points for the pylons are quite small and can be easily broken away so care needs to be taken when attaching these items. The nose and fin radomes along with the extreme tail sections had their surrounds masked and those were then painted.
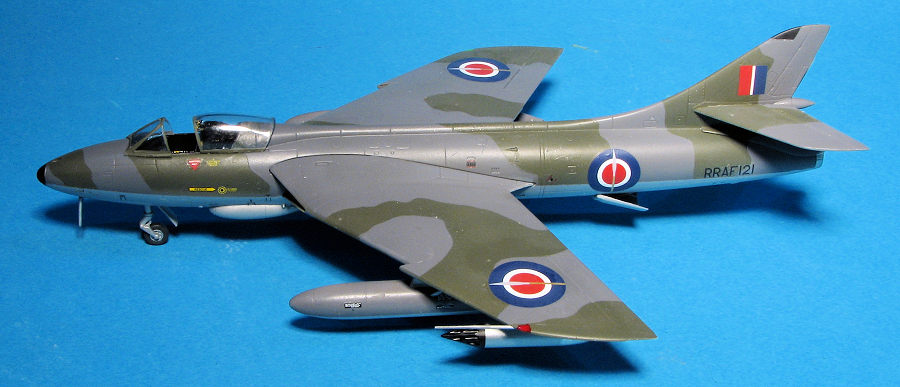
 Next were the
decals. I had decided on a Royal Rhodesian Air Force plane from Xtradecal sheet
72-063. This sheet has several great Hunter schemes so choosing one was
difficult. The sheet offers no stencils so all those had to come from the kit
decals. Once those were in place, the airframe was given a semi-matt clear coat
and the rest of the small parts (wheels, front gear doors, drop tanks and rocket
pods) were added. The canopy was popped off and re-attached in the open
position.
Next were the
decals. I had decided on a Royal Rhodesian Air Force plane from Xtradecal sheet
72-063. This sheet has several great Hunter schemes so choosing one was
difficult. The sheet offers no stencils so all those had to come from the kit
decals. Once those were in place, the airframe was given a semi-matt clear coat
and the rest of the small parts (wheels, front gear doors, drop tanks and rocket
pods) were added. The canopy was popped off and re-attached in the open
position.
| CONCLUSIONS |
| REFERENCES |
https://en.wikipedia.org/wiki/Hawker_Hunter
30 June 2023
Copyright ModelingMadness.com. All rights reserved. No reproduction in part or in whole without express permission from the editor.
If you would like your product reviewed fairly and fairly quickly, please contact the editor or see other details in the Note to Contributors.
Back to the Main Page Back to the Review Index Page Back to the Previews Index Page