| KIT #: | 1429 |
| PRICE: | $15.45 |
| DECALS: | One option |
| REVIEWER: | Scott Van Aken |
| NOTES: | Treat it as a short run. |
| HISTORY |
 Rather than go into the history of the Canberra (of which most are aware, here is a bit on the B(I).8 derivative. It was a third-generation Canberra derived from B.6 as an interdictor. It had a teardrop canopy shifted to the port site of the fuselage for the pilot, with navigator inside the fuselage on starboard. There were provisions for a ventral pack with 4 x 20 mm Hispano cannon (which most aircraft carried), and one external hardpoint under each wing for up to 1,000 lb (454 kg) of bombs or unguided rockets. The aircraft did have the LABS (Low-Altitude Bombing System) for delivery of nuclear bombs if that option was required. The first flight of this version was 23 July 1954. 72 were built including 17 for export. The very similar B(I).58 was a tropicalized version for the Indian Air Force of which 71 were constructed for India.
| THE KIT |
Typical of AModel kits, this one is molded in a light grey plastic. The sprue lines are rather thick, but the gates themselves are pretty small. They do tend to blend into the part so one will need to sand these sections once the bit is removed.
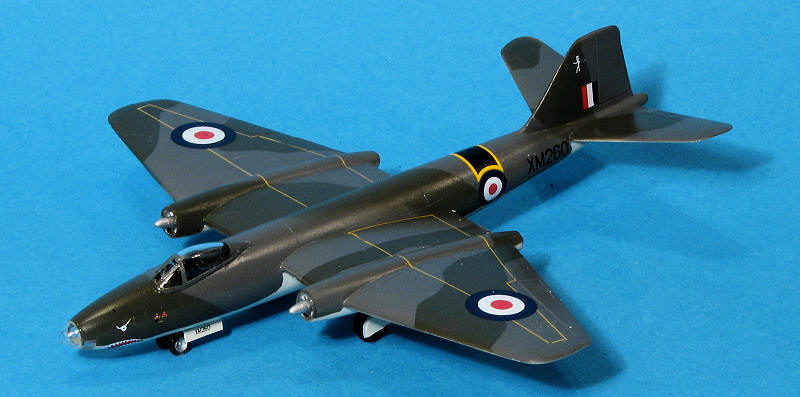
 For those who are looking at the box art and wondering if this isn't a PR.9, it isn't. I don't know why the art person has done that, but for the Canberra kit's I've seen from AModel, he's botched the box art on them all. The kit has the proper gun pack, the proper wings with tanks and the nose on this one is clear plastic to take care of the various windows needed for the bombardier/navigator. The interior consists of two seat shapes, and in this scale, that is adequate. The wings and center fuselage are single constructs, with the nose and tail section butting in place. These butt joins may well be the greatest area for error, especially on this aircraft where the canopy is off to one side and not down the centerline. The kit will need at least 10 grams of nose weight so don't forget to add it when constructing the interior. Molding is fairly good, though on my sample, both lower wing tank pieces were quite lumpy with sink areas. The landing gear and doors are also adequate for this scale. Test fitting shows that the lower wing section will need to be sanded to be flush with the upper when glued together.
| CONSTRUCTION |
This kit is modular so fits very well into the way I normally build kit. With one this simple, the instructions are more of a guide than anything. Simple, however, does not always mean easy and I have several unfinished kits to attest to that axiom.
 One thing I have learned from past Amodel kits is that the wings are invariably too thick. Sanding will be needed to get a good mating surface. The other option is to apply a lot of filler to match things up as they should. I find that invariably, I use both as often the fit requires it. I should point out that in no case during this build was there a seam that did not require filler.
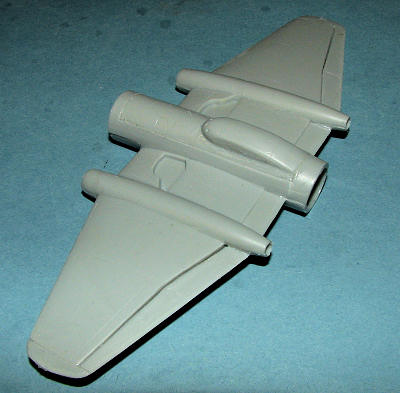
My subassemblies consisted of the wings and the tail section. The upper and lower wing halves include the center fuselage section. This gets the gun pack installed. It seems a bit on the 'square' side to me so you may wish to round off the corners a bit. The aircraft didn't always have this fitted, but it was the more distinctive part of the interdictor package (that is what the 'I' in the type designation means) so I used it.
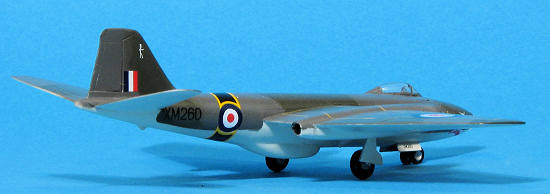
With the wings and the tail section cleaned up, they were joined. Don't try to line up the fore and aft panel lines as it will not match up. Simply get the tail properly adjusted with normal glue, let it dry and then use whatever filler/super glue you want to take care of the gaps.
 The cockpit section is many pieces, half of them clear plastic. I glued together the two injected pieces and glued in the seat. Behind the seat, I put a large weight. Then I glued this partial assembly to the rest of the fuselage, again making sure all was straight. Be wary of trying to line up the canopy opening as it is offset on this version. Then put in more weight in the nose to keep it from tail sitting. I usually put in weight, then balance the airframe with the points of scissors placed in the landing gear attachment holes. This will tell you if you have enough. You'll fill most of the rest of the nose with weight. Paint the interior and weights matte black.
 While all this was drying, I turned my attention to the tail planes. These have small nubs on them that are to fit into even smaller depressions on the tail. To be sure they fit, I drilled out the depressions on the tail to make proper holes. Test fitting showed that the nubs on the tail plane were closer to each other than the depressions on the tail so I made the holes oval until they properly fit. After gluing one in place, I then noticed that they were at a distinct angle when they should be level with the plane of flight. The end result was that I cut off the forward nub and just slathered the area with glue while leveling out the tail planes. Don't forget the rather distinct dihedral. There is no guide to show the proper a
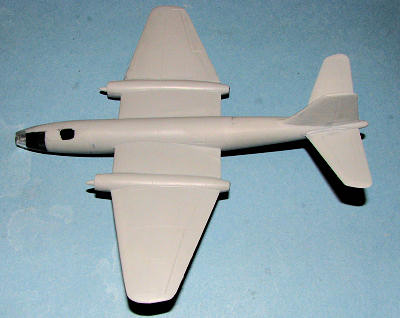 ngle so you need to eyeball it. Of course, this new angle left part of the holes I had drilled in the front exposed so filler was needed (but I mentioned that need at the start, didn't I?).
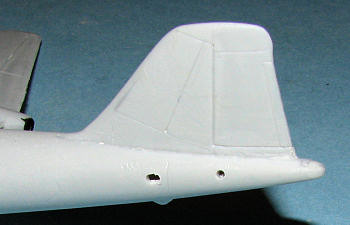
Back at the nose, the clear bits were glued in place and with the usual filler, sanded smooth. I masked off the two windows in hopes of saving them from being scratched and was pretty successful. The nose cap won't be glued on until the very end. I then masked off the main canopy and attached it with clear paint. To be honest, it looks like it sits too far to one side, but that is unavoidable if one wants to cover the cockpit hole. Be sure to paint under it with a black. I then tried to install the engine inlet pieces. These are far too large and as I trimmed them down and test fit them, I managed to break open the seams. SIGH! Nothing to do but continue to sand down the pieces until they smoothly fit, then fix the reopened seams. To my eyes, the intake bullets seem too long, but I'll let that pass as it isn't horrendous. With all the clear bits masked and the airframe pretty well done, it was to the paint shop.
| COLORS & MARKINGS |
There was some discussion as to the correct shades to paint this as the instructions call for a Slate Grey, when consensus has it that it should be Dark Sea Grey. I first painted the underside with Light Aircraft Grey using a Testors enamel. I should have painted the whole airframe with this as a primer as it would have saved much ang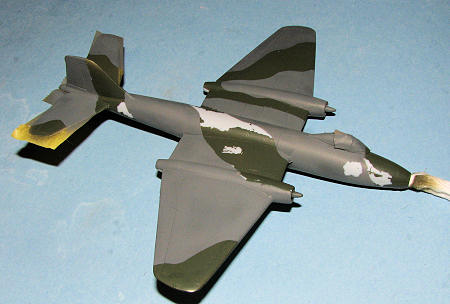 st and additional work later. For the upper colors, I used Agama acrylics, paint I've used before with no problems. Not the case here as it didn't want to stick quite that well. Having sanded every square millimeter of the kit, I'd have thought a primer was not needed, but such was not the case as I found areas quick to peel up when I removed masking tape. Mostly the Green as you can see. Possibly mixed too thin, but whatever the case, it requires several sessions of repainting and masking to get it all correct. A plus side is that it allowed me to add in a section of green in the camo that I missed first time around. In the end, I brush painted some areas. Thankfully, the Agama paint matched as well with a brush as when airbrushed. I then sealed all this in and provided a semi-gloss finish with Testors Metallizer Sealer.
Returning to the bench, I painted the wheel wells with Citadel silver and glued in the gear legs. The wheels were then cleaned up, painted and installed. As luck would have it, the nose gear 'axles' were not aligned and there was a considerable step. This will be sanded down to where they both touch when I'm done.
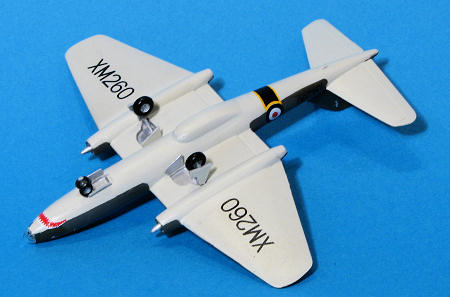
The decals provided are for a nice 16 Squadron plane with a shark mouth. It would have been nice to have more than one option, but there it is. The decals are nicely done and caused no real problems. They are fairly opaque so there wasn't an issue with the underside colors bleeding through the white areas. They are VERY thin so require care not to tear them or have them fold over. I had one wing walk area stripe fold over and I never got it straight. Some spare would have been nice, but wasn't supplied. What was supplied were two sets of fin flashes. I used Microsol on them and it worked perfectly.
| FINAL CONSTRUCTION |
 The last pieces to assemble included the gear doors. These were easily glued in place. I chose not to use the tip tanks on this build for two reasons. One is that the planes often flew without them and they look better with clean wings. Secondly, on one of the kit lower tank halves, there were major sink areas; several of them. I just didn't feel like dealing with it when I didn't have to. I then gave the model a coat or two of Testors Metallizer Sealer to seal in the decals and give the plane the overall shine that was typical of the type. These camo colors were gloss and not matte. The last thing was to remove the masking at glue on the clear nose cap. This was done using clear gloss paint, in this case Vallejo.
| CONCLUSIONS |
Though this one took a bit longer than I'd anticipated due to its short run, low pressure molding and the need to take care of all the seam work, the end result was very much worth the work. Amodel kits are not slap together kits, but with care and the use of a few modeling skills, they are well within the abilities of most modelers. 1/144 enthusiasts will be especially pleased with it and I can recommend it to you.
Late note: I just noticed that the engine intake bullets are not properly lined up. Funny, they looked OK before I looked at the photos.....
| REFERENCES |
October 2009
Copyright ModelingMadness.com. All rights reserved. If you would like your product reviewed fairly and fairly quickly, please contact the editor or see other details in the Note to Contributors.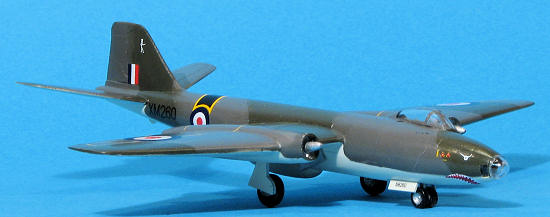 http://en.wikipedia.org