| KIT #: | 7202 |
| PRICE: | $8.95 SRP |
| DECALS: | Three options |
| REVIEWER: | Scott Van Aken |
| NOTES: | Short run kit |
| HISTORY |
The Yakovlev design bureau began work on an advanced
trainer based on the successful Yak-3 fighter in mid 1944, although the trainer
was of low priority owing to the ongoing Second World War. The first prototype
of the new trainer, designated Yak-UTI or Yak-3UTI flew in late 1945. It was
based on the radial-powered Yak-3U, but with the new Shvetsov ASh-21
seven-cylinder radial replacing the ASh-82 of the Yak-3U. It used the same
all-metal wings as the Yak-3U, with a fuselage of mixed metal and wood
 construction. Pilot and observer sat in tandem under a long canopy with separate
sliding hoods. A single synchronised UBS 12.7 mm machine gun and wing racks for
two 100 kg (220 lb) bombs comprised the aircraft's armament.
construction. Pilot and observer sat in tandem under a long canopy with separate
sliding hoods. A single synchronised UBS 12.7 mm machine gun and wing racks for
two 100 kg (220 lb) bombs comprised the aircraft's armament.
An improved prototype flew in 1946, with revised cockpits and a modified engine installation with the engine mounted on shock absorbing mounts. This aircraft successfully passed state testing in October 1946, with production beginning at factories in Saratov and Leningrad in 1947.
Production Yak-11s were heavier than the prototypes, with later batches fitted with non-retractable tail wheels and revised propellers. A 7.62 mm ShKAS machine gun was sometimes fitted instead of the UBS, while some were fitted with rear-view periscopes above the windscreen. In total, Soviet production amounted to 3,859 aircraft between 1947 and 1955. with a further 707 licence-built by Let in Czechoslovakia as the C-11.
The Yak-11 set five world-class records. It was also used by over 20 nations. Many are warbirds, flying in spurious fighter colors, while some have been converted to inline engine Yaks and yet others converted to air racers.
| THE KIT |
There are many of us who just like trainers and as trainers go, the Yal-11 is a nice looking aircraft. Since it was developed from the Yak-3, it has a simple and sleek look to it. I guess you could equate it to the T-6 in terms of aircraft that just look right. It has much in common with the T-6 including a radial engine, low wing, long greenhouse, and it is a tail dragger.
Aeroteam is a company that produced a few short run
kit and may still be around for all I know. This is typical of the genre in that
there is a single sprue with fine engraved detailing and with plastic that is
very shiny on the engraved side. The inside of large
 parts has ejector towers
that will have to be removed. Unlike many short run kits, this one has an
injected canopy, a big plus for those of us who are hopeless when it comes to vac canopies.
parts has ejector towers
that will have to be removed. Unlike many short run kits, this one has an
injected canopy, a big plus for those of us who are hopeless when it comes to vac canopies.
This one comes with a flat cockpit floor on which the two control sticks and two seats are placed. There are a pair of inner framework pieces with consoles to fit onto the cockpit floor. Rudder pedals are small triangular nubs protruding from the floor. A pair of instrument panels with raised detail fit on the fuselage sides. There are different for the front and rear.
The wing consists of a full span lower half onto which the upper wings attach. Single piece tail planes butt join to the fuselage. The kit can be built with the gear up if one wishes. The main gear doors will need to be cut to represent lowered gear. Wheels are fair and are two halves that are cemented together. The engine cowling, is simply cemented onto the front of the fuselage. The Yak-11 had a fan that pretty well hid any engine detail. A separate prop and spinner butt join to the front of the cowling as there is no prop shaft. Small antennas are provided as is a pitot tube. These are placed depending on the markings version you are doing. The canopy is thick and a single piece.
Instructions have five major construction steps with a few detail drawings for things like gear door arrangement. There are markings for three aircraft. One is an Egyptian plane in overall grey-green that looks to be similar to RLM 02 and seems to be the standard color of these planes as a google search shows those few period color photos of this plane in this shade. It has a yellow rear fuselage band and spinner. This plane was captured by the Israelis during the 1967 war and later sold to the civilian market. The other two are Czech. One is an Air Force plane from the mid 1950s in the standard shade. The other is a civil variant in two shades of blue grey over light grey that was flown by an aero club post 1964. Decals are by Propagteam so will be quite thin.
| CONSTRUCTION |
 lower wing. Fit
is actually quite good and while the panel lines do not line up, they are
close. The interior had the seats removed from the sprues, cleaned up and
installed. The kit shows where the small square bases are to fit, but you
need to move them back a bit from that or the control sticks will not fit
into their receptacles.
lower wing. Fit
is actually quite good and while the panel lines do not line up, they are
close. The interior had the seats removed from the sprues, cleaned up and
installed. The kit shows where the small square bases are to fit, but you
need to move them back a bit from that or the control sticks will not fit
into their receptacles.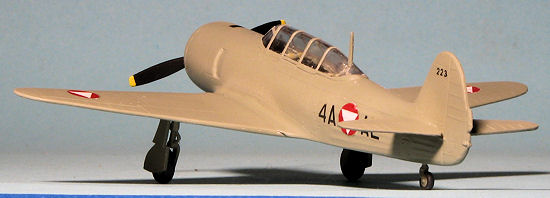 This is rather thick and has a very large sprue
attachment join on the back so care is needed to remove it. I also found
that the indentations along the edges were far too shallow to match the
joining surface. One cannot really make them match or the frame would
disappear, so I deepened them somewhat to where the gaps were not
horrendous. Next was masking, which was a cinch as the frame lines are
prominent and so easy to see. Not like Matchbox or old Airfix kits, but not
'flat' like on a Hasegawa kit. This was then glued on at the few places it
touched and the gaps filled with clear paint. I used Vallejo clear gloss for
this.
This is rather thick and has a very large sprue
attachment join on the back so care is needed to remove it. I also found
that the indentations along the edges were far too shallow to match the
joining surface. One cannot really make them match or the frame would
disappear, so I deepened them somewhat to where the gaps were not
horrendous. Next was masking, which was a cinch as the frame lines are
prominent and so easy to see. Not like Matchbox or old Airfix kits, but not
'flat' like on a Hasegawa kit. This was then glued on at the few places it
touched and the gaps filled with clear paint. I used Vallejo clear gloss for
this. | COLORS & MARKINGS |
Then it was time to paint. I was not sure just what
scheme I wanted to do. Those offered by the kit decals were nice, but I wanted
something a tad different. I did a google search that turned up zillions of war
bird and racer photos, but in amongst them were a pair of some Austrian Yak-11s.
The reference book I had also showed a nice photo of a pair of Austrian planes.
As the Yak-11 was 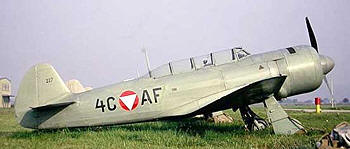 the first equipment of the new Austrian Air Force in 1955, I
thought it would be a good choice. Judging from the period color photos of these
planes I found on the web, they were in an overall green-grey. As they were
probably Avia C.11s, it would make sense that they would be RLM 02 as the Czechs
still had a large stock of this paint and used it on many aircraft. Besides, the
color called out in the kit instructions for the Czech and Egyptian planes was a
green-grey.
the first equipment of the new Austrian Air Force in 1955, I
thought it would be a good choice. Judging from the period color photos of these
planes I found on the web, they were in an overall green-grey. As they were
probably Avia C.11s, it would make sense that they would be RLM 02 as the Czechs
still had a large stock of this paint and used it on many aircraft. Besides, the
color called out in the kit instructions for the Czech and Egyptian planes was a
green-grey.
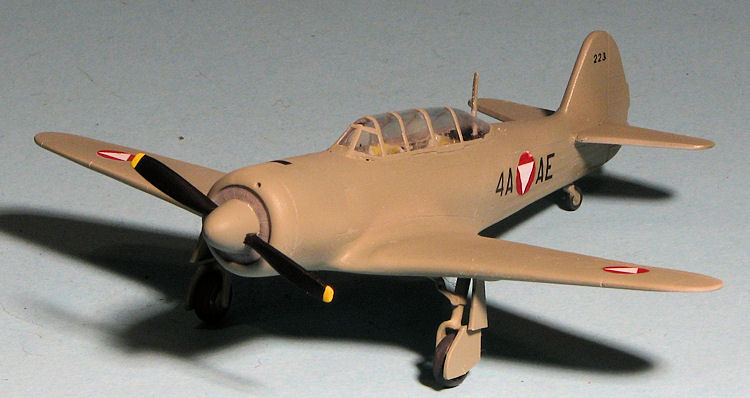
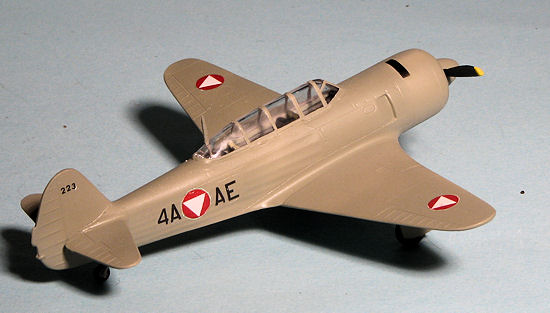
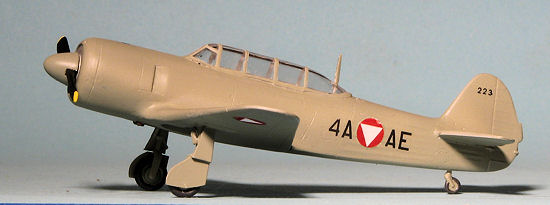
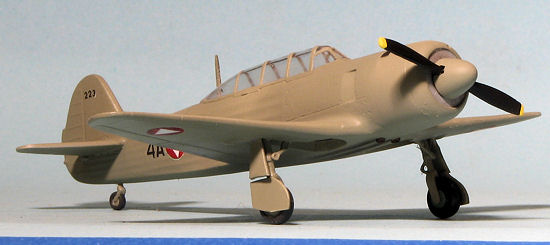
So out came the Model Master RLM 02 and everything was painted in that color. I also did the gear, spinner, and the wheels in this shade, though these later pieces could have been aluminum. The prop is impossibly thick and was suffering from mold mis-alignment so was sanded down and painted black. A note on wheels. I have seen photos of museum planes that have these in a variety of colors from green to aluminum to black to green grey, so it seems there is no set pattern for this. The other Austrian planes in the photos I used had the wheels covered with tarps with only this one having them visible.
 With the painting done, the airframe was given a
gloss coat in preparation for the decals. Thanks to a paucity of Austrian
roundels in the small size I needed, I had no choice but to make some. These
turned out OK, but I would have rather had properly done silk-screened
roundels. The letters and numbers came from Modeldecal sheets and while a
tad undersized with the number 4 in the 'wrong' font, it looks fairly good
so no real complaints there. It isn't like this is a Nationals entry model
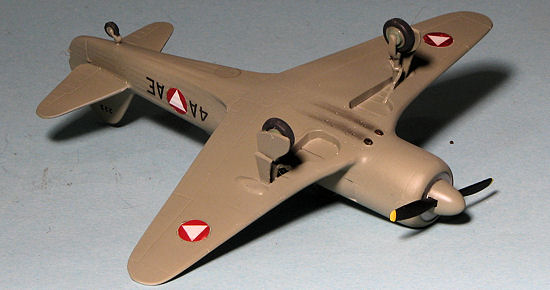
anyway. I should point out that the planes were initially coded 4A as shown
in the photos in the reference book. The 4C coded plane above is shown near
the end of their operational career. Looking at the completed model and the
photo, it seems that RLM 02 is a bit too brown, but perhaps that is just the
result of the light.
With the painting done, the airframe was given a
gloss coat in preparation for the decals. Thanks to a paucity of Austrian
roundels in the small size I needed, I had no choice but to make some. These
turned out OK, but I would have rather had properly done silk-screened
roundels. The letters and numbers came from Modeldecal sheets and while a
tad undersized with the number 4 in the 'wrong' font, it looks fairly good
so no real complaints there. It isn't like this is a Nationals entry model
anyway. I should point out that the planes were initially coded 4A as shown
in the photos in the reference book. The 4C coded plane above is shown near
the end of their operational career. Looking at the completed model and the
photo, it seems that RLM 02 is a bit too brown, but perhaps that is just the
result of the light.
| FINAL CONSTRUCTION |
 With the decals in place, the airframe was given a semi-matte clear coat
and it was time to add the wheels, gear doors, prop/spinner and to drill a hole
in the back of the canopy to accept the radio mast. No long wire needed on this
as the plane had a VHF set that did not need it. I did have to sand down the
area where the mast went into the canopy to get a decent fit. There as a bit of
exhaust stain added to the underside after drilling out the exhaust. I also painted what looks to be a fan at the front of the cowling using Tamiya Aluminum. The masking
was removed from the canopy and the hole in the front for the prop had to be
opened up as it was drilled off center. The prop was installed and that was it.
With the decals in place, the airframe was given a semi-matte clear coat
and it was time to add the wheels, gear doors, prop/spinner and to drill a hole
in the back of the canopy to accept the radio mast. No long wire needed on this
as the plane had a VHF set that did not need it. I did have to sand down the
area where the mast went into the canopy to get a decent fit. There as a bit of
exhaust stain added to the underside after drilling out the exhaust. I also painted what looks to be a fan at the front of the cowling using Tamiya Aluminum. The masking
was removed from the canopy and the hole in the front for the prop had to be
opened up as it was drilled off center. The prop was installed and that was it.
| CONCLUSIONS |
| REFERENCES |
http://en.wikipedia.org/wiki/Yak-11
Air Forces of the World, William Green and John
Fricker, MacDonald Publishing, 1958, page 26. January 2013 Thanks to me for picking this one up many years ago. If you would like your product reviewed fairly and fairly quickly, please
contact
the editor or see other details in the
Note to
Contributors.