| KIT #: | AA-4002 |
| PRICE: | $83.00 SRP |
| DECALS: | One option |
| REVIEWER: | Scott Van Aken |
| NOTES: | Part of a set of four Soviet prototypes so don't have kittens over the MSRP. |
| HISTORY |
By mid-1950s, it became obvious that subsonic
cannon-armed fighters like Yakovlev Yak-25 would be unable to intercept fast
high-altitude targets like the upcoming generation of strategic jet bombers. As
the result, in 1953 Lavochkin OKB proposed addition of an
air-to-air missile system to the Berkut air-defense system. Tasked
with defence of Moscow, the Berkut system consisted of a large network of
radars and surface-to-air missile sites as well as ground-controlled interceptor
aircraft. Lavochkin's proposed missile G-300 utilized a guidance system based on
vacuum tubes and was so heavy (about 1,000 kg (2,200 lb)) that no fighter in
Soviet arsenal could carry it. Instead, a Tupolev Tu-4 bomber (Soviet version of
the Boeing B-29 Superfortress) was modified to carry four G-300 under the wings,
with the whole system receiving designation G-310. For all this
 trouble, G-300 was expected to
have a range of only 15 km (9 mi) and a ceiling of 20,000 m (65,600 ft).
Although G-310 made ten flights in 1952, the system was abandoned as
impractical.
trouble, G-300 was expected to
have a range of only 15 km (9 mi) and a ceiling of 20,000 m (65,600 ft).
Although G-310 made ten flights in 1952, the system was abandoned as
impractical.
In November 1952, Soviet government ordered development of Kompleks K-15 (Complex K-15, a notion analogous to USAF's "weapon system" concept). K-15 was to consist of an interceptor "250" (later designated La-250) carrying "275" guided missiles. La-250 had to be able to intercept targets flying at 1,250 km/h (777 mph, Mach 1.18) at 20,000 m (65,600 ft) and up to 500 km (310 mi) from the airbase. Initial guidance was to be from Vozdukh-1 ground control with terminal onboard radar guidance for the last 40 km (25 mi) and automatic missile firing by the fire control system when in range. Missile "275" was projected to weigh 870 kg (1,915 lb) and, powered by a liquid fuel rocket motor, its top speed was to exceed 3,900 km/h (2,425 mph). With a 125 kg (275 lb) conventional warhead, it had a projected lethal radius of 50 m (165 ft). La-250 was to carry two "275" missiles semi-recessed into the underside of the fuselage in a tandem arrangement.
Problems with the K-15U radar and Klimov VK-9 engines
forced a radical redesign of the aircraft to use the K-15M radar and, more
importantly, much less powerful Lyulka AL-7F engines. This, in turn, led to the
need to change "275" missiles to the lighter "275A" (interestingly, although
total missile weight decreased to 800 kg (1,760 lb), the warhead actually grew
to 140 kg (308 lb)). The new airframe with a smaller fuselage and a delta wing
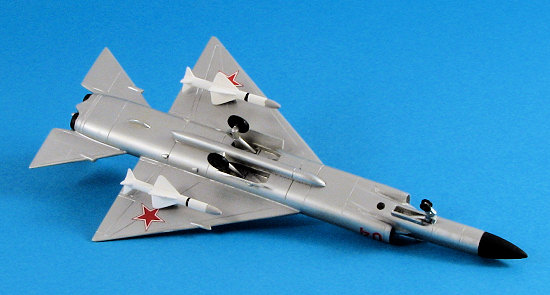
instead of the earlier swept wing was designated La-250A. The "275" missiles
 were now carried on underwing pylons. The lighter airframe was not enough to
overcome weaker engines and projected performance suffered compared to La-250.
While busy redesigning the aircraft, Lavochkin OKB also had to develop new
variants of the "275" missile -- the semi-active radar homing "277," the
nuclear-armed "279," and solid fuel rocket-powered "280." The first La-250A
prototype was finally rolled out on June 16, 1956. Test flights of the five
prototypes were plagued by crashes caused by failures of the hydraulic boost
system and landing gear as well as poor forward visibility (the latter was
corrected with fitting of a new slightly "drooped" nose). La-250A made a
single
test flight in 1956, only 6 flights in 1957, and a mere 14 flights in 1958.
Frustrated by the lack of progress, VVS stopped all work on the K-15 system in
1959. Lessons learned with K-15 were used to develop new interceptor system
requirements which lead to Tupolev Tu-28 interceptor.
were now carried on underwing pylons. The lighter airframe was not enough to
overcome weaker engines and projected performance suffered compared to La-250.
While busy redesigning the aircraft, Lavochkin OKB also had to develop new
variants of the "275" missile -- the semi-active radar homing "277," the
nuclear-armed "279," and solid fuel rocket-powered "280." The first La-250A
prototype was finally rolled out on June 16, 1956. Test flights of the five
prototypes were plagued by crashes caused by failures of the hydraulic boost
system and landing gear as well as poor forward visibility (the latter was
corrected with fitting of a new slightly "drooped" nose). La-250A made a
single
test flight in 1956, only 6 flights in 1957, and a mere 14 flights in 1958.
Frustrated by the lack of progress, VVS stopped all work on the K-15 system in
1959. Lessons learned with K-15 were used to develop new interceptor system
requirements which lead to Tupolev Tu-28 interceptor.
The abortive, trouble-filled development of La-250 was mirrored in the West by the similarly complicated creation of Convair's delta-winged F-102 Delta Dagger and F-106 Delta Dart interceptors.
| THE KIT |
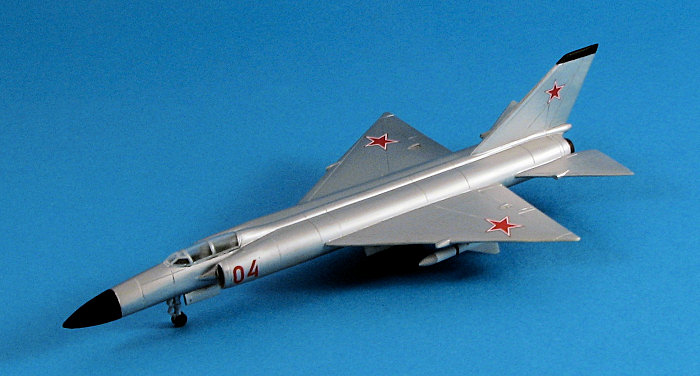
This particular kit is part of the set that comes with the Anigrand M-50 Bounder. It consists of a solid body with separate one piece wings, fin and horizontal stabilizers. There are separate landing gear and doors, as well as separate intakes and exhaust nozzles. A clear resin canopy is also included as are a pair of small and somewhat generic looking ejection seats. There is nowhere to put any weight should the model be tail heavy aside from drilling out the nose section to install a section of lead. Decals are well done and should provide no surprises. Though you may think it odd that I'm reviewing this separately from the rest of the set. I think that the kit itself deserves its own review, as much as it is a somewhat complex build.
| CONSTRUCTION |
In line with other Anigrand kits, there are mold
glitches in the form of air pockets, pinholes and areas where there are chunks
resulting from the removal of resin pour stubs. Fortunately, many of these are
still in place so that they can be more carefully handled. The first thing I did
was to clean up the parts as best I could and this included sanding down seams
and removing stuff from mating surfaces. I then installed the two intakes to the
fuselage. These do not appea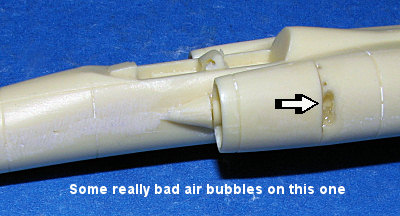 r
to be handed, though I found that they each fit one side better than the other.
This was also done as there were some pretty major air pockets on the intake
join areas and it would be easier to repair/fill them when the intakes had been
glued on. With the intakes in place, I started filling the holes with super glue
and then sanding it down and filling again. Took several applications.
r
to be handed, though I found that they each fit one side better than the other.
This was also done as there were some pretty major air pockets on the intake
join areas and it would be easier to repair/fill them when the intakes had been
glued on. With the intakes in place, I started filling the holes with super glue
and then sanding it down and filling again. Took several applications.
 Meanwhile,
I started to fix the big air pockets at the nose and the tail. First I tried to
fill them with superglue, but seeing that this would not be the easiest way to
do things, I drilled them out to insert some plastic rod. The exhaust area also
had some resin blobs that needed removed and I used a grinder tip on my motor
drill to attend to those. Since the area would be covered by the exhaust
nozzles, I didn't have to be too careful in cleaning up inside surface. Just had
to have enough room for the nozzle pieces to fit in there.
Meanwhile,
I started to fix the big air pockets at the nose and the tail. First I tried to
fill them with superglue, but seeing that this would not be the easiest way to
do things, I drilled them out to insert some plastic rod. The exhaust area also
had some resin blobs that needed removed and I used a grinder tip on my motor
drill to attend to those. Since the area would be covered by the exhaust
nozzles, I didn't have to be too careful in cleaning up inside surface. Just had
to have enough room for the nozzle pieces to fit in there.
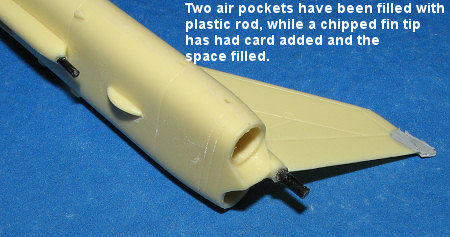 I
then inserted the rod sections in the major air pockets and also replaced the
chipped fin tip with a section of plastic card. When doing the card thing it is
a good idea to enlarge the area to be repaired and make it a square corner. Then
one can apply super glue and if need be, filler to build up the area. When
it had all dried, these areas were then sanded down.
I
then inserted the rod sections in the major air pockets and also replaced the
chipped fin tip with a section of plastic card. When doing the card thing it is
a good idea to enlarge the area to be repaired and make it a square corner. Then
one can apply super glue and if need be, filler to build up the area. When
it had all dried, these areas were then sanded down.
Then I glued on the fin and the wings. Though the
pins on the wings were just nubs, they were enough to help align things. A three
view showing if there was any anheadral on the wings would have been nice. As
there was none, I just glued them on straight. As usual, filler was applied to
all the joins. I did have good guide pins for the horizontal stabilizers and so
had little 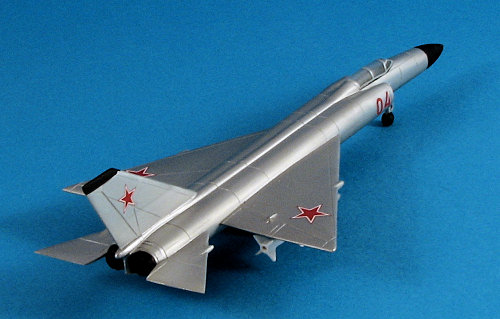 problem with them when
it came to attaching them. They did have rather large sprue gates on the edges
that required some work to get properly removed.
problem with them when
it came to attaching them. They did have rather large sprue gates on the edges
that required some work to get properly removed.
With all the main bits in place, I painted the cockpit with that sort of blue-green shade using Testors ModelMaster enamels and then picked out some of the bits in black. Seats were painted a general grey color. The cockpit canopy is clear resin that really isn't that clear. While you can see through it, you can't really see any detail so no need to put any real effort into the interior. Besides, it is about as thick as the rest of Anigrand's main parts. What is a delight is that the frame lines are easy to see so masking it was not at all difficult using my usual Tamiya tape. it was attached with white glue.
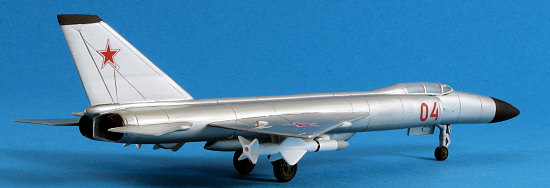
I also cleaned up the landing gear legs and doors. Those were glued in place. I found a photo of the La-250 that shows the main doors attach to the outside at a bit of an angle. There is a bit that gets removed from the front of the nose door to put vertically in front of the leg, while the rest of the door goes on the left side. None of this information is supplied in the instructions.
I painted the wheels with FS 34102 as recommended by some readers and then did the rest in black, setting them aside until after painting.
| COLORS & MARKINGS |
Painting this is a snap. You give it an overall
aluminum finish and paint the fin tip and radome black. In reality, the radome
opening lines are not straight-forward as engraved, but have a 'lip' at the top.
The nose also droops more than is kitted, but most won't
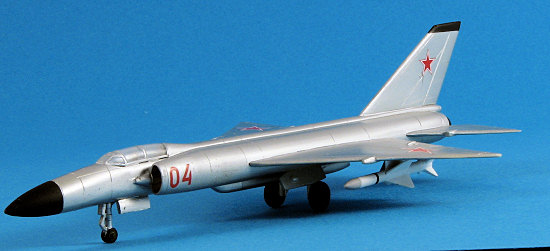 know that and few will correct
it.
know that and few will correct
it.
Anyway, I used SnJ's Talon Aluminum for this. It is an acrylic and should be applied in many thin coats. I found it worked quite well, though there were still a few thin spots even after four or five coats. It can be masked when dry without any problem and I did so when painting the radome and fin tip. It would probably work a bit better if I'd used an undercoat instead of spraying it on bare resin, but it did cover up all the dark grey filler with no problem. I do wish I had more than one shade as that would have been nice to sort of break up the monotony. I did brush paint a few areas with Humbrol Metallic Aluminum, but it ended up being about the same shade!
Anigrand provides the required insignia and bort numbers for this kit. To my mind, the insignia for the wings are oversize as are the bort numbers. At least they seem that way when compared to the drawings provided. They went on with no problems and as always, refused to succumb to Solvaset so sit proudly astride all the panel lines. No clear coat was used nor is any really needed.
| FINAL CONSTRUCTION |
 For the
final bits, I painted the nose wheels (which are molded onto the nose strut),
and glued on the main wheels. The exhaust had been painted Jet Exhaust using
Alclad II and were simply glued into place. The kit includes two very large
missiles of some type that are molded along with the pylon. One the most
egregious seams were removed, the missiles were painted white with Floquil's
Reefer White. Then the tips painted with a Vallejo medium grey and a black strip
decal was wrapped around the front before it was glued into the slot on the
underside of the wing. Masking was taken off the canopy and that was it.
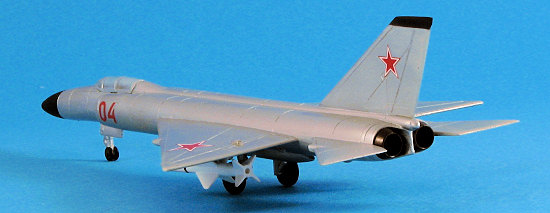
Thankfully, the model has a long wheelbase and does not need any filler. There
is a hole in the bottom forward fuselage that looks like it belongs there so it
wasn't filled. What it is for is a real poser as there is nothing in the parts
to fit there and the instructions are typically quiescent about it.
For the
final bits, I painted the nose wheels (which are molded onto the nose strut),
and glued on the main wheels. The exhaust had been painted Jet Exhaust using
Alclad II and were simply glued into place. The kit includes two very large
missiles of some type that are molded along with the pylon. One the most
egregious seams were removed, the missiles were painted white with Floquil's
Reefer White. Then the tips painted with a Vallejo medium grey and a black strip
decal was wrapped around the front before it was glued into the slot on the
underside of the wing. Masking was taken off the canopy and that was it.
Thankfully, the model has a long wheelbase and does not need any filler. There
is a hole in the bottom forward fuselage that looks like it belongs there so it
wasn't filled. What it is for is a real poser as there is nothing in the parts
to fit there and the instructions are typically quiescent about it.
| CONCLUSIONS |
 A very
nice little model that is perfect for 1/144 scale. It is something that I don't
think has been kitted before, at least not in this scale. As you may know, this
is only part of a set that comes with the Bounder, but since it is awaiting
parts, I figured it would stand well on its own.
A very
nice little model that is perfect for 1/144 scale. It is something that I don't
think has been kitted before, at least not in this scale. As you may know, this
is only part of a set that comes with the Bounder, but since it is awaiting
parts, I figured it would stand well on its own.
June 2007
#1472 in a series
Copyright ModelingMadness.com. All rights reserved. No reproduction in part or in whole without express permission from the editor.
If you would like your product reviewed fairly and fairly quickly, please contact the editor or see other details in the Note to Contributors.