KP 1/72 MiG-19S/F-6 'In Arab Service'
| KIT #: | KPM0188 |
| PRICE: | in the $20.00 range plus shipping |
| DECALS: | Four options |
| REVIEWER: | Scott Van Aken |
| NOTES: | 2020 release |
| HISTORY |
The Mikoyan-Gurevich MiG-19 (Russian: Микоян и Гуревич МиГ-19; NATO reporting name: Farmer) is a Soviet second generation, single-seat, twinjet fighter aircraft, the world's first mass-produced supersonic aircraft. It was the first Soviet production aircraft capable of supersonic speeds in level flight. A comparable U.S. "Century Series" fighter was the North American F-100 Super Sabre, although the MiG-19 primarily fought against the more modern McDonnell Douglas F-4 Phantom II and Republic F-105 Thunderchief over North Vietnam.
Three nations saw considerable combat with the MiG-19/Shenyang F-6; Egypt, Pakistan, and North Vietnam. Since this is the 'Arab Service' boxing, we'll concentrate this section on Egypt. One of the first Egyptian MiG-19 units was the 15th Air Brigade, consisting of Nos 20 and 21 Squadrons, which became operational at Fayid with a forward location at Milayz in the early 1960s.
 In 1962, Egyptian MiG-19s saw some action in the ground-attack role during
the North Yemen Civil War. The first reported air combat in the Middle East with
the MiG-19 happened on 29 November 1966 when an Israeli Air Force (IAF) Dassault
Mirage III shot down two Egyptian MiG-19s which were trying to intercept an
Israeli reconnaissance Piper J-3 Cub in Israeli airspace. The first MiG was
destroyed with a R.530 radar guided missile fired from less than a mile away,
marking the first aerial kill for the French made missile. The second MiG-19 was
dispatched with cannon fire.
In 1962, Egyptian MiG-19s saw some action in the ground-attack role during
the North Yemen Civil War. The first reported air combat in the Middle East with
the MiG-19 happened on 29 November 1966 when an Israeli Air Force (IAF) Dassault
Mirage III shot down two Egyptian MiG-19s which were trying to intercept an
Israeli reconnaissance Piper J-3 Cub in Israeli airspace. The first MiG was
destroyed with a R.530 radar guided missile fired from less than a mile away,
marking the first aerial kill for the French made missile. The second MiG-19 was
dispatched with cannon fire.
Around 80 MiG-19s were in service with Egypt during the Six-Day War in June 1967, but more than half were destroyed on the ground during the opening Israeli airstrikes of Operation Focus. Israeli pilots, however, did find the MiG-19 a potentially dangerous adversary because of its performance, maneuverability, and heavy armament.
Following the war, the Egyptians organized the surviving MiG-19 aircraft and assigned them air defense tasks of Egypt's interior. The Soviet Union did not supply Egypt with any replacement of the MiG-19s destroyed in the Six Day War, but Egypt might have received some from Syria and Iraq, so that by the end of 1968 there were 80+ MiG-19s in service with the Egyptian Air Force. The aircraft also saw combat during the War of Attrition; in one engagement on 19 May 1969, a MiG-19 aircraft engaged two Israeli Mirages, shooting down one with cannon fire while the other escaped. Egypt had around 60 Mig-19s in service during the Yom Kippur War of 1973 in which they served as close air support aircraft.
| THE KIT |
In the 1960s and 70s, KP was a rather prodigious producer of kits, pretty much concentrating on those in Czech service at one time or another. After this initial spurt, the company was quiescent in terms of new releases until fairly recently. This is one of thier most recent kits and is provided in multiple boxings, each with different decals.
I've always liked the MiG-19, but have only built two kits in the last 50 years. One was the Heller kit and the other the older KP kit. What kept me from doing more was the myriad small air scoops both kits provided. Indeed, the MiG-19 is seemingly festooned with these small scoops around the engine section. Undoubtedly to keep the engines from overheating. When I heard of this release, I decided to order one so sent my electronic funds to acquire one.
 Just looking at the sprues, this
is an improvement over those older kits, with modern engraved panel line detail.
Gone is all the rivet detail of the older kit. Not gone is the need to add a
zillion scoops. Interior is well done with sidewall detail. KP provides decals
for the instruments and side panels. There is even a harness decal for the
single piece seat. The intake is deep enough to satisfy many and one will need
10 grams of nose weight, which is quite a bit for a kit of this size. A single
piece canopy tops everything.
Just looking at the sprues, this
is an improvement over those older kits, with modern engraved panel line detail.
Gone is all the rivet detail of the older kit. Not gone is the need to add a
zillion scoops. Interior is well done with sidewall detail. KP provides decals
for the instruments and side panels. There is even a harness decal for the
single piece seat. The intake is deep enough to satisfy many and one will need
10 grams of nose weight, which is quite a bit for a kit of this size. A single
piece canopy tops everything.
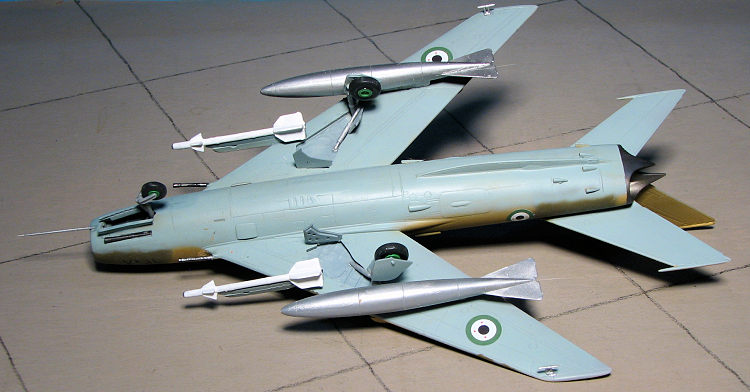
Wings are upper and lower half on each sied with small plates to be inserted into the gear wells. No holes to open as all the pylons are butt joined. There is a large, shallow trough for the wing fence. Exhaust is two tubes that fit into the end piece. Again, adequate for this scale. The landing gear legs all have separate wheels and the doors are mostly butt joins. For things under wings you have two fuel tanks and either air to air missiles or rocket pods. If doing the Shenyang version, a parabrake housing fits on the rear fuselage.
Instructions are nicely drawn and adequate, providing generic color information during the build. Four markings options are provided. Three are Egyptian at various times with schemes ranging from unpainted metal, to brown and tan over light blue to light and dark grey with large orange bands on the wings and fin. The orange will need to be painted as will the white fuselage band on one of the options, though the black surrounding stripes are provided. The third is a Syrian aircraft as shown on the box art in a green and darker brown over light blue. Decals look to be very nicely done and frankly, it is for the markings that I chose this boxing. There are aftermarket, but why go that route when the kit ones are so nice.
| CONSTRUCTION |
 For this one I decided to pretty
much follow the instructions, though I did clip and glue together the wings and
drop tanks ahead of time. The cockpit requires you to first attach some intake
side pieces that also form part of the intake. Though there are small
depressions into which one puts pips on these pieces, the attachment point is
not positive so you have to fiddle around a bit to get them in place. This sort
of fitment turned out to be fairly standard with this kit. Also standard with
the kit is a very crowded instruction sheet that makes it rather difficult to
see exactly how some of the pieces fit in place. This became apparent once I
started assembling the cockpit. One also has to hunt around on the sprue diagram
to see where these smaller bits are located as the sprues are not marked.
For this one I decided to pretty
much follow the instructions, though I did clip and glue together the wings and
drop tanks ahead of time. The cockpit requires you to first attach some intake
side pieces that also form part of the intake. Though there are small
depressions into which one puts pips on these pieces, the attachment point is
not positive so you have to fiddle around a bit to get them in place. This sort
of fitment turned out to be fairly standard with this kit. Also standard with
the kit is a very crowded instruction sheet that makes it rather difficult to
see exactly how some of the pieces fit in place. This became apparent once I
started assembling the cockpit. One also has to hunt around on the sprue diagram
to see where these smaller bits are located as the sprues are not marked.
I eventually got most of the cockpit and interior bits in place and painted them a blue-grey using AKAN paint. This shade is pretty close to the plastic itself. Before fully installing the cockpit bits, I attached the decals provided for the side panels and instrument panel. Not surprising is that they did not fit the spaces they were supposed to. Test fitting showed that the instrument panel piece and the piece behind it were too wide. Same for the rear bulkhead as it was not possible to close the fuselage halves until a bit of judicious sanding was done. The floor also did not fit where it should, either due to some error in my construction or just poor engineering. It is actually a bit lower, so perhaps I needed to install the side pieces higher, though there is little space to do that.
 Once those were all in place, I
stuffed as much weight as I could above the intake and under the cockpit. The
instructions state 10 grams, which is actually quite a bit for a kit this size.
I then closed the fuselage halves and installed the nose and tail sections. Fit
is fair, but I did have to do some sanding and filling to get things flush. This
removed all the detail from these areas, though I was able to rescribe most of
it back. There is a panel that fits on the underside of the fuselage. It is a
bit too large to fit in the opening so needed some trimming and sanding to fit.
Once those were all in place, I
stuffed as much weight as I could above the intake and under the cockpit. The
instructions state 10 grams, which is actually quite a bit for a kit this size.
I then closed the fuselage halves and installed the nose and tail sections. Fit
is fair, but I did have to do some sanding and filling to get things flush. This
removed all the detail from these areas, though I was able to rescribe most of
it back. There is a panel that fits on the underside of the fuselage. It is a
bit too large to fit in the opening so needed some trimming and sanding to fit.
KP wants you to build up the wings and attach the small gear doors prior to gluing the wings to the fuselage. I simply glued the upper and lower halves together. No need to drill holes for pylons as there aren't any mounting holes for these things. They also want you to attach the tailplanes at this time and then attach the small scoops. I did the scoops before the flight surfaces. The drawings showing what goes where are a bit confusing and the scoops are fairly small. Fortunately, you get more than you'll need. You do need to make educated guesses on some of the placement as well as the part numbers as they don't seem to match the sprue diagram perfectly. Eventually I got them all on and then attached the tailplanes and wings. Like the interior, the placement of the tailplanes is less than positive. Next was the canopy and after masking it, it was time for paint.
| COLORS & MARKINGS |
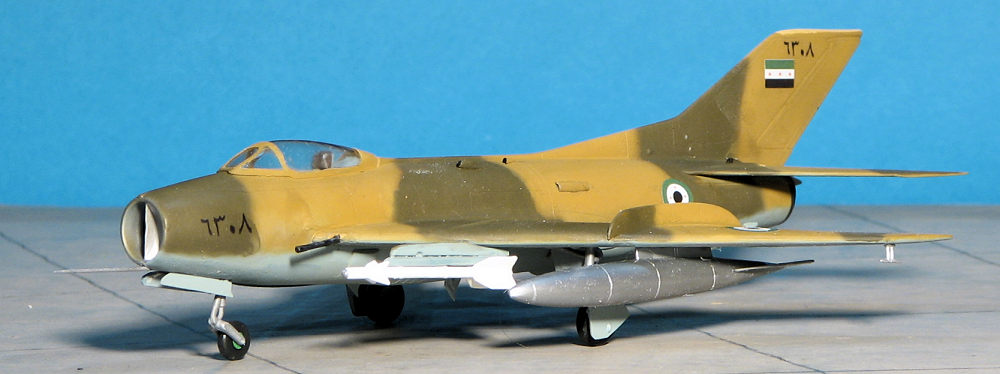
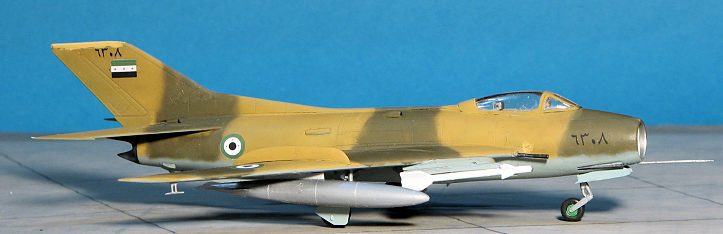
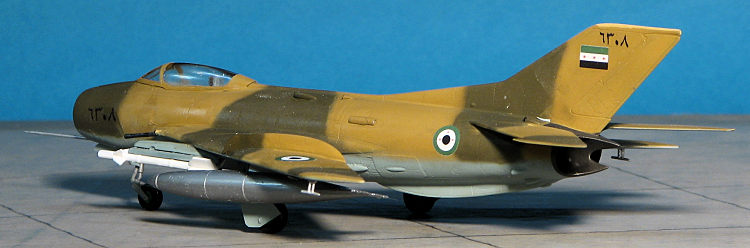
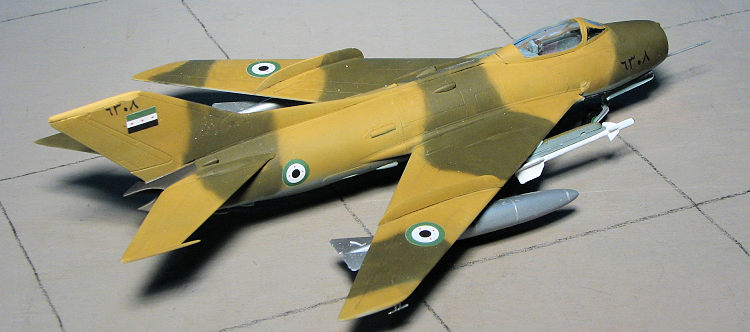
I chose the Syrian Air Force option for this one. It calls for Humbrol 93 Sand and Humbrol 155 Olive for the upper colors. It also required Humbrol 65 light blue for the underside. I had 93 and 155 so mixed those up for the upper surfaces and hand sprayed the pattern. For the underside I did not have the Humbrol paint mentioned, but through a replacement chart on the net, found that RLM 65 was a match so used that from the Mr. Color line.
Once done, the landing gear was installed and the airframe given a clear coat using Future. I was pleased that I put in enough weight to prevent tail sitting. As a note on the main gear retraction struts. They are a bit too long so don't fit in the small depressions made for them. There is no positive attachment point on the gear legs so I just laid them in place and dabbed them with cement.
The kit decals are superb and went on without any issues. I did use Microsol to help them along and it worked just fine. Once done, the airframe was provided a coat of near matte clear using Tamiya paint. Then I attached the gear doors. Again, the large main gear doors have no positive attachment point and the placement of the auxiliary outer doors is rather vague. The inner doors and the nose doors went on without a hitch.
 Next the things under wings were
dealt with. I deepened the holes for the drop tanks and that worked very well.
For some reason, KP totally ignores the fact that the missiles require a set of
rail extensions as trying to glue them on the pylons shows that you need these.
You can find them on the sprue. In addition, the parts they show for the wing
gun barrels are not correct. Again, the correct ones are on the sprue. There is
also a blanking plate for the lower left of the nose that does not fit at all
well. I had to sand and fill that area then repaint it. Fit of the nose gun is
poor. Then there is the pitot. I broke it during handling so used the longer
end, which means it is a bit short. This is an item that would do well with a
metal replacement. During all this handling, I lost one of the nose gear doors.
I have no idea where it is so made a replacement out of plastic card. I'm sure
I'll come across it and when I do, will replace the card one. Last items to add
were the rad alt antennas on the outer lower wings. Well, almost the last. I
discovered that I'd not removed a sprue stub from the top of the fin. I sanding
it off and brush painted the bare plastic. Not surprising is that the color
didn't match. I'll live with it. I also knocked the wing guns out of alignment.
Those have been fixed.
Next the things under wings were
dealt with. I deepened the holes for the drop tanks and that worked very well.
For some reason, KP totally ignores the fact that the missiles require a set of
rail extensions as trying to glue them on the pylons shows that you need these.
You can find them on the sprue. In addition, the parts they show for the wing
gun barrels are not correct. Again, the correct ones are on the sprue. There is
also a blanking plate for the lower left of the nose that does not fit at all
well. I had to sand and fill that area then repaint it. Fit of the nose gun is
poor. Then there is the pitot. I broke it during handling so used the longer
end, which means it is a bit short. This is an item that would do well with a
metal replacement. During all this handling, I lost one of the nose gear doors.
I have no idea where it is so made a replacement out of plastic card. I'm sure
I'll come across it and when I do, will replace the card one. Last items to add
were the rad alt antennas on the outer lower wings. Well, almost the last. I
discovered that I'd not removed a sprue stub from the top of the fin. I sanding
it off and brush painted the bare plastic. Not surprising is that the color
didn't match. I'll live with it. I also knocked the wing guns out of alignment.
Those have been fixed.
| CONCLUSIONS |
As you can tell, I had several adventures with this kit. It is by no means one I'd recommend for those without experience building short run kits. I found the instructions to be a bit lacking in areas, but are nothing that can't be dealt with. As always, the finished model looks good enough for the display shelf and makes a nice addition to my MiG collection. I will probably build another sometime in the future, now that I know the glitches. I can only hope that someone will do a replacement metal probe for this one as that would be a huge help.
| REFERENCES |
https://en.wikipedia.org/wiki/Mikoyan-Gurevich_MiG-19
12 February 2021
Copyright ModelingMadness.com. All rights reserved.
Purchase courtesy of my PayPal account. If you would like your product reviewed fairly and
fairly quickly, please
contact
the editor or see other details in the
Note to
Contributors. Back to the Main Page
Back to the Review
Index Page
Back to the Previews Index Page