| KIT #: | AK 48050 |
| PRICE: | $ |
| DECALS: | Four options |
| REVIEWER: | Scott Van Aken |
| NOTES: | 2021 tooling |
| HISTORY |
 One of the recommendations from the government testing of Lavochkin
La-130 (Lavochkin La-9 prototype) was to further develop it into a
long-range escort fighter. The resultant La-134 prototype (also sometimes
referred to as La-9M) featured increased fuel and oil capacity. Armament was
reduced to three cannons. The prototype flew in May 1947. The second
prototype, La-134D had fuel capacity increased by an additional 275 l (73 US
gal) with wing and external fuel tanks. The aircraft was fitted with larger
tires to accommodate the increased weight and amenities for long flights such as
increased padding in the seat, armrests, and a urinal. In addition, a full radio
navigation suite was installed. Not surprisingly, combat performance with a full
fuel load suffered. However, as the fuel load approached that of La-9, so did
the performance. The aircraft was found to be poorly suited for combat above
7,000 m (23,000 ft). The new fighter, designated La-11 (OKB designation La-140)
entered production in 1947. By the end of production in 1951, a total of 1,182
aircraft were built.
One of the recommendations from the government testing of Lavochkin
La-130 (Lavochkin La-9 prototype) was to further develop it into a
long-range escort fighter. The resultant La-134 prototype (also sometimes
referred to as La-9M) featured increased fuel and oil capacity. Armament was
reduced to three cannons. The prototype flew in May 1947. The second
prototype, La-134D had fuel capacity increased by an additional 275 l (73 US
gal) with wing and external fuel tanks. The aircraft was fitted with larger
tires to accommodate the increased weight and amenities for long flights such as
increased padding in the seat, armrests, and a urinal. In addition, a full radio
navigation suite was installed. Not surprisingly, combat performance with a full
fuel load suffered. However, as the fuel load approached that of La-9, so did
the performance. The aircraft was found to be poorly suited for combat above
7,000 m (23,000 ft). The new fighter, designated La-11 (OKB designation La-140)
entered production in 1947. By the end of production in 1951, a total of 1,182
aircraft were built.
| THE KIT |
I was impressed with a reader's preview of the La-9 and since I already have an La-9, decided to order the La-11 from a company that popped up when I googled the kit. About a month later, a nice, sturdy box from Kazakhstan arrived at my door. In it is a 'lunchbox' style cardboard box with a flimsy cover that has the kit artwork. One nice addition is a set of 3D printed instrument panels and seat harness, a nice touch.
External molding is quite good though some might think the panel lines are too deep. True, they don't have the finesse of Hasegawa, but are acceptable to most of us. There are a considerable number of pieces that make up the cockpit assembly. Note that this is when you'd use the 3D decals. Instructions have you remove raised detail first, but there isn't any. Then that is trapped between fuselage halves. Tailplanes and upper cowling are added followed by building up the wing. This has a separate main gear well insert and ailerons. If you wish to install the landing light lens, the area in both upper and lower wings must be removed. There is nothing to fit behind this transparency. Then the wing is attached to the fuselage.
 The next several steps deal with building up and installing
the landing gear and doors. The pitot is part of this but I'd leave it off until
after painting. Speaking of paint, there are no color callouts anywhere in the
construction steps so you are on your own. Probably won't be needing pink. The
final steps are building up the cowling and attaching the prop. There is no
engine as you wouldn't be able to see it behind the cooling fan. The forward
part of the cowling is a single piece while the area behind it is an upper and
lower half. Though the kit includes two seemingly identical single piece
canopies. These have well defined frame lines so masking will be fairly straight
forward.
The next several steps deal with building up and installing
the landing gear and doors. The pitot is part of this but I'd leave it off until
after painting. Speaking of paint, there are no color callouts anywhere in the
construction steps so you are on your own. Probably won't be needing pink. The
final steps are building up the cowling and attaching the prop. There is no
engine as you wouldn't be able to see it behind the cooling fan. The forward
part of the cowling is a single piece while the area behind it is an upper and
lower half. Though the kit includes two seemingly identical single piece
canopies. These have well defined frame lines so masking will be fairly straight
forward.
The instruction booklet is nicely printed and save the lack of paint info, is well done. There are three markings options. Three are Soviet with two of the planes being in a medium grey color. I'd use the lighter of the AMT shades used for late WWII fighters. The other option is red, undoubtedly for air shows. The other is a Chinese plane, also in a medium grey. Note that when looking at period photos, some Soviet La-11s were in the darker grey, so perhaps that would be an option. The nicely printed decal sheet is by Begemont and offers full stencils of which there is a guide.
| CONSTRUCTION |
For this one, I went pretty standard in terms of building.
Mainly as there aren't that many sub-assemblies. I first gathered all the
interior pieces and assembled the interior. I painted the overall interior and
side panels of the fuselage with Color Coats Soviet grey metal primer. I also
used this shade for the inside of the gear wells, inner gear doors, and the gear
struts. 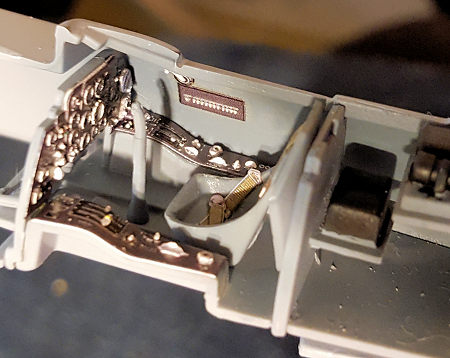 When dry,
other items were painted, such as the seat padding reddish brown, and the two
radio boxes and the dynamotor with flat black. This kit comes with 3D decals for
the instruments and seat harness.
These work pretty well, but refuse to conform over anything but the mildest flat
curve. Means that the seat belts won't mold over the seats. You also have to
coat the area where they are to fit with something like clear paint or PVA glue
prior to attaching or there is a possibility they won't stick. With that done, I
trapped the cockpit assembly in the fuselage halves.
When dry,
other items were painted, such as the seat padding reddish brown, and the two
radio boxes and the dynamotor with flat black. This kit comes with 3D decals for
the instruments and seat harness.
These work pretty well, but refuse to conform over anything but the mildest flat
curve. Means that the seat belts won't mold over the seats. You also have to
coat the area where they are to fit with something like clear paint or PVA glue
prior to attaching or there is a possibility they won't stick. With that done, I
trapped the cockpit assembly in the fuselage halves.
There are separate cowl flaps that can be posed anywhere from
closed to full open, but since there are no exhaust pipes, no need to model it
full open. The tailplanes and rudder were then cemented in place. This was
followed by 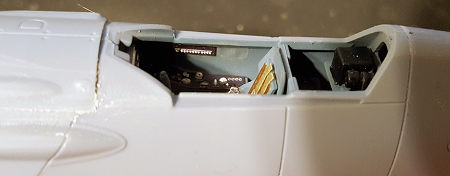 the upper forward
fuselage piece. This piece is a poor fit. It is slightly too wide and a great
deal too tall in the back as you can see in the image. I 'cured' the situation
by using a motor tool and sanding wheel, but were I to do this kit again, I'd
sand the lower attachment area at an angle to get a good fit.
the upper forward
fuselage piece. This piece is a poor fit. It is slightly too wide and a great
deal too tall in the back as you can see in the image. I 'cured' the situation
by using a motor tool and sanding wheel, but were I to do this kit again, I'd
sand the lower attachment area at an angle to get a good fit.
 With that in place, I assembled all the cowling pieces. Fit is
only fair on these and it takes some fiddling around to get everything in place.
Then came the wing. It came as no surprise that there were fairly large gaps on
the upper wing/fuselage join. Attempts to spread the fuselage to deal with it
were fruitless as the gaps were not uniform on their length. I sadly broke out
the filler and sandpaper to deal with it.
With that in place, I assembled all the cowling pieces. Fit is
only fair on these and it takes some fiddling around to get everything in place.
Then came the wing. It came as no surprise that there were fairly large gaps on
the upper wing/fuselage join. Attempts to spread the fuselage to deal with it
were fruitless as the gaps were not uniform on their length. I sadly broke out
the filler and sandpaper to deal with it.
After I dealt with the wing root situation, the tailplanes were attached. Then the clear armor section was attached just behind the seat. I then test fit the canopy and found it would not fit flush in the back. This required considerable sanding of the armor section until it allowed the canopy to fit properly. The canopy was then masked, the gear wells filled with Silly Putty and it was off for some paint.
| COLORS & MARKINGS |
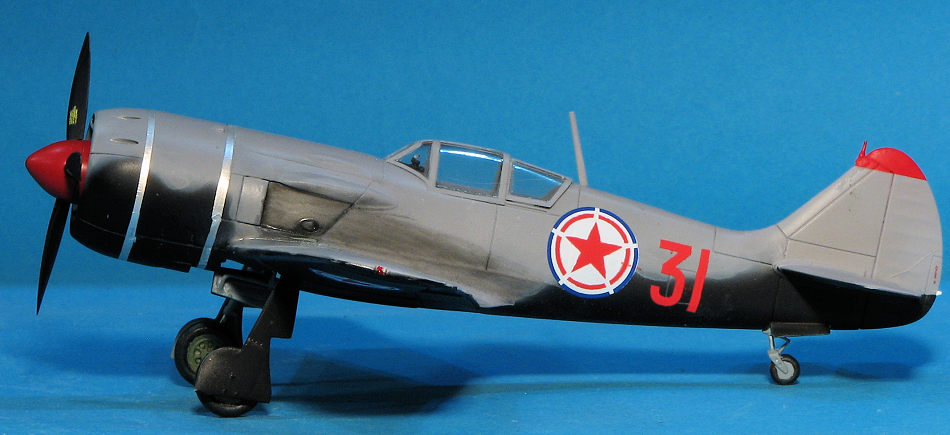
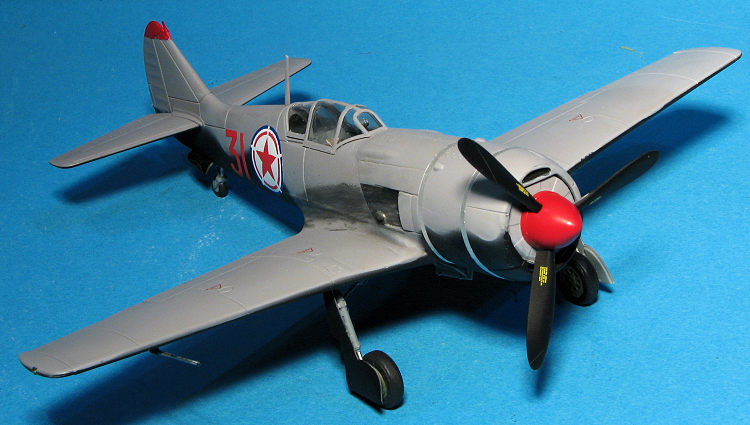
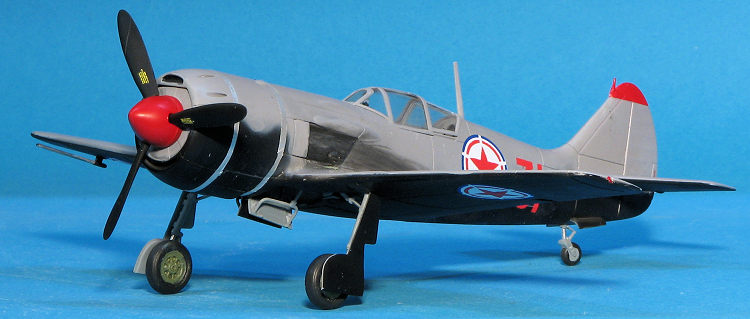
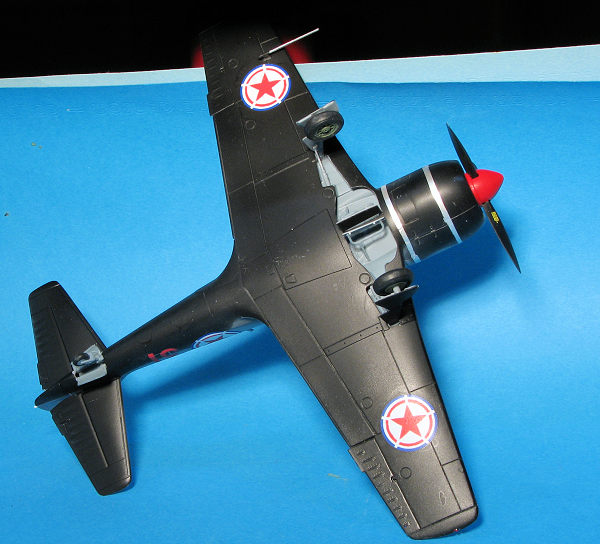
I had decided to use a night attack airplane from the North Korean Air Force from the extensive Begemot decal sheet on this plane. This meant a red spinner and tail tip. These areas were first painted matt white then gloss red using Tamiya paint for both. The underside was then painted with Tamiya X-18 semi-matte black. This shade was also used on the outside of gear doors. Areas were then masked and the upper surface painted AMT-11 using the Colorcoats range. This blue-grey is pretty close to the color of the plastic. There was the usual back and forth until I was satisfied with the scheme. Meanwhile, the main wheels were painted a medium green shade.
 With the painting done, I attached the landing gear and gear
doors. The gear doors are admirably thin, which is something I like. Main gear
were a fairly loose attachment. To properly install the retraction struts, you
need to place the large part of the strut into the square openings in the gear
well. I found that the tail gear hole was larger than the tail gear strut so
again, care is needed to attach it and I used super glue to ensure a solid fit.
With the painting done, I attached the landing gear and gear
doors. The gear doors are admirably thin, which is something I like. Main gear
were a fairly loose attachment. To properly install the retraction struts, you
need to place the large part of the strut into the square openings in the gear
well. I found that the tail gear hole was larger than the tail gear strut so
again, care is needed to attach it and I used super glue to ensure a solid fit.
After this, the airframe was clear coated and the decals applided. I used Begamot 48-055 to do a North Korean version. The decals are excellent and quite opaque. Aside from stencils, there aren't many of them and apparently these planes had no upper wing insignia. Note that with the repainted black underside, a majority of the stencils will disappear once applied so I didn't use any other than the upper surface ones. Bare Metal Foil was used for the straps around the cowling. I then attached the radio mast and the pitot tube. I'd broken the mast from the fin long ago so drilled out the mount and inserted a section of wire to replace it. These were then brush painted and when dry, the airframe was given a coat of semi-matte clear to seal things in place. Final steps were to glue on the prop, remove the masking from the clear bits, and add some exhaust staining.
| CONCLUSIONS |
A few things to take away from this build. One is that, while
the 3D printed instrument panels worked just fine, the seat harness did not.
This is because it is too thick to drape like etched metal or standard decals.
I'm sure that if they are attached like etched belts using super glue, that
they'd work just fine, but as decals, these items just don't seem to cut it.
Another is that the fit of the wings to the fuselage is poor. High end or not,
this is a short run kit and one expects fairly questionable fit. One could say
the same of the engine cowling as it seems a rather fussy construct, though I
understand it is done to allow the La-9 cowling assembly to use many of the same
parts.
Bottom line is that it is a fairly good kit of an interesting subject, but one
does have to have short run kit experience and to be well versed in the use of
files/sandpaper and filler get an acceptable result. The Begemot decals worked
just fine and are recommended.
| REFERENCES |
https://en.wikipedia.org/wiki/Lavochkin_La-11
18 February 2022 Copyright ModelingMadness.com. All rights
reserved. No reproduction in part or in whole without express permission of the
editor. If you would like your product reviewed fairly and fairly quickly, please
contact the editor
or see other details in the
Note to
Contributors.