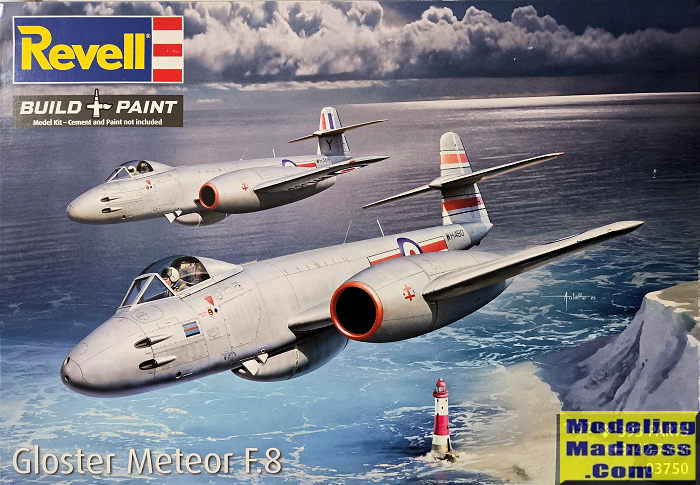
Revell 1/32 Meteor F.8
| KIT #: | 03750 |
| PRICE: | $99.00 from Amazon |
| DECALS: | Three options |
| REVIEWER: | Scott Van Aken |
| NOTES: | 2026 release |
| HISTORY |
The Gloster Meteor was the first British jet
fighter and the Allies' only jet aircraft to engage in combat operations during
the Second World War. It was designed and primarily produced by the Gloster
Aircraft Company, although its development was heavily reliant on its
ground-breaking turbojet engines, pioneered by Frank Whittle and his
company, Power Jets Ltd.
The Meteor F.8 was greatly improved from the F.4.
Longer fuselage, greater fuel capacity, standard ejection seat and modified tail
(derived from the E.1/44). A prolific frontline fighter in the RAF during
1950–54, this variant was ordered by the RAAF, with which it saw action in
the Korea War. Designated F-8 by the Brazilian Air Force. This version was even
more widely used by foreign air forces than the earlier Meteor F.4. Even today,
at least one F.8 is still flying.
| THE KIT |
I was actually looking for Revell's Meteor F.4 when I ran across this one and a much lower price to the earlier kit. Not much of a surprise is that many of the sprues in the kit are the same ones used on the earlier F.4. The biggest change is the rear fuselage and Revell had that in mind by making that a separate section.
As one would expect from a modern 1/32 kit, there are a lot of options. The kit provides two full engines. You can pose one out of the airframe on an engine stand, however, it will leave that bay empty as the kit does not provide an option for a false engine front. The engines have to be installed even if you do not want to show them off.
Building up the interior takes a lot of steps. The ejection seat has two styles of ejection seat handles. The required 10g of weight is put into the gun ammunition boxes behind the cockpit. A pilot figure is included if you want to use one and a separate set of seat cushions is provided for this option. Eventually all the interior bits are installed into a single construct that will fit into the fuselage halves. There is a slot under this for another 50g of weight. Gun bays are provided and there are guns to fill them up. Once the outer nose sections are put around all this, you have the option of adding gun bay doors. Depending on which decal option you are using, holes will need to be opened in the upper fuselage halves.
Assembling the engines and exhaust takes up several more steps. Of course you can leave off some of these if you are going to model the engine access panels closed. The main gear wells and engine attachment areas are all part of the wing spar assembly. There are holes to open in the lower wing if you wish to install the rockets, wing fuel tanks, and/or the centerline fuel tank. Note that you cannot install the rockets if you choose the wing tanks.
Once the engines are installed, then the rest of the wing can be assembled. Again depending on which markings option you choose, large or small intake openings are added. The center fuselage is added to the wings after which the main gear, wheels, and doors are attached. I would leave these latter items off until after painting.
On the nose, the gear attachment points, nose gear,
nose wheel, and the nose cap are added before attaching that subassembly to the
rest of the fuselage. Then the clear bits are added. Two different canopies are
provided depending on the markings option. This item can be posed open if you
wish. We finally get to the tail section with its separate rudders and
elevators. Then the things under wings are glued in plac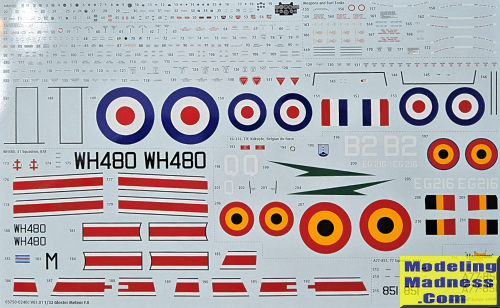 e.
The kit can be modeled with speed brakes and flaps raised or lowered. There are
optional ailerons depending on markings options.
e.
The kit can be modeled with speed brakes and flaps raised or lowered. There are
optional ailerons depending on markings options.
Instructions are quite complex with 118 construction steps. Revell paints make up the color references with some shades needing mixed. Three options are provided. The box art option from 41 Squadron RAF is the most complex. This plane is in overall high speed silver. A Belgian offering in camouflage colors with large red areas from a target towing flight. The third is also in overall high speed silver with the RAAF as flown in Korea. The large decal sheet is nicely printed and comes with a plethora of stencils. A full stencil placement guide is provided so you can get them all in place. Aftermarket sheets are few as this is still a fairly new kit so one hopes that more will become available as time goes on.
| CONCLUSIONS |
If you like Meteors and you like them large then this is a kit for you. Despite the large parts count, this should be a fairly straight-forward build that any somewhat experienced modeler can easily tackle.
| REFERENCES |
https://en.wikipedia.org/wiki/Gloster_Meteor#Variants
July 2026 Copyright ModelingMadness.com. All rights reserved. No
reproduction in part or in whole without express permission If you would like your product reviewed fairly and fairly quickly, please
contact
the editor or see other details in the
Note to
Contributors.