
Amodel 1/72 DH-104 Devon
| KIT #: | 72334 |
| PRICE: | @$40.00 by the time it gets to your door. |
| DECALS: | Two options |
| REVIEWER: | Scott Van Aken |
| NOTES: | Short run with photo etch fret. 2018 tooling |
| HISTORY |
The de Havilland DH.104 Dove was a British short-haul airliner developed and manufactured by de Havilland. It was a monoplane successor to the prewar de Havilland Dragon Rapide biplane. The design came about from the Brabazon Committee report which, amongst other aircraft types, called for a British-designed short-haul feeder for airlines.
The Dove was a popular aircraft and is considered to be one of Britain's most successful postwar civil designs, in excess of 500 aircraft being manufactured between 1946 and 1967. Several military variants were operated, such as the Devon by the Royal Air Force, the Sea Devon by the Royal Navy and the type also saw service with a number of overseas military forces.
A longer four-engined development of the Dove, intended for use in the less developed areas of the world, was the de Havilland Heron. A considerably re-designed three-engined variant of the Dove was built in Australia as the de Havilland Australia DHA-3 Drover.
An initial batch of 30 Devons was delivered to the Royal Air Force, these aircraft were used as VIP and light transports for over 30 years. The Royal New Zealand Air Force acquired 30 Devons between 1948 and 1954 and these remained in service for VIP, crew-training and light transport duties into the 1970s. Many other nation's military forces also used the DH-104, the Argentine Air Force being the largest operator with 50 aircraft ordered and delivered.
| THE KIT |
 This
is one of those kit buys that was inspired by a decal sheet. Though Airfix does
a nice Heron in 1/72 scale, no one did a Dove/Devon. Amodel has now come to the
rescue and this is their Devon boxing.
This
is one of those kit buys that was inspired by a decal sheet. Though Airfix does
a nice Heron in 1/72 scale, no one did a Dove/Devon. Amodel has now come to the
rescue and this is their Devon boxing.
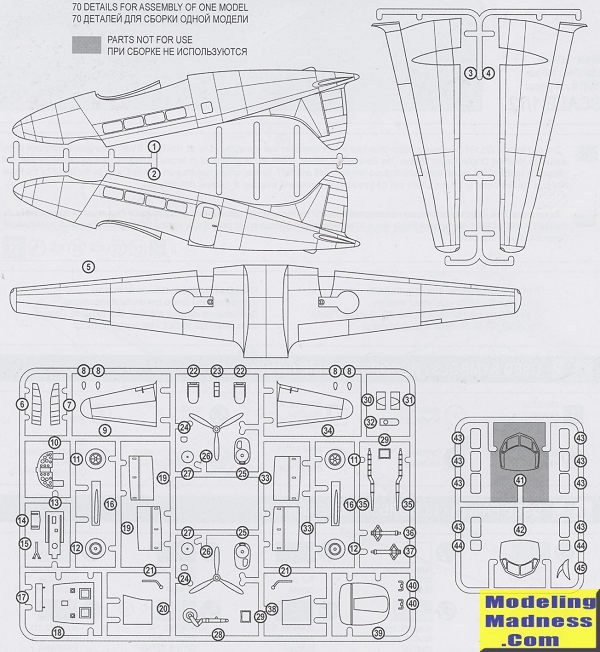
The instructions start in the cockpit and the amount of detail is adequate for this scale. Somewhat generic seats and no belts, but one does wonder how much will be seen through the transparency. The nose gear well has to be built up from four parts and the engine nacelles are also four pieces. There is no allowance made for the props to spin so you'll have to devise something from tubing or the such for that.
Before installing anything into the fuselage halves, the cabin windows are installed. The instructions show these being attached from the outside. I'd do a test fit to see if these could be left off until after painting. Conversely, you can prepaint the areas around the windows. With that done, the nose gear is attached to the nose well and that along with the cockpit is installed. There is no indication of any weight, but I'd put in as much as you can fit as bet it needs some.
With that done, the tailplanes are attached followed
by the wing. There is a single lower piece and two upper halves. The wing will
need filler. You see, in order to cast such a large piece, the sprue attachment
stub had to be l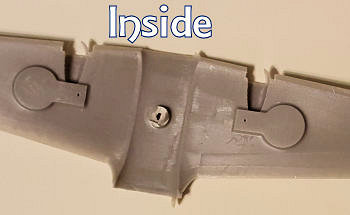 arge
and is in the middle of the wing. Removing this stub leaves a large hole in the
lower wing so break out the card/filler and prepare yourself for some ded
arge
and is in the middle of the wing. Removing this stub leaves a large hole in the
lower wing so break out the card/filler and prepare yourself for some ded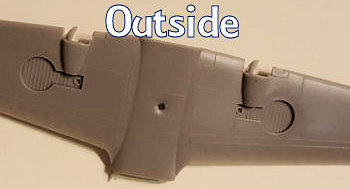 icated
filling. I'd use a two part filler or super glue as that much one-part filler
will shrink with time. With that on, the cockpit transparency is glued on. You
are provided with two. For the two markings options you use the one without the
side windows. The entire transparency save the windscreen frames is clear so
break out the masking fluid for this one.
icated
filling. I'd use a two part filler or super glue as that much one-part filler
will shrink with time. With that on, the cockpit transparency is glued on. You
are provided with two. For the two markings options you use the one without the
side windows. The entire transparency save the windscreen frames is clear so
break out the masking fluid for this one.
The next couple of steps have you install the engine nacelles along with the various landing gear legs, wheels and doors. You'll notice rather quickly that the wheel wells are too shallow to actually hold the wheels, but, if you want to model this gear up, simply use one half of the wheels and perhaps sand down the gear leg. Then you attach the props and determine if your option has the radio feed in the upper cockpit transparency.
But wait, this kit comes with photo etch. What about that. Well, there is another sheet included that replaces the final construction step. This includes external stuff like windscreen wipers, static dischargers, a variety of antennas and a mounting plate for the roof antenna. The construction step tells you which bits to use for which marking option.
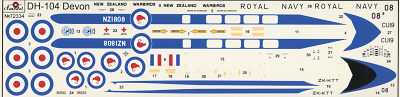 Speaking of
which, you get two in this kit. One is the box art war bird from the New Zealand
Air Force. Like the other option, it is in aircraft grey undersides/flight
surfaces with a white upper fuselage/fin. The broad fuselage stripe is provided
as a deal which is nice as is the nose anti-glare panel. By simply removing the
civil registration and the word 'warbirds' you can do a service aircraft. The
other option is a Sea Devon of the Royal Navy. This also includes the fuselage
stripe and nose anti-glare panel. No unit information is provided. This option
also appears to be based on a war bird. Decals are quite matte and in perfect
register. There are aftermarket sheets available for this kit if you don't like
the kit options.
Speaking of
which, you get two in this kit. One is the box art war bird from the New Zealand
Air Force. Like the other option, it is in aircraft grey undersides/flight
surfaces with a white upper fuselage/fin. The broad fuselage stripe is provided
as a deal which is nice as is the nose anti-glare panel. By simply removing the
civil registration and the word 'warbirds' you can do a service aircraft. The
other option is a Sea Devon of the Royal Navy. This also includes the fuselage
stripe and nose anti-glare panel. No unit information is provided. This option
also appears to be based on a war bird. Decals are quite matte and in perfect
register. There are aftermarket sheets available for this kit if you don't like
the kit options.
| CONCLUSIONS |
It has been pretty obvious over the years that the 'big boys' were not going to produce a kit of this plane and I've very pleased that Amodel has stepped up. I anticipate this taking a bit of time and effort to complete, but I'm also sure that it will make a very nice model for the shelves.
| REFERENCES |
https://en.wikipedia.org/wiki/De_Havilland_Dove
December 2018 Copyright ModelingMadness.com.
All rights reserved. If you would like your product reviewed fairly and
fairly quickly, please
contact
the editor
or see other details in the
Note to
Contributors.
Back to the Main Page
Back to the Review
Index Page
Back to the Previews Index Page