| KIT #: | 721023 |
| PRICE: | €41.50 from PJ Production |
| DECALS: | Four options |
| REVIEWER: | Scott Van Aken |
| NOTES: | Resin with photo etch and cast metal parts |
| HISTORY |
 Developed from the standard F-84F, the RF-84F needed a redesign of the nose and the wings in order to fulfil the tac recce requirements. Because the nose was needed for the camera suite, the intakes had to be moved to the side and were incorporated into the wing roots. Despite the general consensus that moving them there would reduce engine efficiency and cause a greater drag on the airframe, the RF-84F is only marginally slower than the standard F-84F.
Since the F-84F was chosen and the standard fighter-bomber by a number of NATO countries, it was logical that the RF version would also be picked up and so it was. In fact, the RF-84F often outlasted the standard fighter-bomber variant. Many nations holding on to them even as they converted to the F-104G, though some adopted recce pods for the F-104G. The last user of the RF-84F was Greece which didn't retire their last one until late in the 1980s.
| THE KIT |
PJ Production has done several full resin 1/72 kits and all have received a lot of praise. I finally was able to see one of these when they were kind enough to send one in for a review. Overall, it is a superb job of casting. The kit is complete with alignment pins and slots so it should build very much like a standard injection molded kit, but with the requirement that one use resin building techniques and materials.
 I found it a tad odd that such an aircraft would be kitted. However, the truth is that those already out there (basically the Italeri kit) has some shape inaccuracies. This is true of many kits that PJ Production has done over the years. The kit is quite complete and offers all you need. There are photo etch parts for some of the finer bits and I'm pleased to notice that none are really replacements for 3-D bits (like control sticks or pitot tubes) so are quite appropriate. Using cast metal landing gear on a resin kit is just common sense. Resin will deform over the years if the part is thin and carries any weight (such as landing gear). While some companies reinforce their gear with wire, cast metal makes the most sense.
The kit also includes markings for four NATO countries and the decals are well made. At the time I previewed the kit, I did not notice that I was missing the nose gear doors. Somehow these bits departed the resin pour stub prior to being packaged. An e-mail to PJ Production resulted in a replacement sprue.
Please visit the preview for a better look at what's in the box.
| CONSTRUCTION |
 There really isn't that much clean-up to this kit in comparison to some others I've done in the past. Some of the bits do require a razor saw to remove, but most can be cut off with a sharp knife. I found that most of the parts had some small amounts of flash that had to be removed and some of the smaller bits and gear doors were left on the sprues to ease painting.
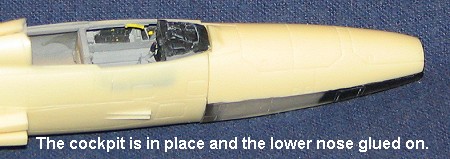
I started with the cockpit. This is fairly well done with a nice selections of boxes and stuff. I decided to paint my interior with Dark Gull Grey so used Testors Model Master enamels for this purpose. The instrument panel and shield were painted matte black. I glue on the instrument panel piece after dry brushing it with white and then glued on the control stick. You get two seats by no hint as to which version is used with which aircraft. I chose the one with the indented head rest. This seat has six parts, one of which is photo etched. Assembly wasn't too bad, but I had a bit of difficulty placing the arms. With all the bits in place, it was painted Dark Gull Grey as well. The head rest and ejection seat handles were painted white and later the head rest was painted red and the handles were done in yellow. The nice molded in seat belts were painted a dark olive green. I decided to leave the set out until near the end of the build.
 At this time, I glued in the interior to one half after painting the side consoles and some of the boxes in black and dry brushing them. I would suggest not attaching the interior, but allowing it to 'float' a bit as it is held securely in place and would have facilitated fit a bit later in the construction. After attaching the interior to one fuselage side, I glued the lower section of the fuselage together. Test fitting showed that the bit behind the seat may be a tight fit so by leaving the upper half unglued, I would have more room to work with things.
During this time, I also painted the inside of the lower nose black (mainly because the clear resin isn't very clear) and added in the nose gear well, which fit superbly. Then weight was a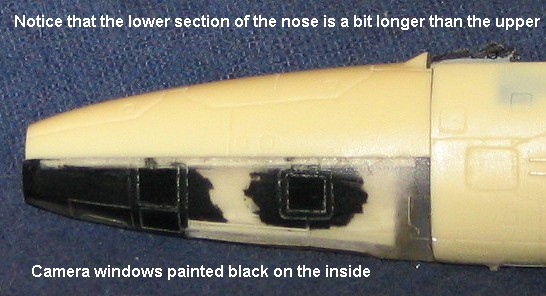 dded to the upper and lower nose halves as I wasn't sure if it was needed and figured having some was better than having a tail sitter. I next glued these halves together. Fit is quite good as there are positive locators. I did notice that the lower piece is a bit longer than the upper so mated things as best I could at the rear where it would match up with the rest of the fuselage. I then glued the lower part of the nose to the fuselage leaving the upper fuselage unglued. This was because the fit wasn't perfect and I wanted to have room to push things around. As it sits now, there will be a step between the fuselage and the nose which means the canopy will have a major gap in the front.
 I then installed the radio compartment behind the
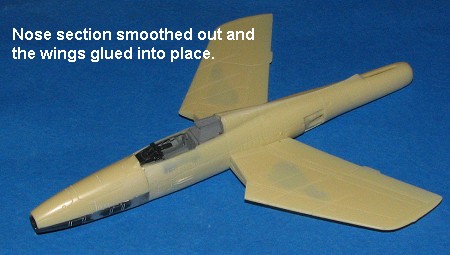
 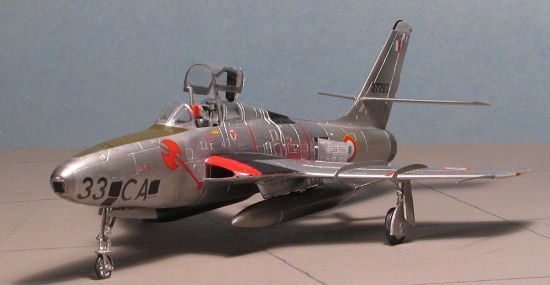 seat and glued the upper fuselage, holding it in place while the super glue dried. It was so tight that I was unable to get the radio compartment out to glue it in place! Then I pushed down on the upper portion of the forward fuselage that I'd not yet cemented and applied super glue in the slots. This cut down a teeny bit on the step, but not that much. I then sanded down all the seam areas to remove as much of the steps as I could. I also took this time to add in the wings. As you can see, the intakes are separate parts, but the fit of the wings is quite good and I anticipate no problems getting these installed.
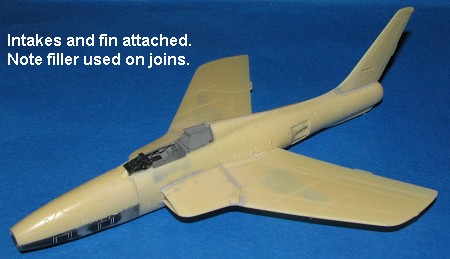 Well, the intakes were not that much of a problem, but they also did not fit at all well. Liberal use of super glue as a filler along with some preliminary sanding got them in place and several applications of Mr. Surfacer were needed. There is a brass splitter plate that fits into the inside of the intake. This fits well, but is a teeny bit smaller than the attachment area. Not enough to cause problems, but you should know about it.
Alright. Intakes in place so now on to the lower wing pylons. Again, fit is good, though you will have to drill the holes a tad larger. These are keyed somewhat for one side or the other so it a pylon doesn't fit on one side, try the other. I next attached the tail planes. These are very thin and I can see all sorts of air pockets. They may be just below the surface so I did not do any sanding for fear of breaking through the thin resin skin. Fit was good, but the inside forward pointy bits had been broken off during shipment. They are too small to replace and if you wanted to properly fix it, it would require removing a larger section and replacing it with card. I left it as is.
 At the nose, I sanded down the front and attached the clear forward piece, after painting the inside black. This was also not very clear so I'm glad PJP didn't decided to do the canopy like that. On the bottom of the aircraft. The metal landing gear were installed. A bit of bending was required once they were in place. I put mine too far outboard as I was later to discover so leave a small space.
 The nose gear required cleanup more than the main struts. There are small retraction struts for the main gear that you just sort of put in there as best you can. These are quite small and difficult to work with. I didn't put on the nose wheel steering strut as it had also disappeared with the nose gear doors. With the gear in place, I attached the gear doors. At this juncture, three weeks into the build, I still had not received the replacement nose gear doors. I did just tack the main wheels into place while I set things up. There is a small tab on the outermost gear door that you shouldn't remove (as I did on one) as this tab fits into the well (remember the space you left?). The large lower doors are well molded and fit perfectly. I recommend attaching the etched oleo scissors before the doors. I forgot and it was a bit of a chore to get them in place.
Next were the speed brakes. The outer portion is photo etch brass, while the inside is resin. I annealed the outer portion and formed them around a metal tube. Then I formed them around the fuselage to get a closer shape. These will not fit into the speed brake wells (a little bit too large) so you have to pose them open if you don't want to trim them. The trick is that the resin is flat and the brake insides are curved. There is a small space all around the resin part when installed so I glued one end first. Then I used clamps to hold down the rest while I applied glue to the edges. It seems to have worked rather well. These were not installed at this time, though I did try to clean up the actuator pistons. These have some rather large mold mismatch so unless you replace them with scratch-built ones, they will be a bit flat.
With that out of the way, I moved on to the drop tanks. I chose the small ones as the big ones just look too big. One of these had the mold sprue snapped off so I built up the nose with super glue and then sanded it to shape. The fins all had the small forward points broken and they were too fat to fit into the thin slots in the tanks provided. Were I smart, I'd have enlarged the slots, but I'm not and I just glued the fins in place. These were then reinforced somewhat by an additional application of super glue.
 Now on to the canopy. I still was fussing with the seat and getting it painted (I did check to be sure it fit), so cut out the canopy. PJP provides a spare and I needed it, having botched the first one due to a knife slip. After test fitting it several times, I decided that this was on kit that would look better with the canopy open. It meant that I had to cut the canopy into five sections; the windscreen, canopy itself, two side sections and the center section that was being replaced by a resin piece. I found fitting the rear side sections to be not as easy as I'd hoped. Same for the windscreen, which was further troubled by a bit of a step between the nose section and the rest of the fuselage that I mentioned earlier. After scraping down the forward portion of the rest of the fuselage, I was able to get a flat surface on which to fit the windscreen. Still needed to use a considerable amount of filler on it to smooth things out.
With those in place, I glued on the resin aft canopy support and then moved to install the wing fences. These are brass and commendably thin. I did, however, have to use a razor saw to cut into the leading edges of the wings as these openings were too small. The fences slid into place and were glued down. I then attached the speed brakes. I had to trim down the actuators once I had them glued in place as they are a bit too long. Attaching the brakes themselves was not the trauma I had anticipated.
| COLORS & MARKINGS |
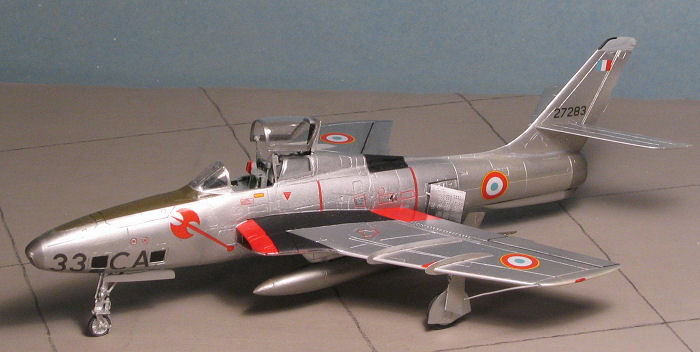
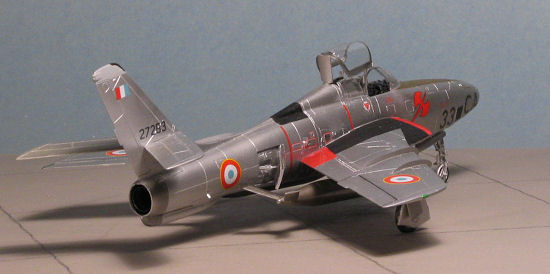
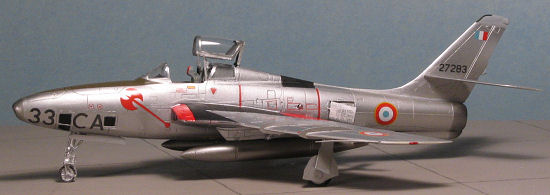
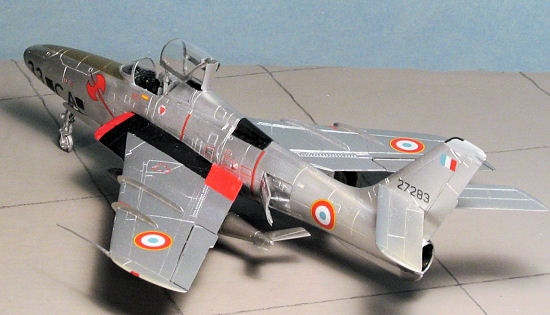
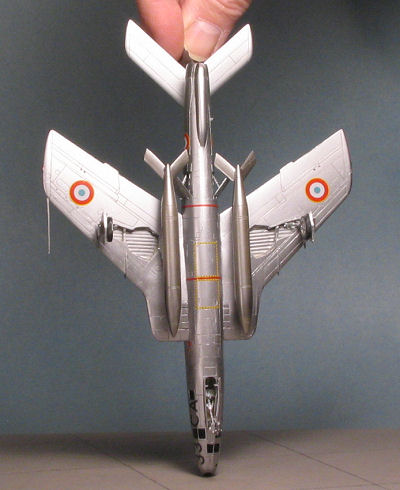
About this time, I realized it was appropriate for me to start painting. The canopy area was masked in preparation. I first sprayed on some Alclad II Aluminum to most of the airframe (I was using the nose section to hold onto things). When that dried, I sprayed the upper intake and flap section with Floquil's Reefer White. When dry, some Gunze red was sprayed in place. About this time, the long-awaited replacement nose gear sprue arrived. Thank you PJ Production. The nose gear doors were attached and the red areas masked off, and it was back to the paint shop.
 When I finally arrived (after battling through feline infested territory), I sprayed on the black wing walk areas and the black upper fuselage section. I also did the upper fin tip in a light grey. These were duly masked and the rest of the kit sprayed with Alclad II white aluminum. It showed up every little sanding mark and other glitch! The nose and tail section were then sprayed with Alclad II duralumin (probably misspelled that).
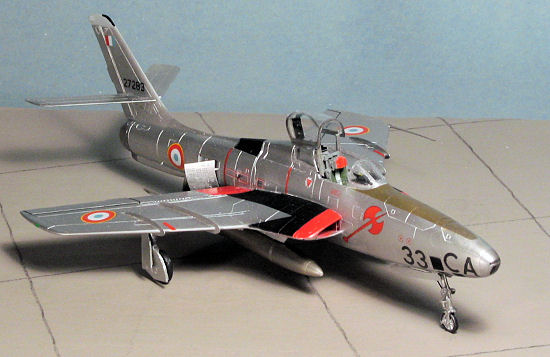
I returned to the bench where I did some careful masking removal and then painted the tires. When that was dry, I started on the decals. The ones in the kit are really superb. They are well printed and very thin, but not troublingly so as with some others I've used. I did note that the white is not that opaque, so it is a good thing that this wasn't a camouflaged aircraft or you'd see the color changes under roundels and such. There are a goodly number of stencils and such to apply as well, and these went over protuberances swimmingly after a dash of Microset decal solution. As I was applying the large axe markings on the nose, I realized that I'd forgotten the nose anti-glare panel. After the decals had set, I sprayed some Metallizer Sealer onto the nose section and when dry, carefully masked over the decals. I used some PollyScale Olive Drab acrylic for this section. Even more carefully peeling off the masking, I was relieved that the decals stayed put and continued with the decaling job. There are a myriad of decals for this aircraft, but the decals were superb.
| FINAL CONSTRUCTION |
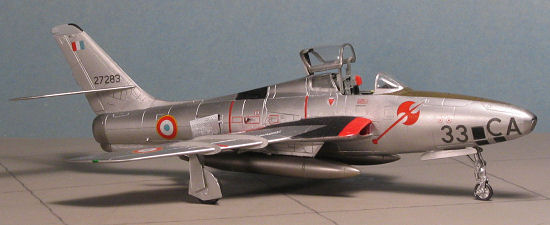
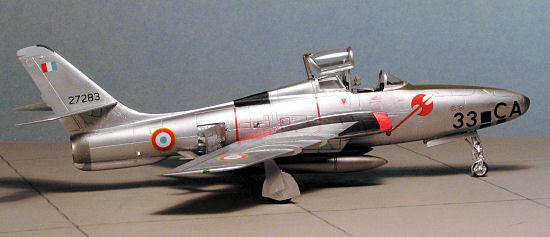
 Decals now securely in place, I attached some of the final bits. Starting with the cockpit, I glued on the canopy section, expecting all sorts of problems and didn't get them. I then put in the seat, which was a bit of a tight fit, despite test fitting it earlier. Then the canopy support struts. These are supposed to fit behind the seat, but gave me fits so I glued them as close to that area as I could. The drop tanks were then glued on with no drama as I'd opened up the attachment holes in them a bit just to be sure. I then glued in the exhaust that had been painted with Burnt Iron. The last piece to go on was the cast metal pitot tube. It is too large for the hole and nearly impossible to keep straight. This is a time when a section of tubing or resin or even stretched sprue might not be the best. No touch up painting was needed and the kit was finished.
| CONCLUSIONS |
This kit took me about a month to build, and I worked on it a bit nearly every day. It was longer than some resin kits, but considering the complexity of the kit and the amount of detail you get with it, I figure that is about right for an OOB build. I was impressed with the general good fit of the resin and metal parts. A lot of thought went into engineering this kit and the end result shows. While not a kit for the beginner, for those wanting a high quality multi-media kit that makes into a superb model, this one is hard to beat.
January 2006
#1397 in a series
Copyright ModelingMadness.com. All rights reserved. No reproduction in part or in whole without express permission.
My thanks to PJ Production for providing the review kit.
If you would like your product reviewed fairly and fairly quickly, please contact the editor or see other details in the