| KIT #: | FR0035 |
| PRICE: | $ |
| DECALS: | Three Options |
| REVIEWER: | Scott Van Aken |
| NOTES: | 2019 release |
| HISTORY |
The Super Mystère represents the final step in evolution which began with the Dassault Ouragan and progressed through the Mystère II/III and Mystère IV. While earlier Mystère variants could attain supersonic speeds only in a dive, the Super Mystère could exceed the speed of sound in level flight. This was achieved thanks to the new thin wing with 45° of sweep (compared with 41° of sweep in the Mystère IV and only 33° in Mystère II) and the use of an afterburner-equipped turbojet engine.
The first prototype Super Mystère B.1, powered by a Rolls-Royce Avon RA.7R, took to the air on 2 March 1955. The aircraft broke the sound barrier in level flight the following day.
As the Super Mystère B.2, sometimes known as the SMB.2, the aircraft entered production in 1957. The production version differed from the prototype by having a more powerful SNECMA Atar 101G engine. A total of 180 Super Mystère B.2s were built.
 In 1958, two Super Mystère B.4 prototypes were built. Equipped with a new 48°
swept wing and a more powerful SNECMA
Atar 9B engine, the aircraft were capable of Mach 1.4.
Production never materialized because the faster Dassault
Mirage III was entering service.
In 1958, two Super Mystère B.4 prototypes were built. Equipped with a new 48°
swept wing and a more powerful SNECMA
Atar 9B engine, the aircraft were capable of Mach 1.4.
Production never materialized because the faster Dassault
Mirage III was entering service.
In 1973, the Israeli Air Force and Honduras Air Force upgraded their Super Mystère B.2s with a non-afterburning version of the Pratt & Whitney J52-P8A and new avionics. In Israeli service these upgraded SMB.2s were also known as the IAI Sa'ar (after a Hebrew word meaning "storm").
The Super Mystère served with the French Air Force until 1977. In addition, 24 aircraft were sold to the Israeli Air Force in 1958. The aircraft saw action in the 1967 Six-Day War and the 1973 Yom Kippur War. They were well liked by the Israeli pilots and were a match for the Arab MiG-19 aircraft in air-to-air combat.
In 1976, Israel sold 12 complete airframes to Honduras. In 1979, Honduras purchased 4 more complete airframes, totaling 16 aircraft. They were involved in numerous border skirmishes with Sandinista Nicaragua and were finally withdrawn from service in 1996, replaced by 12 Northrop F-5Es. The 11 surviving aircraft are for sale as surplus and 1 more is preserved at the Honduras Air Museum.
| THE KIT |
 For
decades, the only nice Super Mystere available in this scale has been by Airfix.
While it was top notch in the 1970s, there has been a need for a newer
technology kit. Thanks to the Special Hobby/Azur/FRROM folks, we now have an up
to date kit. You would expect one with a lot of parts and we do have that. In
addition, there are no photo etch and no resin parts, which would make many who
do not like dealing with these materials.
For
decades, the only nice Super Mystere available in this scale has been by Airfix.
While it was top notch in the 1970s, there has been a need for a newer
technology kit. Thanks to the Special Hobby/Azur/FRROM folks, we now have an up
to date kit. You would expect one with a lot of parts and we do have that. In
addition, there are no photo etch and no resin parts, which would make many who
do not like dealing with these materials.
Some of the features of the kit are full intake and exhaust that start and end with the compressor stages, a well done cockpit with a decal for the instrument panel, and a separate external exhaust piece for those boxings to come that have the extended tailpipe section. There is no indication of any nose weight, but there is room above the intake for it. The underside of the intake is the nose gear well. A separate nose piece is also provided.
Wings are an upper and lower wing section and the upper section has the outer well piece. The inner piece is inserted into the appropriate fuselage half prior to assembling the halves. Landing gear are very nicely molded with all the oleo scissors molded in place. Gear doors are also nicely done and there are no ejector marks on the inside. The inner main gear doors are usually closed on the ground, but open options are provided.
 The kit instructions have you
complete the seat late in the process and there are
five pieces to this assembly. You are able to pose the canopy open or closed and
separate pieces are included. Under the wings you have a pair of fuel tanks with
pylons and outer missile pylons with missiles. Two different size fuel tanks are
included so you have a choice. The underwing mounting holes are a bit shallow
and will need to be deepened.
The kit instructions have you
complete the seat late in the process and there are
five pieces to this assembly. You are able to pose the canopy open or closed and
separate pieces are included. Under the wings you have a pair of fuel tanks with
pylons and outer missile pylons with missiles. Two different size fuel tanks are
included so you have a choice. The underwing mounting holes are a bit shallow
and will need to be deepened.
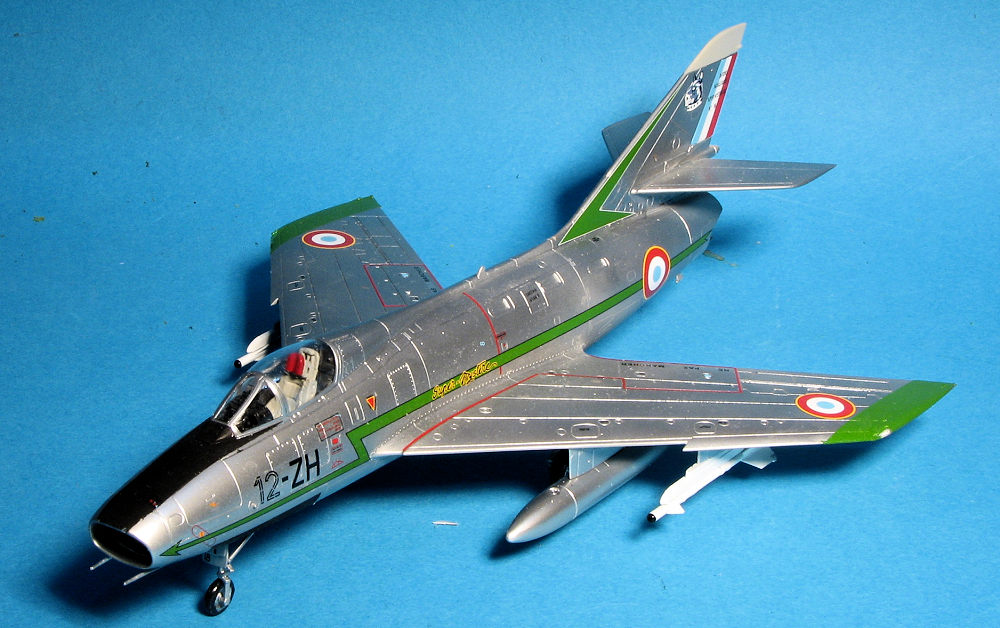
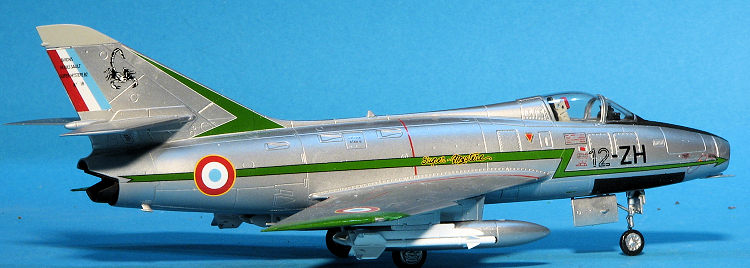
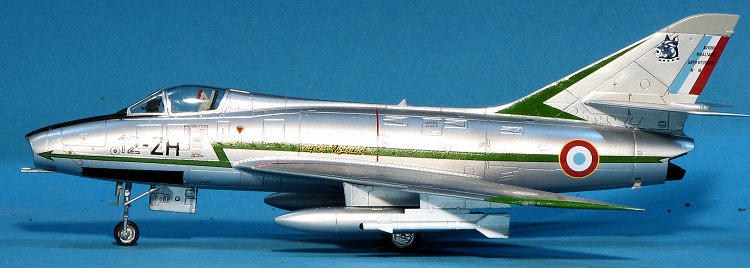
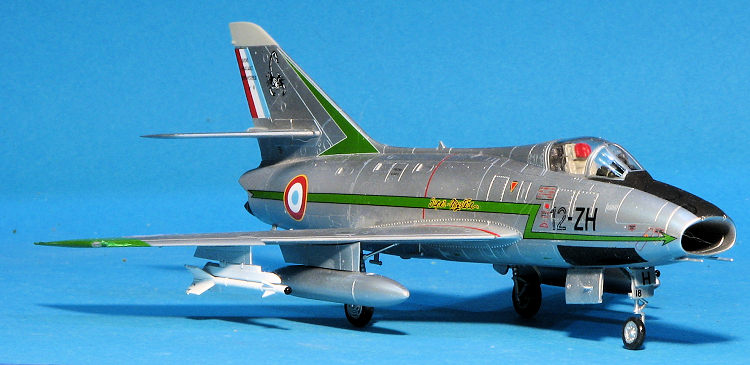
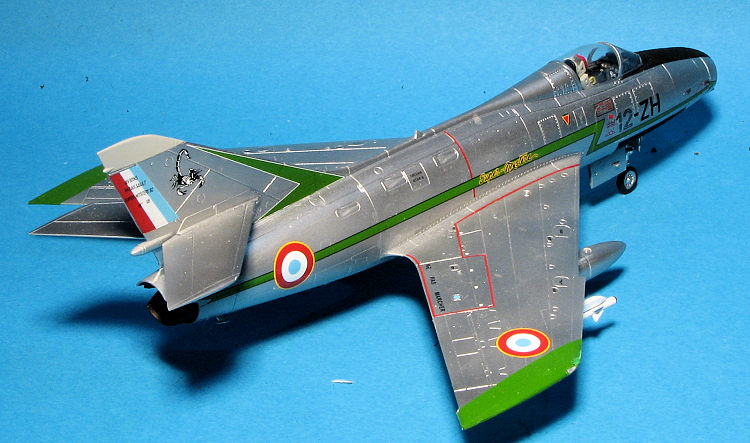
Instructions are superb and in color. Paint references are with Gunze paints. All three options are in unpainted metal with a black anti-glare panel on the nose. The box art plane is from EC 1/10 'Valois' from 1961. It has blue trim. With green trim is a plane of EC 2/12 'Cambrai' from 1968. Finally, from EC 1/5 'Vendee' is a red trimmed aircraft from 1961. Included in the decals are the color wing tip markings as well as a full set of stencils. The sheet is superbly printed by Cartograf.
| CONSTRUCTION |
It has been a while since I have built a kit molded by Special Hobby (Azur/FRROM is a branch), but when I had a chance to look this one over, it immediately went onto the work bench. This is partially because of the subject and partially because of how well some of the parts matched up when I did some test fitting.
As is the norm for me, I started by building up subassemblies, and actually
the instructions do somewhat the same thing. Before that, I needed to prepaint a
number of parts. This included the intake and exhaust parts, the wheel wells,
and the cockpit. With the cockpit, I actually built up the big bits prior to
painting. The 'pit is black which makes for a dark interior. This was later dry
brushed with white to lighten things up a bit. I used the decal over the
instrument panel. I also built the bang seat which isn't really installed until
much later in the build. When I finally started adding glue, I was quite
impressed 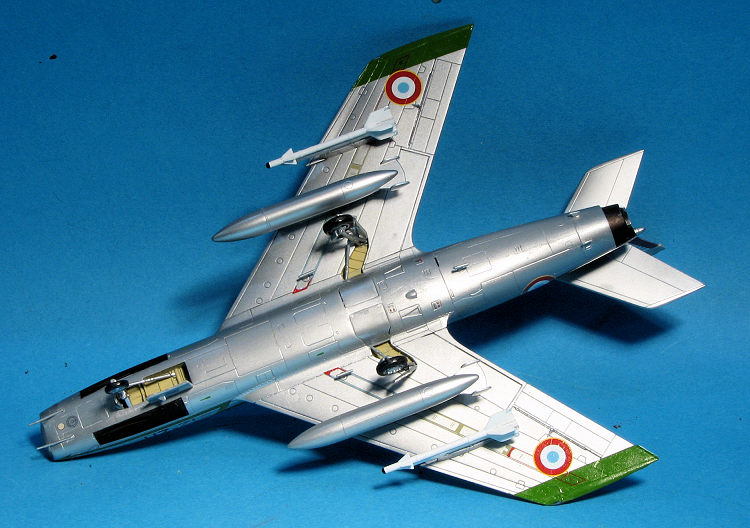 by how well parts actually fit together. It seems that SH has hired
someone who studied the Tamiya method of kit design. While not quite to those
standards, parts fit where they should and there were keyways to assist in
alignment.
by how well parts actually fit together. It seems that SH has hired
someone who studied the Tamiya method of kit design. While not quite to those
standards, parts fit where they should and there were keyways to assist in
alignment.
Eventually, I got most of the bits for inside the fuselage halves done. I found that the rear fuselage extension did not fit very tightly and left a rather noticeable gap when all was said and done. This later seemed to be about the norm for airframe fit. Now Azur does not indicate the need for nose weight, and taping on parts, I could see where none may be needed, but as I'm paranoid about tail sitting, I added about 5 grams above the intake before closing the fuselage halves.
Once the halves were closed and the seams dealt with, I glued on the nose piece and fin. As I mentioned above, there were gaps that needed to be dealt with. This was after trimming the mating surfaces and letting the glue soften the plastic (which actually helped quite a bit). With that done, I attached the wings (which had been built up earlier) and the tailplanes. After getting these in place, I noticed that I had the intake piece slightly out of alignment, but it was too late to do anything about it now.
Though the installation of the canopy and windscreen wasn't until the instruction sheet's last steps, I was building this one canopy closed and so worked on that prior to painting. There is an instrument panel anti-glare covering along with head armor and a gun sight to install. Then the seat had to be painted and installed. This was masked and the various wells were filled with Silly Putty. I also put this around and inside the burner petals as they'd already been painted.
| COLORS & MARKINGS |
A simple scheme for the most part as things are overall aluminum. I used Alclad II for this. Then masked and painted the nose anti-glare panel and the areas around the guns. The fin tip was painted a light grey. I didn't discover until the model was almost completely decaled that the fuselage spine was also to be painted light grey.
 With the paint
done, I installed the main gear members. Then the main inner gear doors were
glued in the closed position after cutting away the hinges. I was going to do
that with the large nose gear door, but I must have placed the retraction strut
wrong as it would not fit so I left it open. The very small nose gear doors were
left off until after decaling as were the outer main gear doors due to all the
handling required.
With the paint
done, I installed the main gear members. Then the main inner gear doors were
glued in the closed position after cutting away the hinges. I was going to do
that with the large nose gear door, but I must have placed the retraction strut
wrong as it would not fit so I left it open. The very small nose gear doors were
left off until after decaling as were the outer main gear doors due to all the
handling required.
The decals were then applied. These generally fit quite well. The long fuselage bolt is easily torn so care and a lot of water is needed to get it in place. Typical of jets of the time, there are a ton of small stencils, but I used them all. That added a week to the build. Seriously. Couple of main notes. On the underside of the wings are some long decals. If you did as I and installed the wing pylons and the small antennas, you'll have to remove the pylons and cut the decal so it will slip over the antennas. Leave all the underside bits off until after decalling.
When all that was done, I started adding the final bits. I somehow lost one of the main gear wheels to robbed another from a second kit I have. I then added the remaining gear doors, the nose probes, and replaced the pylons I removed. I used the smaller of the two drop tanks and those fit with no issues. Same with the missile rails and missiles. There are no missile decals and I can't believe they were simply overall white with no markings. I used no clear coat so unmasked the canopy and windscreen and that was it.
| CONCLUSIONS |
This is the best kit from the Special Hobby gang that I've yet to build. The parts fit quite well and so there is minimal fussing with it. The instructions are actually quite good though I wish they'd have mentioned the bit about the lower wing decals. Finally, the decal selection was quite colorful and any of the three options would have been quite nice.
| REFERENCES |
https://en.wikipedia.org/wiki/Dassault_Super_Myst%C3%A8re
August 2019 Thanks to
www.frrom.com for the review kit. You can find
this kit at your favorite hobby shop
or on-line retailer.
If you would like your product reviewed fairly and fairly quickly, please contact the editor or see other details in the Note to Contributors.
Back to the Main Page Back to the Review Index Page Back to the Previews Index Page