 Kit #: 4805
 Czech Model 1/48 FJ-1 Fury
Kit #: 4805
MSRP: 29.95
Decals: Two aircraft from VF-51
Date of Review:
Review and Images by: Scott Van Aken
`

North American's FJ-1 was it's first foray into the world of jet powered aircraft. It was also it's first Navy fighter. This design was further modified to become the famous F-86 Sabre of Korean War fame. Built in 1945, it was advanced for it's time, but quickly taken over by even more advanced designs like the FH-1 Phantom and later the F9F Panther. It was recognized that these early naval jets would only be stepping stones to better aircraft so only about 30 aircraft were produced. They were used to develop operational procedures and tactics for Naval jet aircraft. Only one active squadron; VF-5A (later redesignated VF-51) operated the type and it was taken on only two cruises. The aircraft that survived were turned over to the Reserves and flown by units at Oakland, Olathe, Los Alamitos and Dallas. By 1953 they were gone from the flight line.
This is the fifth kit by Czech Model and each one looks better than the
one before it. This one is typical in that it has a folded single-sheet
instruction, and Propagteam decals. The instructions are more informative and
provide better construction tips than the previous sheet. The resin parts are
also very well done, but typical for me with Czech Model kits, parts were
broken; in this case the exhaust pipe. I do wish the resin parts were better
protected from damage other than being put together in a bag where the jostling
and bumping from shipment causes the parts to come together and thus become
damaged. As you can see from the below image, the sprue gates are much smaller,
though there are still injector pins that must be removed from the wings and
fuselage.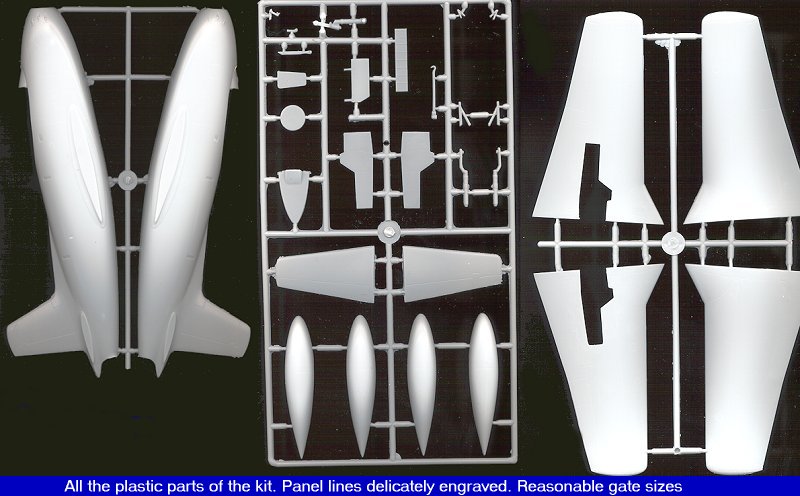
 What isvery nice is that two crystal clear canopies are provided so you can
screw one up. One little thing about the canopy is that I believe the center
panel of the windscreen should be flat where the vac canopy has that panel
curved. I'll let the experts decide if that is correct or not.
What isvery nice is that two crystal clear canopies are provided so you can
screw one up. One little thing about the canopy is that I believe the center
panel of the windscreen should be flat where the vac canopy has that panel
curved. I'll let the experts decide if that is correct or not. 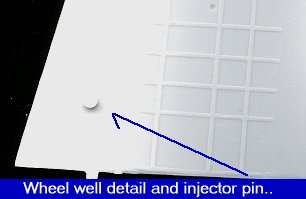
First step for this kit is to remove the injector pin stubs and the blocks from the resin pieces. Whenever sanding resin, make sure that you do not breathe the dust as it is a major irritant. You can either wet sand or or wear a filter mask to prevent inhaling the dust.
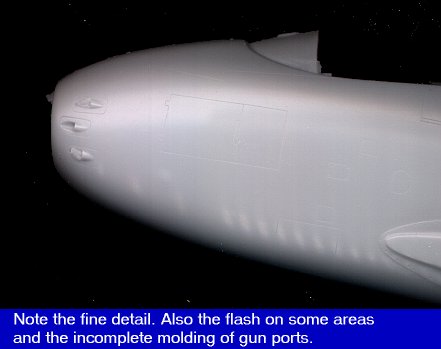
One of the first things that I noticed were that the wings were warped. Nota major problem, but one that needs attention. Imagine it is because of the size of the parts. No other Czech Model kit has parts of this size and they do a very good job of carrying out the molding, but still the wings are warped. Also noted were flash on many of the edges and some parts had incomplete molding. This was most noticeable on the fuselage where three of the six-gun ports were plugged and a couple of the intakes on the side were also plugged. It just means more work for the modeler to clean up these areas; the fuselage intakes being particularly difficult to dig out and smooth as they are of a slit type.
Now on to the kit. Once all the parts were removed from
their resin carrier, the cockpit was built up. This is a complete resin assembly and is
superbly done. Dry fitting showed that unlike the XP-77 built a few months ago,
this one fits very well. At this time the nose wheel well, intake and exhaust
blanks were dry fit. These all fit very well, though the resin intake seems to be a bit undersize to fit the opening. Nothing a bit of filler won't
cure. The cockpit was then painted an interior green and set aside to dry. The
nose well was then glued in place with superglue. Again the fit is great. If you recall, the exhaust was broken (actually rather badly due to
very thin resin), so that had to be repaired using a lot of superglue to prevent
an additional damage. 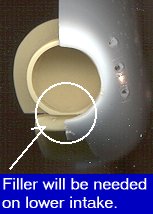 It
was then slid into place and superglued. The intake was next. The instructions
tell you that you need to sand away at the top of the nose well to get it to fit. That I did and was able to get the top to fit beautifully.
However, the bottom of the intake has quite a gap that will need filled once the
fuselage halves are finally glued together. There is a ton of space in the
forward fuselage for weight so a couple of fishing weights were glued in place
to hopefully prevent any tail sitting.
It
was then slid into place and superglued. The intake was next. The instructions
tell you that you need to sand away at the top of the nose well to get it to fit. That I did and was able to get the top to fit beautifully.
However, the bottom of the intake has quite a gap that will need filled once the
fuselage halves are finally glued together. There is a ton of space in the
forward fuselage for weight so a couple of fishing weights were glued in place
to hopefully prevent any tail sitting.
Attention was then paid to other parts of the airframe. The wings were
removed, cleaned up and glued together. The main gear wells have a rather
rudimentary detail in them and are not boxed in so this is an area that many of you
may wish to add more detail. I left them as they were. Once the glue had seethe seams were cleaned up and the tip lights were cut off and replaced
with colored plastic. Tip tanks were next and glued together. Now you are
probably thinking that I must have a screw loose. Why install wingtip lights if
they will be covered by tip tanks? Well, the FJ-1 flew as often as not without
the tip tanks and I am hoping that the tanks will be a 'press fit' and just
slide over the tips so the aircraft can be displayed both with and withoutthem. Guess we will have to see how it turns out.
While the glue was setting on that, the cockpit from the instrument panel on up was painted flat black as per the directives of the day. The cockpit was then given a dark wash and then drybrushed to bring out the details.As that was drying, the fuselage was worked on. Specifically the gun ports were dug out (those that were imperfectly molded) and drilled, the tail hook recess also needed reshaping as there were blobs of plastic filling the recess. Then the cover plate was glued over the top as per the instructions. Once the cockpit was dry it was superglued in place and then the fuselage halves were glued together. Overall the fit wasn't bad at all. I had anticipated lot of problems, but it didn't happen. What I did find was that the intake was a very poor fit. It turned out to be more undersized that I had thought and so a lot of filling and filing was needed to get even an acceptable fit for this part. Also discovered was a slight short shot of one fuselage half in the exhaust area, causing some consternation there as well. Nothing that cannot be fixed by filler, but something that adds to the difficulty of construction.
While that was drying, the tip tanks were sanded and, where needed, filler was added. This brings up a bit of a gripe I have with Czech Model kits.That is the panel lines. They are so fine that any sanding at all will obliterate them. To add to it, the aileron, rudder and elevator hinge areas are Justas faint. One would think that these parts of the airframe could be more pronounced. These may seem like minor points, but for these kits to improve, things like this are going to have to be addressed. Sure, these are short run kits. Sure, I could always go to building vacuforms. Sure, I shouldn't expect the same level of quality as a main-stream kit. All valid points, but it isn't something that is beyond the abilities of these kit makers.
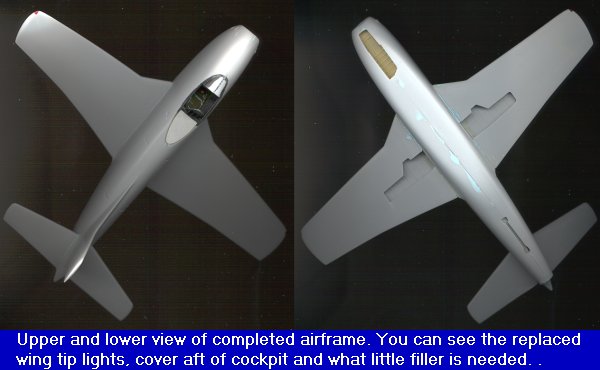 Meanwhile, back at the kit. There were a few bits that needed filler on the
fuselage so that was taken care of. Looking behind the cockpit, there is a
gaping hole. A bit of fiddling around with the canopy and the insert that fits init showed that if I wanted to open the canopy, this hole would be VERY
visible. The only cure was to make a cover for it out of plastic sheet. In that
way if the canopy was to be open, it would look a lot neater. At this time
the tailplanes and wings were glued on. Both of these are butt joints. Should
one desire, spars and pins could easily be made, but frankly the semi-softness
of the plastic pretty well ensures a good bond. The instructions show the
correct dihedral for the wings and tailplanes. A touch of filler was used at the roots to smooth things out a bit. For me, this kit was going
together in record time. From opening the plastic to this stage was less than
two days!
Meanwhile, back at the kit. There were a few bits that needed filler on the
fuselage so that was taken care of. Looking behind the cockpit, there is a
gaping hole. A bit of fiddling around with the canopy and the insert that fits init showed that if I wanted to open the canopy, this hole would be VERY
visible. The only cure was to make a cover for it out of plastic sheet. In that
way if the canopy was to be open, it would look a lot neater. At this time
the tailplanes and wings were glued on. Both of these are butt joints. Should
one desire, spars and pins could easily be made, but frankly the semi-softness
of the plastic pretty well ensures a good bond. The instructions show the
correct dihedral for the wings and tailplanes. A touch of filler was used at the roots to smooth things out a bit. For me, this kit was going
together in record time. From opening the plastic to this stage was less than
two days!
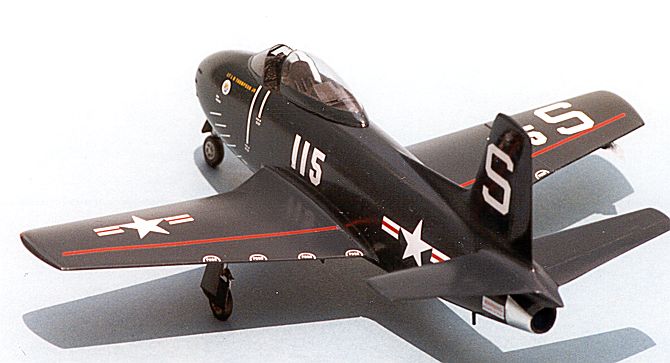
While all this was curing, attention was turned to the tip tanks. Now I realize that these may not be used at all, but no sense in not building them right. After the halves were glued together and smoothed out, the tips were cutoff and replaced with clear plastic. I believe that either landing lights were placed here as photos I have seen of the tanks show a clear tip. The clear plastic came from an old toothbrush handle. Once dry it was sanded to shape and then polished. The fins for the tanks are resin and they were carefully scribed away with a sharp Xacto. Superglue was used to attach them to the tanks. I have been told that these tanks are not very accurate and that the aircraft actually used old F4U Corsair drop tanks. Apparently, to 'accurize' the kit tanks, you need to add the weld bead that runs for much of the top/bottom length of the tank. Well, I don't know about that but there is the info in case you want to modify the kit ones or rob a Corsair kit for the tanks.
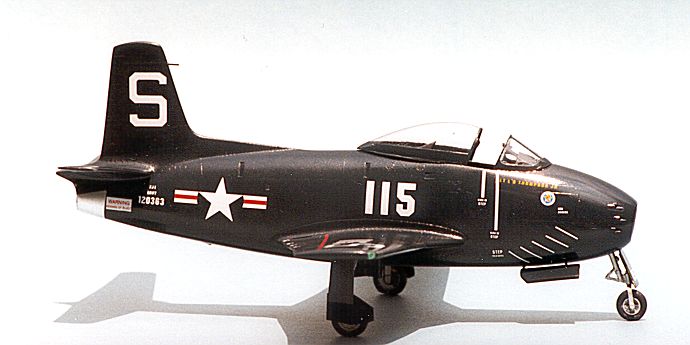
Next step was to trim the canopy. This was accomplished without the usual problems as it seems the canopy was actually designed for this kit!! After that it was masked off and set aside for painting. Painting is the next step and Aeromaster Gloss Dark Sea Blue enamel was chosen (mainly because I had a bottle of it in the paint bin). The first part painted was the upper half of the airframe. The cockpit was stuffed with tissue to prevent overspray from getting in there. Once the upper was painted, I painted the wheel wells.It was tough to decide what colors to paint these. There is much photographic evidence on how Korean War era Navy aircraft such as Panthers and Banshees were done, but darn little on the FJ-1. Photographs of the time were not very helpful as the gear doors and such were always in dark shadow. After making a few Internet Inquiries, I got a very nice response from Larry Webster who helped move the New England Air Museum FJ-1 last year. He told me that the gear wells and nose gear doors were interior green and the main gear doors were Dark Sea Blue. This makes some sense as a period photo of an FJ-1showed the open gun bay to be chromate in color. Anyway, it would provide a bit more color contrast than painting the whole thing Dark Sea Blue, so that is how I went.
 Once
the paint was fully dry, the landing gear were installed. Typically the fit
wasn't very good with the gear having a much larger gluing surface than the
slots and holes provided. The holes in the wing were enlarged to accept the
struts and the nose gear was adjusted to properly fit. Superglue was used. Next
the wheels were installed. The nose wheel fit very well though it ended up
jutting too far forward. However, the attachment points for the main wheels are too short to fit in the wheels so some
creative gluing was required.
Once
the paint was fully dry, the landing gear were installed. Typically the fit
wasn't very good with the gear having a much larger gluing surface than the
slots and holes provided. The holes in the wing were enlarged to accept the
struts and the nose gear was adjusted to properly fit. Superglue was used. Next
the wheels were installed. The nose wheel fit very well though it ended up
jutting too far forward. However, the attachment points for the main wheels are too short to fit in the wheels so some
creative gluing was required.
When the kit was on it's gear it was time to attach the gear doors and the canopy. I cut the canopy to allow it to be positioned open so all the cockpit detail could be seen. Non-fogging superglue was used for the windscreen, but I still managed to get some on the inside of the screen :( The canopy was also superglued on as was the insert. Now it was on to the decals. These are really super and very opaque. Even with the dark blue background there was no bleed thorough. The decals are super thin so require a bit of care to use. You will quickly notice that most of them are oversize for the aircraft. If they would have scaled them down about 15%, they would-be perfect. Doesn't make them unusable, just makes them look a bit odd when compared to photos. A word of warning on the five angle of attack stripes on the lower nose. These must be cut apart before application or they will not match up to the photo or instructions. Also, those eight half circles all go on the trailing edge of the flaps. There were a few other decals that took some deciphering to find out their location and I never did find out where the white 'T' or the four lines of lettering next to it went. All thedecals reacted well to Champ setting solution.
Once the decals were dry, the kit was wiped down to remove excess setting solution then given a nice gloss coat. Unfortunately for me, I think my spray room was too humid as I was left with a slightly 'pebbly' surface and not the smooth one I had hoped for. Nothing major as this is not a contest quality kit anyway, but frustrating. Some of the really fine bits like the tail pitot (which I broke almost as soon as I removed it from the resin block) and the fuel dump (which was drilled out) were attached and final touchup was done with a brush. Gear doors were cut and glued in place and the tail section given a piece of Bare Metal Foil matte aluminum.
Overall, I really liked this kit. For one, it is a subject I like, having built a Rareplane 1/72 vac and a Merlin 1/72 kit of this aircraft in years past. Another is that it is probably the best short run kit from the Czech Republic I have ever built and it was finished in less than a week; a real light speed job for me as it usually takes a month or two at best for me to build a kit from start to finish. I highly recommend this kit; especially for those looking for their first short run model. It makes a great introduction to the genre.
Copyright ModelingMadness.com. All rights reserved.
No reproduction in part or in whole without express permission from the editor. Back to Reviews Page
2022