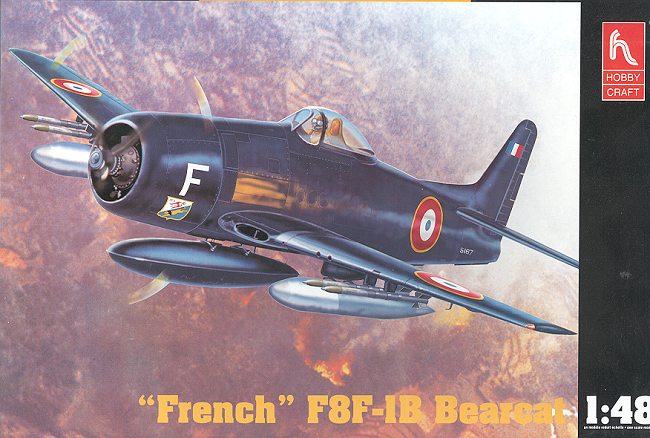
Hobbycraft 1/48 F8F-1B Bearcat
|
KIT # |
1441 |
|
PRICE: |
$16.98 |
|
DECALS: |
several aircraft |
|
REVIEW: |
|
|
NOTES: |
|
HISTORY |

Grumman's stubby little Bearcat was the result of putting the largest engine into the smallest possible airframe that could accommodate all the usual required things for use on aircraft carriers. The aircraft itself was probably the finest piston-engined Naval fighter to be produced, though I'm sure there are some FAA protagonists that would disagree! The aircraft was all that the Navy wanted and more, however, the end of the war in the Pacific meant that there was no real need for the aircraft and proposed construction was severely curtailed, resulting in only 1,265 aircraft being produced between August 1944 and May 1949. No Bearcats saw action on American carriers either during WW2 or during Korea, as by that time, jets were already in place as fighters. In civilian hands, the Bearcat proved itself to be a superb air racer, with Darryl Greenameyer's Conquest I finally beating the world speed record for prop driven aircraft in 1969, 30 years after it was last set by the Me-209v1.
 It was the French who ended up taking the Bearcat into combat. As is
so often the case, it was used as a ground attack platform, and not as a
fighter. To my knowledge, the F8F never shot down an aerial victim. France was
the first country to receive export Bearcats in 1951; all of the 140 delivered
being F8F-1 and F8F-1B variants. The -1B were cannon armed. All of these
aircraft were delivered to French Indochina, where the French were having a bit
of trouble with Communist insurgents.
It was the French who ended up taking the Bearcat into combat. As is
so often the case, it was used as a ground attack platform, and not as a
fighter. To my knowledge, the F8F never shot down an aerial victim. France was
the first country to receive export Bearcats in 1951; all of the 140 delivered
being F8F-1 and F8F-1B variants. The -1B were cannon armed. All of these
aircraft were delivered to French Indochina, where the French were having a bit
of trouble with Communist insurgents.
Eventually ten squadrons were outfitted with the Bearcat and all of them served in Indochina. They were all used for ground support, though in reality there were never more than four squadrons' on active duty at any one time. This happened during the siege of Dien Bien Phu in early 1954 during the height of the fighting. Besides being operated as fighter bombers, a few were given to reconnaissance squadrons, where a camera pod was placed on the centerline rack.
When the French part of the Indochina war ended in mid 1954, the French then turned over its Bearcats to the South Vietnamese and Thai Air Forces. The US also supplied Bearcats to Thailand, all of them F8F-1 and -1Bs. The -1Bs were never in operational service and were used for spares. Thailand was the final operator of the Bearcat, striking the last one from service in 1963.
|
THE KIT |
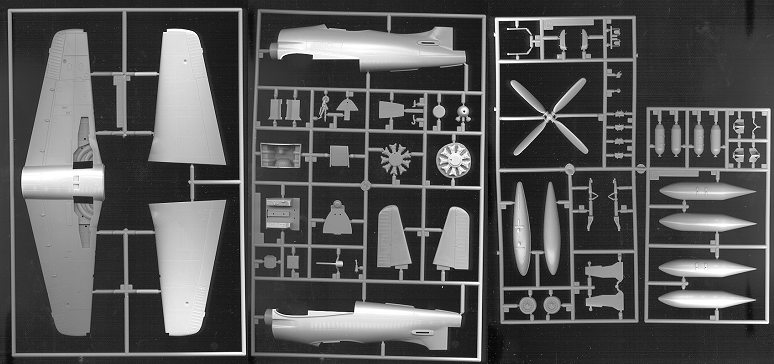
 Hobbycraft's kit of the Bearcat is really very nicely done. It is
pretty complete and offers everything that one would look for in a 1990s model
kit. Detail is good and enough for most modelers, with crisp engraved panel
lines and a nicely detailed interior and wheel wells. Those who have criticized
this kit have generally pointed to the engine cowling as probably the biggest
area of concern. They say that the cowling edge is too sharp and needs to be
more rounded. A number of aftermarket cowlings are available for those who wish
to replace this item. There are also aftermarket interiors and wheel wells
should you wish to triple the cost of your F8F!
Hobbycraft's kit of the Bearcat is really very nicely done. It is
pretty complete and offers everything that one would look for in a 1990s model
kit. Detail is good and enough for most modelers, with crisp engraved panel
lines and a nicely detailed interior and wheel wells. Those who have criticized
this kit have generally pointed to the engine cowling as probably the biggest
area of concern. They say that the cowling edge is too sharp and needs to be
more rounded. A number of aftermarket cowlings are available for those who wish
to replace this item. There are also aftermarket interiors and wheel wells
should you wish to triple the cost of your F8F!
Typical of kits, there are the needed parts only to do an F8F-1B. The kit is designed for the taller tail and different cowling of the -2, which are not included in this kit. This version also has the additional underwing armament of napalm tanks and bombs as used by the French. They also used rockets, but despite being shown on the box top, those are not to be found amongst the sprues. Also included is a two-piece canopy so that you can show off the interior. I am puzzled by why some other companies still do not provide this option as it seems like such a simple thing.
Hobbycraft has often been derided on its instruction sheet.
Basically for it being weak in calling out colors in the construction steps.
This one is no exception. There is no hint as to what color landing gear struts,
wheels wells, cockpit interior, or any other part of the inside of the plane
should be painted! It is only when the builder looks at some small boxes in the
decaling section that one finds information on the cockpit colors. Like
most builders and reviewers, I 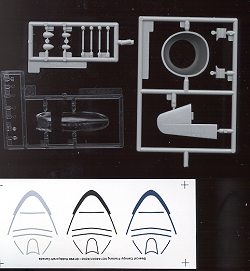 find this to be an incredible oversight
on the part of Hobbycraft. Sure, more experienced modelers will have a good idea
of what to paint these parts, but what about those who don't?
find this to be an incredible oversight
on the part of Hobbycraft. Sure, more experienced modelers will have a good idea
of what to paint these parts, but what about those who don't?
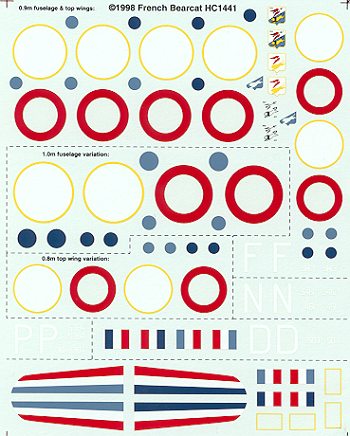
The decals provided are for four aircraft at Dien Bien Phu in 1954. All of them are overall gloss sea blue, albeit that the gloss is probably gone from the planes by this time! The Hobbycraft decal sheet is just superb, offering several different roundel sizes for the builder to choose from. There are also two different shades of blue for these roundels as color images of these aircraft are quite rare. These decals are a huge improvement over earlier sheets and are truly first rate. I robbed a few roundels for another project and was very impressed with the quality. Way to go, Hobbycraft!
In addition to the usual markings, Hobbycraft have included a smaller decal sheet that has canopy frames on it. These are in two shades of blue and aluminum. Many prefer to use things like this as their canopy masking abilities are not that good. Hobbycraft should be lauded for including them as well.
|
CONSTRUCTION |
As with most aircraft kits, this one starts with the cockpit. The first thing I did was to glue in all the cockpit components into the tub and then paint it and the sidewalls of the fuselage with US interior green. Once that was done, the instrument panel and side consoles were painted flat black. While I had the black out, the aft section of engine cylinders was also painted flat black as was the control stick and the head rest. When all that was dry, the flat black bits were then drybrushed with steel to bring out detail. I also drybrushed the rest of the cockpit with this color.
 While that was drying, I glued together the wings. The fit is quite
good. It was then that I realized that I forgot the wheel well center section.
There is an intake trunk that fits into the lower wing and then the center
section. This is all supposed to be done prior to gluing the upper and lower
wing sections, but fortunately, there is enough give in it to do it later.
(whew!) Don't forget to open up the required holes in the lower wing for
whatever stuff you are going to have hanging from there. I opened up all of them
except for the centerline fuel tank. I found quite a few French Bearcat images
and few of them showed the centerline tank. I also glued the napalm tanks
together. I'm going to use those instead of the 500 lb bombs. For the rockets, I
have some from a Hasegawa Hellcat that I can use.
While that was drying, I glued together the wings. The fit is quite
good. It was then that I realized that I forgot the wheel well center section.
There is an intake trunk that fits into the lower wing and then the center
section. This is all supposed to be done prior to gluing the upper and lower
wing sections, but fortunately, there is enough give in it to do it later.
(whew!) Don't forget to open up the required holes in the lower wing for
whatever stuff you are going to have hanging from there. I opened up all of them
except for the centerline fuel tank. I found quite a few French Bearcat images
and few of them showed the centerline tank. I also glued the napalm tanks
together. I'm going to use those instead of the 500 lb bombs. For the rockets, I
have some from a Hasegawa Hellcat that I can use.
I then painted the inside of the fuselage and then installed the cockpit. Fit is quite good. Don't forget to add the small piece behind the cockpit section as it won't fit after the fuselage halves are together. The fit of the fuselage halves is good also. Since this was a land based Bearcat, the tail hook was not installed. Next the fin and rudder were glued in place. This part is a bit thinner than the lower fin so some filler was needed to smooth the transition. I also used a bit of filler in various places on the fuselage, though there was nothing major. When dry, the tail planes were glued in place without any trauma.
Once the fuselage and tail sections were done, the wing was cemented in place. Due to a building glitch on my part, one side did not match the wing root too well and I had to use some filler to take care of the step, however, if you are more careful than I, you should have no trouble at all.
The engine was next. The kit supplies both engine banks and though it is a bit basic, looks pretty good when washed and dry-brushed. I painted the engine aluminum and washed it with black to fill in the cylinder cooling fins. The crankcase cap is in two pieces and holds the prop shaft. Frankly, it would have been easier to have this as one piece and then supply us with a longer shaft.
 This was then glued onto the mount on the fuselage. Next the cowling,
which had been painted interior green on the inside, was glued in place. Mine
fit fairly well, but thanks to the self-inflicted wing glitch mentioned
previously, was a tight fit. Moving to the wings, the cannon bumps, drop tank
and rocket racks were glued to the already opened holes in the wing. Fit here
was good as well. Then it was on to the landing gear. Since the entire airframe,
including wheel wells and gear was to be painted dark sea blue, it was much
easier to assemble these parts unpainted. Makes for a much stronger bond as
well. The mounting points for the landing gear are not large and the gear has a
bit of play, so you need to make sure it dries in the position you want it. The
additional gear link helps to strengthen what I initially feared would be a weak
gear assembly. It turned out to be pretty sturdy.
This was then glued onto the mount on the fuselage. Next the cowling,
which had been painted interior green on the inside, was glued in place. Mine
fit fairly well, but thanks to the self-inflicted wing glitch mentioned
previously, was a tight fit. Moving to the wings, the cannon bumps, drop tank
and rocket racks were glued to the already opened holes in the wing. Fit here
was good as well. Then it was on to the landing gear. Since the entire airframe,
including wheel wells and gear was to be painted dark sea blue, it was much
easier to assemble these parts unpainted. Makes for a much stronger bond as
well. The mounting points for the landing gear are not large and the gear has a
bit of play, so you need to make sure it dries in the position you want it. The
additional gear link helps to strengthen what I initially feared would be a weak
gear assembly. It turned out to be pretty sturdy.
Just before painting, I added the pitot tube to the underside of the wing and the roll over assembly to the area behind the cockpit. The engine and cockpit were stuffed with damp tissue and now the plane was ready to paint.
|
PAINT & DECALS |
I like Gloss Sea Blue schemes. Mostly because they are all one color so there is no complicated masking to do. I used AeroMaster Enamel for this job, and like the time I used it before, it coats beautifully and takes ages to dry. However, this time, it was dry enough after just a few days. I gave it a few more to cure, just to be on the safe side. Especially since I'd be using an acrylic clear on it. Needless to say, once it was painted, it was time to apply decals.
I used kit decals for this one. There is a nice Microscale sheet that has French markings in it, but really, the kit decals are just as good if not better. I know, blasphemy to use the terms 'Hobbycraft decals' and 'good' in the same sentence, but they really are very nice. All four aircraft are from the same unit, so I picked the one with the nice rudder stripes!
Once they were on and snuggled down with setting solution, the residue was cleaned up and it was off to have a coat of semi-matte clear put on. I did this because the French aircraft spent all their time outside in some of the nastiest weather in the world. No one will say that rain forests are good for paint jobs! Once the matte was dry, it was on to more gluing.
|
CONSTRUCTION CONTINUES |
 The landing gear got my attention at this time. First, the brakes were
painted burnt metal, then the oleos wrapped with Bare Metal Foil. The wheels
were then glued in place. These have flat bottoms so be sure to get them in the
proper position. Once dry, the gear doors were glued in. Moving to the wings, I
scrounged some rockets from the Hasegawa Hellcat kit, painted them OD and glued
them onto the rocket stubs. I know they are probably not the right kind, but
who's to say they weren't used?
The landing gear got my attention at this time. First, the brakes were
painted burnt metal, then the oleos wrapped with Bare Metal Foil. The wheels
were then glued in place. These have flat bottoms so be sure to get them in the
proper position. Once dry, the gear doors were glued in. Moving to the wings, I
scrounged some rockets from the Hasegawa Hellcat kit, painted them OD and glued
them onto the rocket stubs. I know they are probably not the right kind, but
who's to say they weren't used?
Next the gun barrels were drilled out and glued in place. Then the clear bits. No problems with the canopy and windscreen. The wing tip lights were another story. One fit beautifully, and the other was too big! The landing light and underwing lenses were then installed. I didn't put the ones on the top of the wing as I had lost one of them while clipping them off and those areas are covered by the insignia.
I brought out the pastels to give it some grunge. The kit was then resprayed with clear matte and the pastel colors promptly disappeared! Oh well, the pastels were then reapplied. Final assembly consisted of removing the masking, gluing on the napalm tanks (which had been painted aluminum), and installing the prop. The shaft was quite sloppy so I glued it in place before attaching the prop.
|
CONCLUSIONS |

The final result is a very nice model. It is one that doesn't take a lot of time to build and which looks very much like what it is supposed to be. Those who are experts will give you a litany of what is wrong with the kit. I recommend that you ignore all that and have a great time building this one. It is a kit that I recommend to all building levels. You'll like it!
|
REFERENCES |
Grumman Aircraft since 1929 by Rene J Francillon,
1989
F8F Bearcat in Action #99, by Charles L Scrivner,
Squadron/Signal, 1990
September 2000
Review kit courtesy of me and my wallet!
If you would like your product reviewed fairly and fairly quickly, please contact the editor or see other details in the Note to Contributors.