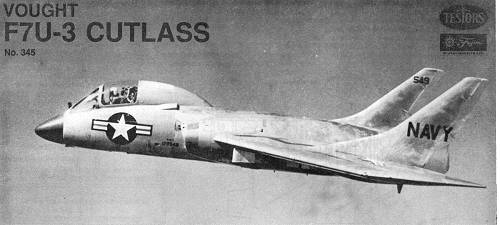
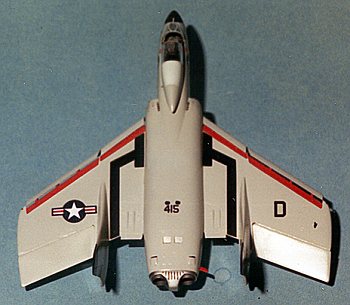
Testor's 1/72 F7U-3 Cutlass
|
KIT # |
345 |
|
PRICE: |
$7.99 |
|
DECALS: |
Four aircraft |
|
REVIEW: |
|
|
NOTES: |
Bagged kit -- Fujimi mold |
|
HISTORY |
Vought's F7U was to be the Navy's latest and greatest in fighter aircraft. Ordered in 1946 with the first flight in September 1948, the aircraft was soon to earn a reputation as a pilot killer, with 5 out of 17 F7U-1s crashing, killing 3 pilots. However the aircraft was saved by the Korean war and a redesign of the forward section of the aircraft. Put into production as the F7U-3, 290 were eventually built between 1951 and 1955. Although it has a superb rate of climb, making it a great bomber interceptor, it was seriously hampered by production problems and so quickly phased out by 1958 having seen service with only a few front-line squadrons.
|
THE KIT |
Fujimi's kit is typical of their better kits, with semi-hard light grey plastic and finely engraved detail. There are no more than two trees per package with the clear bits in thier own package, keeping scratching down to a minimum. The Testor's instruction sheet is typically good giving color readouts on each page and having a logical assembly sequence. While the wings cannot be folded on this version, the slats and flaps are separate allowing them to be displayed in the lowered position. Decals are by Scalemaster and are in perfect register, unlike thier current kit offerings.
As I usually do, the first thing done is the gluing of subassemblies and painting of the interior. The interior is black with grey seat padding. I know of no resin or brass etched add on parts for this kit so if anyone knows of any, please let me know. There are some aftermarket decals available; one by Ventura and another for the F7U-3M by Superscale.
|
CONSTRUCTION |
 Since this kit comes in a photo-recce
version, the cockpit section is separate from the wing/fuselage section.
In my kit, I had problems with warped parts. No doubt due to the
amount of time spent in a bag being dragged around the world and left in hot
warehouses. The front fuselage was one part warped. The cockpit consists of a believable
bang seat, instrument panel, stick and tub with raised detail on the
console and instrument panel. Since this is supposed to be a quick build
(right), I used the decals vice picking out detail. The instrument panel
fit perfectly and aligned up beautifully with the raised detail. The
console decals were similarly well behaved. I used Champ decal setting
solution which is definitely an industrial strength product, but works perfectly
on Scalemaster, Aeromaster, and Superscale/Microscale decals. Oh yes, before
that, I painted the cockpit black although it may just as easily been dark gull
grey. The instrument panel and stick were then glued to the tub and installed in
the front fuselage half. Then the nose wheel well bay was glued in.
Next was the other fuselage half. I had to use a lot of clamping and
superglue to get the two halves to fit. In the process, the
headrest/sliding canopy bit was glued solid instead of being able to be opened
and closed. No real tragedy, but one of the prices one pays for (a) buying
a bagged kit and (b) waiting so long to build it.
Since this kit comes in a photo-recce
version, the cockpit section is separate from the wing/fuselage section.
In my kit, I had problems with warped parts. No doubt due to the
amount of time spent in a bag being dragged around the world and left in hot
warehouses. The front fuselage was one part warped. The cockpit consists of a believable
bang seat, instrument panel, stick and tub with raised detail on the
console and instrument panel. Since this is supposed to be a quick build
(right), I used the decals vice picking out detail. The instrument panel
fit perfectly and aligned up beautifully with the raised detail. The
console decals were similarly well behaved. I used Champ decal setting
solution which is definitely an industrial strength product, but works perfectly
on Scalemaster, Aeromaster, and Superscale/Microscale decals. Oh yes, before
that, I painted the cockpit black although it may just as easily been dark gull
grey. The instrument panel and stick were then glued to the tub and installed in
the front fuselage half. Then the nose wheel well bay was glued in.
Next was the other fuselage half. I had to use a lot of clamping and
superglue to get the two halves to fit. In the process, the
headrest/sliding canopy bit was glued solid instead of being able to be opened
and closed. No real tragedy, but one of the prices one pays for (a) buying
a bagged kit and (b) waiting so long to build it.
While that was drying, I painted the intake trunks and a number of other parts aluminum Metallizer. The intake trunks were then glued together and after a black wash, the aluminum painted engine faces were glued to the intake trunks. I made no effort to fill the intake seams. This assembly was then glued onto the bottom wing section and then the top section was glued on. Since I was building a ''clean" aircraft, none of the holes for pylons or the rocket pack were opened in the wing. The wing top section was glued in sections as it was warped. While that was clamped and drying, the tails were glued together. Again, one of them was badly warped and glued in sections.
When dry, the fuselage was glued to the wings. I had to do some carving to get the fuselage to fit flush to the wings. When dry, the intakes were glued on. They actually fit quite well, despite some warnings from others who had built this kit. The assembly was left to dry and then all the glitches were puttied; the aft section being particularly in need of filler. When that was dry and sanded down, it was time to install the two tails. Well, the one that was warped ended up being about 1/8" too narrow for the adjacent fuselage. Since it is basically hollow, I put a small spreader bar in the aft portion and crammed another in the front. The back part worked well while the front part (on the top of the wing) was less successful. Typically, it took several putty sessions to get a decent fit and fill the gaping holes! I always have at least one major disaster per kit and this one had already given me two. I was on a roll. What next???
|
PAINT & DECALS |
 Well, what was next was a boo-boo of epic
proportions. Having read on RMS about this neat paint that looked just
like chrome that was available at hardware stores, I thought I'd take a quick
way out and try some. I headed for my friendly True-Value store and picked up a
can. A test spray showed that it was indeed, just like chrome. Oh
Joy! No more messing with SNJ or Metallizers!! I prepped the kit and got
ready to spray. A huge amount of paint erupted from the can. YIKES!!
My poor Cutlass was engulfed with about ten times too much paint. An
attempt at removing it just made things worse. I let the paint dry and
then started sanding on it to remove it. Well, the paint etched the hell
out of the Fujimi plastic. It also weakened the glue joints and bits and
pieces started falling off the kit. At that, I put it in a box and ignored
it for about four months.
Well, what was next was a boo-boo of epic
proportions. Having read on RMS about this neat paint that looked just
like chrome that was available at hardware stores, I thought I'd take a quick
way out and try some. I headed for my friendly True-Value store and picked up a
can. A test spray showed that it was indeed, just like chrome. Oh
Joy! No more messing with SNJ or Metallizers!! I prepped the kit and got
ready to spray. A huge amount of paint erupted from the can. YIKES!!
My poor Cutlass was engulfed with about ten times too much paint. An
attempt at removing it just made things worse. I let the paint dry and
then started sanding on it to remove it. Well, the paint etched the hell
out of the Fujimi plastic. It also weakened the glue joints and bits and
pieces started falling off the kit. At that, I put it in a box and ignored
it for about four months.
Determined to finish all my started kits, I went back to the Cutlass. Grabbing my favorite paint stripper (Strip-A-Kit), much of the dreaded chrome lacquer was removed. The kit was an etched mess. It was sanded as best as possible and then the unglued parts were reattached and lots of filler was used to try to repair some of the damage. This was not going to be a contest kit, that's for sure!
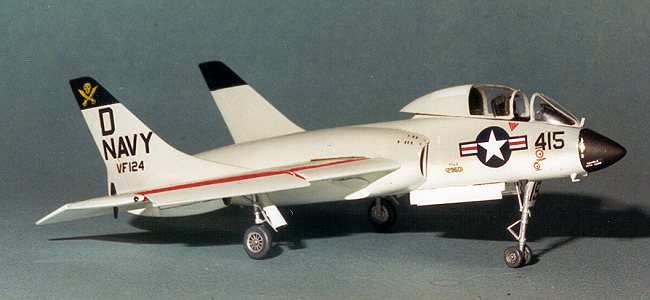
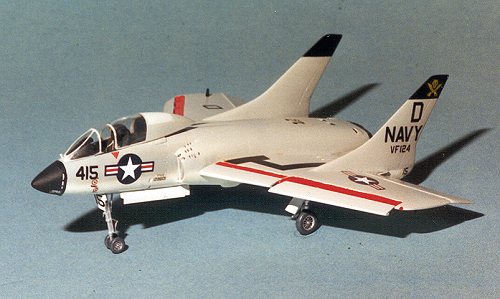
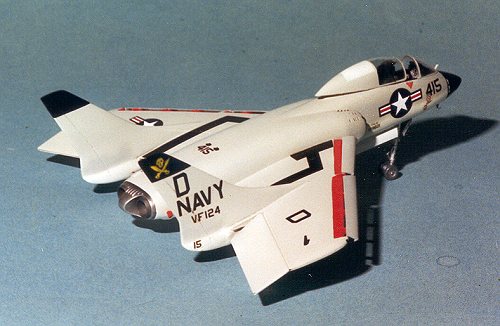
Eventually, much filling and sanding later, I was back at the painting stage. This time, I had to go with Gull Grey and White as it was too etched to use Metallizer and the paint may fill in many of the etchings. First the bottom and control surfaces were sprayed with Model Master Gloss White. Then that was masked (sort of) and the upper surfaces painted with Model Master Gull Grey. After much back and forthing with the colors I was satisfied and the nose was masked off and painted flat black. Then the exhaust cone assembly was painted Steel. Finally, the slat areas on the leading edge and underside of the slats were painted gloss red and attached.
|
THE SAGA CONTINUES |
 Now I had a relatively complete airframe and started to work on
the landing gear. The various components were cleaned up and painted gloss
white as were the gear doors. Then the landing gear were attached along with the
wheels. At least it was on it's landing gear and it was starting to look like it
might finally get finished, though some 7 months after I had originally started
on it. However, it was time for the other shoe to drop; almost literally. I was
moving some books when the top one slipped off the pile and landed right on top
of the Cutlass. Landing gear and slats everywhere! Fortunately, they broke right
where they entered the fuselage so some drilling and reinforcement with paper
clip sections was all that was needed.
Now I had a relatively complete airframe and started to work on
the landing gear. The various components were cleaned up and painted gloss
white as were the gear doors. Then the landing gear were attached along with the
wheels. At least it was on it's landing gear and it was starting to look like it
might finally get finished, though some 7 months after I had originally started
on it. However, it was time for the other shoe to drop; almost literally. I was
moving some books when the top one slipped off the pile and landed right on top
of the Cutlass. Landing gear and slats everywhere! Fortunately, they broke right
where they entered the fuselage so some drilling and reinforcement with paper
clip sections was all that was needed.
Then I started putting on the decals. These are Scalemaster and what wasn't out of register fit just beautifully. After 90% of the decals had been put on, I lost interest in the kit. I mean big time loss of interest. It wasn't until over a year and a half later that I dusted off the kit and decided to finish the thing off. By this time, the decal setting solution that I hadn't wiped off had turned a lovely mud brown color. I removed as much as I could with a damp cloth and a bit of rubbing alcohol, but some staining remained. The final decals were attached with no further problem. The canopy parts were glued on using non-fogging superglue as were the gear doors. I separated the right main doors and then realized that they remained closed except when the gear was cycling through. Add that to the list of stupid things. Finally, the various antenna and fuel dump tubes were glued in place and I was done.
|
CONCLUSIONS |
Well, I had successfully completed the kit over two years since I started it. The kit is not to blame and had I not screwed it up so badly would have been beautiful. I still have one that I'm holding on to as a replacement for this one, and I now know what not to do to it. I really can highly recommend this kit. The fit was great, the detailing equally superb and it looks cool sitting on the shelf.
|
REFERENCES |
Didn't use any, but I know that they are out there.
Copyright ModelingMadness.com. All rights reserved. No reproduction in part or in whole without express permission from the editor.
Review copy courtesy of me and my wallet. If you would like your product reviewed fairly and fairly quickly, please contact the editor or see other details in the Note to Contributors.