| HISTORY |
| KIT: | AeroTeam 1/72 Zlin Z-142C |
| KIT #: | 7204 |
| PRICE: | I seem to recall it was around $15 or so |
| DECALS: | Four options |
| REVIEWER: | Scott Van Aken |
| NOTES: | Treat it as short run |
| HISTORY |
The Zlin Z 142 is a single-engine two-seat Czechoslovakian trainer aircraft manufactured by Moravan Otrokovice. The Z 142 is the most popular aircraft variant in its aircraft line, with the base model being the Z 42. In contrast to the older Z 40 which had both seats in tandem, all Z 42 series aircraft use side-by-side seating.
The aircraft were built by Moravan Aviation, founded in 1934 in aviation by Tomas Bata in the Czech Republic.
 The aircraft fuselage center section is
of welded steel tube, covered with sheet metal and fiberglass panels. The
tailcone is of monocoque construction. The empennage is of sheet metal, and
incorporates an all-flying tail. The two-spar wings are of all-metal
construction. The tricycle landing gear is fixed, with a steerable nose wheel.
The Z 42 is powered by a Walter inverted six-cylinder engine rated at 134 kW
(180 hp).
The aircraft fuselage center section is
of welded steel tube, covered with sheet metal and fiberglass panels. The
tailcone is of monocoque construction. The empennage is of sheet metal, and
incorporates an all-flying tail. The two-spar wings are of all-metal
construction. The tricycle landing gear is fixed, with a steerable nose wheel.
The Z 42 is powered by a Walter inverted six-cylinder engine rated at 134 kW
(180 hp).
The prototype Z-142 first flew on December 28, 1978.
The Zlin Z 142 is a development of the Zlin Z 42 M platform, equipped with a Walter (now LOM) fuel-injected inverted 6 cylinder, supercharged air-cooled engine rated at 157 kW (210 hp), driving a constant speed propeller.
Designed for aerobatics instruction, it was certified to +6.0 and -4.0 limit maneuvering load factors, and was equipped with full inverted fuel and oil systems permitting extended inverted flight.
In the late 1980s further development work was initiated. The inverted inline engine was replaced with a four-cylinder horizontally-opposed Lycoming IO-360 engine. This variant is designated the Z 242, and is immediately distinguishable by its relatively wide cowling which houses the flat-four engine.
 The Z 42 variants are used for basic
and intermediate VFR
flight training, for basic aerobatics training, for night and instrument flight
training, and for glider towing.
The Z 42 variants are used for basic
and intermediate VFR
flight training, for basic aerobatics training, for night and instrument flight
training, and for glider towing.
The aircraft were largely used in former COMECON countries for air club and basic air force training. It was also used by the air forces of Algeria, Mexico, Macedonia, and Slovenia. According to the Tamil Eelam Airforce, it was used in bombing sorties on the Sri Lankan air force bases in occupied Tamil Eelam and southern Sri Lanka.
There have been wing difficulties resulting in restriction of permitted aerobatic flight time for original aircraft. The factory offers a retrofit package of replacement wings and an AMU-1 fatigue monitoring system, which extends overall airframe life to 5,500 hours, all of which may be aerobatic.
| THE KIT |
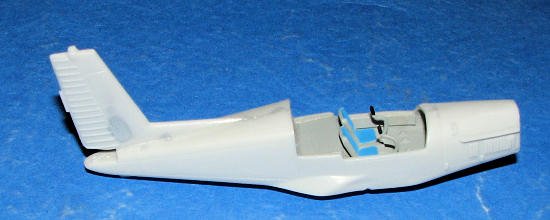
Made in the Czech Republic, this kit looks very much like many of its contemporaries. The detailing is finely engraved and well done. The edges appear quite crisp compared to some even newer kits where it is more rounded or 'soft'. The single sprue has relatively large connections, so one will need to take care when removing the somewhat soft plastic. Although not a ton of parts, the folks at Aero Team seem to have missed including the very distinctive control sticks. Making these will not be a simple task, though one could probably just put in some straight sticks as few will realize the glitch.
 No
optional parts with this one. An interior that consists of a pair of seats, an
instrument panel and an aft bulkhead. A large anti-glare panel is provided.
Though there is some light detail on the instrument panel, one would probably be
better off using the paper one provided as it has more detail. The fixed landing
gear is properly scale and perhaps may not be able to handle the nose weight
required, but one will only have to wait and see. All of the wheels will need
the axle holes drilled out. A single, well molded vacuform canopy is provided. I
do wish they'd included a spare just in case. The major parts have ejector stubs
that will need removed and I found one rather broad sink area on one side of the
fin, though it will be an easy patch.
No
optional parts with this one. An interior that consists of a pair of seats, an
instrument panel and an aft bulkhead. A large anti-glare panel is provided.
Though there is some light detail on the instrument panel, one would probably be
better off using the paper one provided as it has more detail. The fixed landing
gear is properly scale and perhaps may not be able to handle the nose weight
required, but one will only have to wait and see. All of the wheels will need
the axle holes drilled out. A single, well molded vacuform canopy is provided. I
do wish they'd included a spare just in case. The major parts have ejector stubs
that will need removed and I found one rather broad sink area on one side of the
fin, though it will be an easy patch.
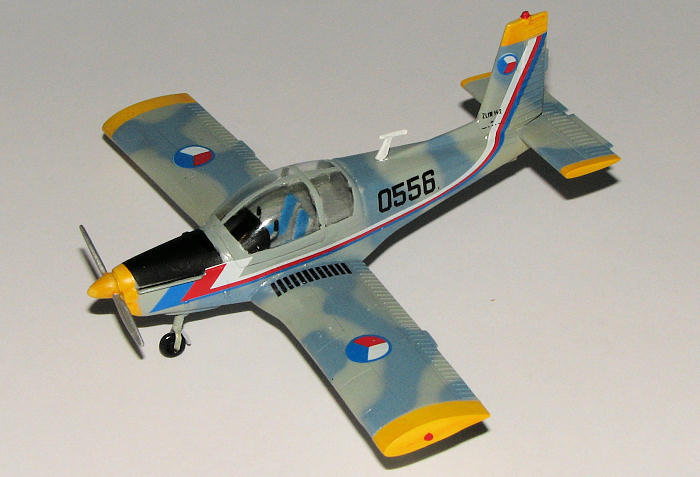
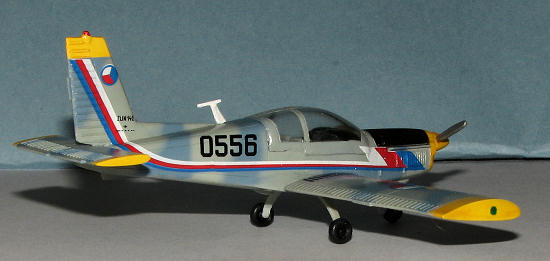
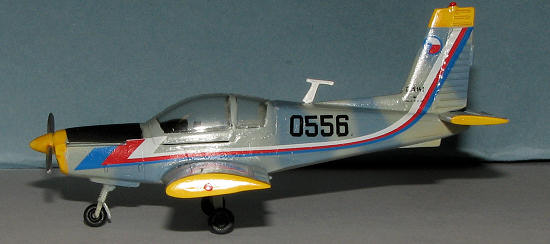
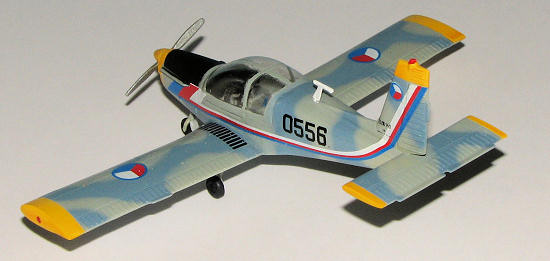
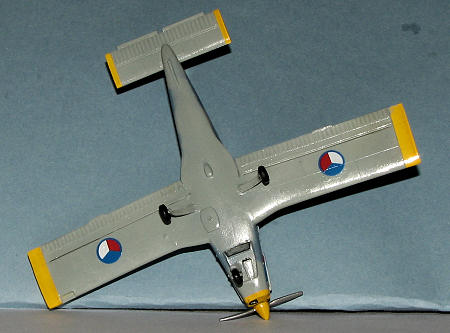
The instructions consist of a superbly drawn exploded view with three detail views for the instrument panel, canopy and the lower nose arrangement. Also included is an additional sheet showing various details in photos and a cutaway view of the real plane. Very much overkill in my opinion as no way will most modelers be able to use the detail information provided. Yet it is there if one wants it. Markings are provided for four aircraft. Three are shown on the color box art. First is a provisional Czech AF from November 1993. Next a civilian scheme from an aero club around 1982. The third on the box is a fake Snowbirds scheme. The fourth is a German aircraft in white with blue markings. The huge decal sheet is by Propagteam so you know it is well done and super thin.
| CONSTRUCTION |
First thing I did with this one was to fashion some control sticks.
Somehow, these rather convoluted items were missing from the sprues. Not like
they had disappeared, but more like they were not molded in the first place. As
they were not straight sticks, I had to do some major work with two pairs of
needle nose pliers to bend some straight pins into something close to the
correct shape.
 Once that
was done, they were glued in place using super glue and when dry, the pin heads
were snipped off with cutters. Then the rest of the cockpit was built up. There
are two seats, a nice lower platform, and a back wall. No real placement guides
for the interior aside getting it to match the cut-out area for the canopy in
the back. During this time, it is an excellent idea to tape the fuselage halves
together so that one side can be cemented in place. During this period, I also
glued the instrument panel into the large anti-glare panel. After painting the
anti-glare panel black, I cut out and glued the paper instruments using clear
paint. There is no interior color information that I could find, so I used a
generic medium grey with the center of the seats in a nice blue shade.
Once that
was done, they were glued in place using super glue and when dry, the pin heads
were snipped off with cutters. Then the rest of the cockpit was built up. There
are two seats, a nice lower platform, and a back wall. No real placement guides
for the interior aside getting it to match the cut-out area for the canopy in
the back. During this time, it is an excellent idea to tape the fuselage halves
together so that one side can be cemented in place. During this period, I also
glued the instrument panel into the large anti-glare panel. After painting the
anti-glare panel black, I cut out and glued the paper instruments using clear
paint. There is no interior color information that I could find, so I used a
generic medium grey with the center of the seats in a nice blue shade.
 Meanwhile,
I glued the wings together. Fit is actually quite good once the ejector stubs
are removed. I used the usual filler on the leading edges. It seems as if there
is a landing light involved here as the lower port wing has a cut out for it.
Nothing in the instructions about it.
Meanwhile,
I glued the wings together. Fit is actually quite good once the ejector stubs
are removed. I used the usual filler on the leading edges. It seems as if there
is a landing light involved here as the lower port wing has a cut out for it.
Nothing in the instructions about it.
Moving back to the fuselage, the section with the fin in place had the large sink hole filled and sanded smooth. I also glued the other fuselage half to the one with the cockpit in place and did the usual filler work on it. It is needed more on the underside than the top. I left off the forward cowling section until near the end of the build so I could determine how much nose weight was needed.
With the fuselage done, I added the one-piece horizontal stab. No specific mounting points for this either, so one has to slide things about some until one gets it in place. At this time, I mated up the wings in a test fit. These wings have a forward sweep to them, but the wing roots and inner wing sections don't match up perfectly. I sanded on the wing roots (the part on the fuselage), until I got a better fit. This is all butt joined as you can tell. One I was happy, the wings were attached one at a time. This way if any adjustment was needed it could more easily be made. The wings took considerable filler, especially on the underside.
 Now I had
a pretty complete airframe and it was the perfect time to work on the canopy.
Unfortunately, AeroTeam only provides one and so there was MUCH trimming and
testing to get a somewhat decent fit. I've NEVER been able to get a vac
canopy look as good as an injected plastic one and this kit is no exception.
Once the canopy was as good as I was going to get it I installed the instrument
panel. Fit is only fair, but it can be done. Back at the canopy, it was
masked using Tamiya tape and then was attached, again using clear paint. I use
Vallejo acrylic clear as it is handy, but you could use any acrylic clear to get
the same results. It does need to be gloss clear.
Now I had
a pretty complete airframe and it was the perfect time to work on the canopy.
Unfortunately, AeroTeam only provides one and so there was MUCH trimming and
testing to get a somewhat decent fit. I've NEVER been able to get a vac
canopy look as good as an injected plastic one and this kit is no exception.
Once the canopy was as good as I was going to get it I installed the instrument
panel. Fit is only fair, but it can be done. Back at the canopy, it was
masked using Tamiya tape and then was attached, again using clear paint. I use
Vallejo acrylic clear as it is handy, but you could use any acrylic clear to get
the same results. It does need to be gloss clear.
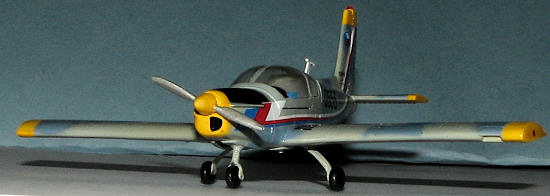
Now the landing gear. These are not very well done and getting the proper attachment was not an easy task. Though there are attachment points under the fuselage and pins on the gear, they don't match up at all well. What's more, they are not shaped well and one had the little axle stub almost pointing aft instead of out to the wing tip. Regardless, the main gear, a couple of underfuselage items and the nose gear were all glued down and left to properly dry. Once that was done, it was time to add nose weight. I crammed as much as I could into the small space provided and it needed every bit. Even now, if one bumps the table too much it will tail-sit. With that done, the nose section was attached (a bit oversize) and the usual filler and sanding was done. I used as little as I could in terms of both filler and sanding so as not to destroy detail. It was now time to choose a set of markings and add paint.
| COLORS & MARKINGS |
 In
truth, I bought this kit as I had thought it was an UTVA-75 as I have a number
of interesting schemes for that plane. However, it isn't and I've yet to find an
easy source for this equally interesting light aircraft. This left me with the
four kit choices. I picked the Czech military trainer as being the most
interesting to me and set about painting. Again, the instructions were useless
in recommending colors so I used Finnish Light Blue-Grey and Flanker Blue for
the two camo colors. But first, the tips and the spinner were painted white then
yellow. When dry, they were masked off and the plane given an overall coat of
Finnish Light Blue. I used one of my old Aeromaster Acrylics for the Light Blue
and it seems to have covered quite nicely. The Flanker Blue was a Model Master
enamel and this was sprayed using my
Skybow AB-100 airbrush
at about 7 psi with the paint thinned to water-like consistency. This to me is
the fun part. Once dry, an overall coat of Future was applied. Then the nose
section masked off and the black anti-glare section painted in place.
In
truth, I bought this kit as I had thought it was an UTVA-75 as I have a number
of interesting schemes for that plane. However, it isn't and I've yet to find an
easy source for this equally interesting light aircraft. This left me with the
four kit choices. I picked the Czech military trainer as being the most
interesting to me and set about painting. Again, the instructions were useless
in recommending colors so I used Finnish Light Blue-Grey and Flanker Blue for
the two camo colors. But first, the tips and the spinner were painted white then
yellow. When dry, they were masked off and the plane given an overall coat of
Finnish Light Blue. I used one of my old Aeromaster Acrylics for the Light Blue
and it seems to have covered quite nicely. The Flanker Blue was a Model Master
enamel and this was sprayed using my
Skybow AB-100 airbrush
at about 7 psi with the paint thinned to water-like consistency. This to me is
the fun part. Once dry, an overall coat of Future was applied. Then the nose
section masked off and the black anti-glare section painted in place.
Decals for this kit are by Propagteam. Those who have used these decals know that they are about as thin as one can get. This means they are VERY easy to tear and require great care when applying. Naturally, I managed to not only tear the large stripe, but also totally hosed the first set of serial numbers that I wanted to use. Fortunately, this scheme has two serial options and I was able to cut bits from other decals to match the chunks ripped out of the fuselage stripe. I also found the decals to be slightly off register. Another thing I don't like about these decals is that the glue on the backing sheet seems to disappear about 5 seconds after the decal has come loose from the backing. Means you have to be very quick when moving a decal on to the model or you'll have to literally peel it from the backing, hoping you don't tear it in the process. For a setting solution, I used Microsol, which seems to have worked quite well.
| FINAL CONSTRUCTION |
 Once all
that was done, a nice gloss clear coat was applied. Modern trainers are
generally kept in very clean condition and thanks to polyurethane paint, stay
glossy for decades. The prop had the blades painted with Humbrol #11 and glued
in place. Thanks to my total inability to paint tires unless the wheels are
strongly delineated, I painted both hubs and tires with Floquil engine black,
then did the tread with Weathered Black. The hubs on the main wheels had to be
drilled out quite a bit to fit. The mud guard was glued on the nose strut, the
antenna painted and glued in place and the formation lights painted. Then some
black in the intakes and that was it.
Once all
that was done, a nice gloss clear coat was applied. Modern trainers are
generally kept in very clean condition and thanks to polyurethane paint, stay
glossy for decades. The prop had the blades painted with Humbrol #11 and glued
in place. Thanks to my total inability to paint tires unless the wheels are
strongly delineated, I painted both hubs and tires with Floquil engine black,
then did the tread with Weathered Black. The hubs on the main wheels had to be
drilled out quite a bit to fit. The mud guard was glued on the nose strut, the
antenna painted and glued in place and the formation lights painted. Then some
black in the intakes and that was it.
| CONCLUSIONS |
You may have noticed that I tend to build kits like this more than most. It is because I never see them done and they have the real benefit of not taking up oodles of shelf space. I'm always looking for things like this and when I see them, snap them up. I think you'll enjoy kits like this as well. They are a great way to sharpen your skills without getting into frustration overload.
| REFERENCES |
http://en.wikipedia.org
July 2008
Hope you liked it as I've not seen one built any where else.
If you would like your product reviewed fairly and quickly, please
contact
me or see other details in the
Note to
Contributors.