
Hasegawa 1/144 YS-11
|
KIT # |
10302 |
|
PRICE: |
@ $17 |
|
DECALS: |
Two Aircraft |
|
REVIEW : |
|
|
NOTES: |
Decals by Liveries Unlimited |
|
HISTORY & THE KIT |
Follow this link for info and images of the kit itself.
|
CONSTRUCTION |
Construction started out easily enough. The interior of the cockpit and all cockpit components were painted flat black. Nose weight was inserted along with the cockpit pieces and the fuselage halves glued together. Frankly, there is darn little to see inside a 1/144 airliner cockpit. Besides, many airliner modelers will use a decal for the windscreen, though you don't have to with this kit as a clear one is provided.
 Then the
upper and lower wing halves were glued together. Fit is good. Next the engine
nacelles were glued together. This is where I ran into a glitch. I was missing
one of the engine nacelle halves. No problem, I thought. I'll just contact the
distributor and ask for another part. After several unanswered e-mails and
letters over a period of several months, I just gave up and consigned the kit to
the 'probably will never be built' pile. I often wonder why places will have
contact e-mails and addresses and then never respond. This seems to be more the
norm than the exception anymore.
Then the
upper and lower wing halves were glued together. Fit is good. Next the engine
nacelles were glued together. This is where I ran into a glitch. I was missing
one of the engine nacelle halves. No problem, I thought. I'll just contact the
distributor and ask for another part. After several unanswered e-mails and
letters over a period of several months, I just gave up and consigned the kit to
the 'probably will never be built' pile. I often wonder why places will have
contact e-mails and addresses and then never respond. This seems to be more the
norm than the exception anymore.
That was about 18 months ago. Since then I had bought another Hasegawa kit that was missing a part. Again, no response from the importer. Two weeks ago I got yet another kit missing a part. Deciding to give it a try, I wrote directly to Hasegawa using the address on the box and including kit# and the part that was missing. Within two weeks I got a nice box with all the parts I needed and a nice letter from Hasegawa. I sent back an equally nice letter thanking them. If there is a moral to this tale it is not to go through the importer, and to write nice letters to the kit maker.
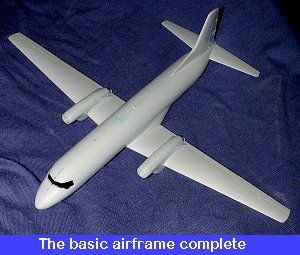 Now having the needed part, the dust
was blown off the kit (literally) and construction recommenced. After the engine
halves has been glued together, they were glued to the wing. The fit is really
tricky on these and I did have to resort to filler for the seams all the way
around. Meantime, the fuselage had been treated to its putty applications and
sanded smooth. The tailplanes were glued in next and the fit is excellent with
no filler used. Next the wings. These also fit very well and no filler used on
the wing/fuselage join. Good thing as it would be tough to get into that are on
the top. I now had a complete airframe. Once the underfuselage intakes were
glued on, it seemed like a good time to start some painting.
Now having the needed part, the dust
was blown off the kit (literally) and construction recommenced. After the engine
halves has been glued together, they were glued to the wing. The fit is really
tricky on these and I did have to resort to filler for the seams all the way
around. Meantime, the fuselage had been treated to its putty applications and
sanded smooth. The tailplanes were glued in next and the fit is excellent with
no filler used. Next the wings. These also fit very well and no filler used on
the wing/fuselage join. Good thing as it would be tough to get into that are on
the top. I now had a complete airframe. Once the underfuselage intakes were
glued on, it seemed like a good time to start some painting.
|
PAINT |
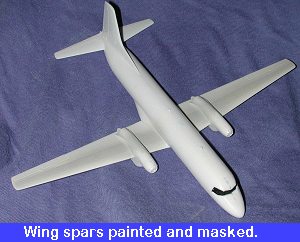 Looking at the
instructions, there was a statement that the wing spar areas were to be painted
Aircraft Grey. Not wanting to buy yet another bottle of paint to add to the
myriad cluttering my painting area, I thought that perhaps Voodoo Grey from the
Model Master line would suffice. I mean, there aren't many color police in the
airliner ranks (thank goodness). So, grabbing my faithful Iwata, the areas were
painted. Once dry, it was masked off. I used low tack Scotch tape instead of my
trusty Tamiya tape. The reason is two-fold. One, the area is flat, and two, it
allows me to be able to see the panel lines more clearly so I can cut them
cleanly. Then the wings and lower fuselage were painted Testors Model Master
FS16440 gloss Light Gull Grey.
Looking at the
instructions, there was a statement that the wing spar areas were to be painted
Aircraft Grey. Not wanting to buy yet another bottle of paint to add to the
myriad cluttering my painting area, I thought that perhaps Voodoo Grey from the
Model Master line would suffice. I mean, there aren't many color police in the
airliner ranks (thank goodness). So, grabbing my faithful Iwata, the areas were
painted. Once dry, it was masked off. I used low tack Scotch tape instead of my
trusty Tamiya tape. The reason is two-fold. One, the area is flat, and two, it
allows me to be able to see the panel lines more clearly so I can cut them
cleanly. Then the wings and lower fuselage were painted Testors Model Master
FS16440 gloss Light Gull Grey.
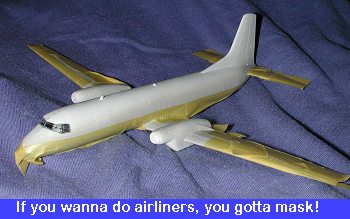 Once that was done, the lower side of the fuselage, the wings and
the tail planes were masked off. This is in preparation for painting the white
on the upper fuselage. The engines and nacelles also need to be painted a
metallic color. After masking the grey bits with Tamiya tape(and you need to
cover every bit that you don't want overspray on), I glued in the windscreen.
Didn't mask it as I'm going to use the decal for that part.
Once that was done, the lower side of the fuselage, the wings and
the tail planes were masked off. This is in preparation for painting the white
on the upper fuselage. The engines and nacelles also need to be painted a
metallic color. After masking the grey bits with Tamiya tape(and you need to
cover every bit that you don't want overspray on), I glued in the windscreen.
Didn't mask it as I'm going to use the decal for that part.
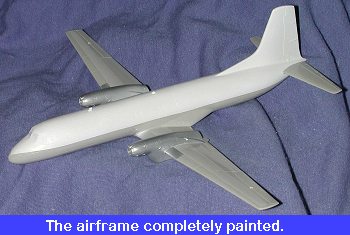 For
the rest of the paint, I used Tamiya gloss white acrylic. I did this so that
when I put the Alclad II on for the engine nacelles, there will be a barrier
that will protect the underlying plastic and other paint. Once the white
was dry, that was masked and the engines and leading edges were painted with
Alclad II. When all was dry, the kit was unmasked and taken back to the
workbench to have some more bits and pieces added to in prior to decaling.
For
the rest of the paint, I used Tamiya gloss white acrylic. I did this so that
when I put the Alclad II on for the engine nacelles, there will be a barrier
that will protect the underlying plastic and other paint. Once the white
was dry, that was masked and the engines and leading edges were painted with
Alclad II. When all was dry, the kit was unmasked and taken back to the
workbench to have some more bits and pieces added to in prior to decaling.
|
CONSTRUCTION CONTINUES |
I now had a pretty well complete airframe. However, in order to help with decals, I felt it should at least be standing on its gear! To that extent, the nose and main landing gear, which had been painted aluminum, were glued in place. This was followed by the wheels and finally, the gear doors themselves. Fit on all these parts was quite good and there were no surprises. The last bits to be glued in place were the exhaust (which were painted burnt iron. The only parts left off until the end were the props. Now on to the most time consuming part of just about any airliner model: the decals.
|
DECALS & FINAL BITS |
 When doing
airliners, it is really the decals that make or break the kit. It is also decals
that take quite a large amount of time. Even on a small aircraft such as a 1/144
scale YS-11, this is the case. This particular boxing of the YS-11 (and there
are a number of them) started out with an advantage. This is because Hasegawa
intelligently used Liveries Unlimited to produce the decal sheet. As you can see
from the preview, it is most complete and even includes things like the leading
edge de-icing boots and prop warning markings. There are also options for an
early or late livery (the early one has the airline name in Japanese as I
modeled) as well as the ability to choose from a number of registrations.
When doing
airliners, it is really the decals that make or break the kit. It is also decals
that take quite a large amount of time. Even on a small aircraft such as a 1/144
scale YS-11, this is the case. This particular boxing of the YS-11 (and there
are a number of them) started out with an advantage. This is because Hasegawa
intelligently used Liveries Unlimited to produce the decal sheet. As you can see
from the preview, it is most complete and even includes things like the leading
edge de-icing boots and prop warning markings. There are also options for an
early or late livery (the early one has the airline name in Japanese as I
modeled) as well as the ability to choose from a number of registrations.
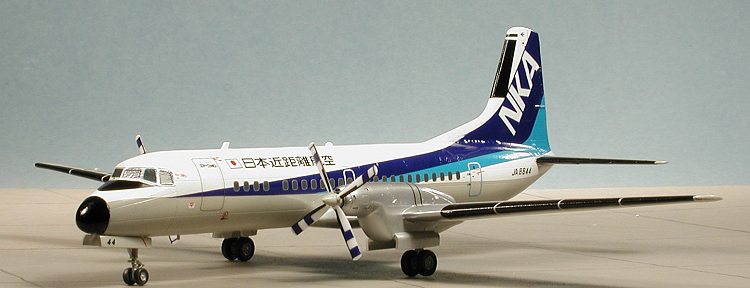
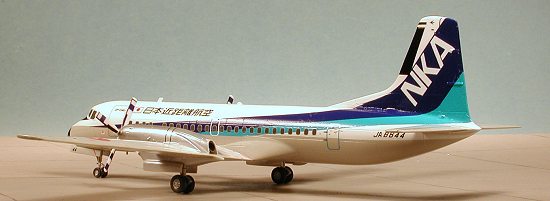
I started this one by applying the fuselage stripes. These stripes include not only the windows but also the door outlines. It was with this first step that I knew there was going to be a problem. You see, it appears that the decals were slightly larger than they needed to be. As a result, none of the door outlines matched those marked on the kit. You could get one in place, but the rest would be way off. The only option really is to go back and fill in all the engraved areas marking the doors on the aircraft before painting. Well, it was obviously too late for me to do anything about it at this time so I just soldiered on as best as possible.
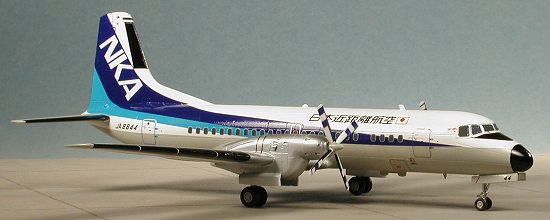 The
fit of the fuselage stripes, other than mentioned above, was pretty good. The
fuselage stripes were a two piece affair with the bit that fit on the fin being
an additional decal. When doing these combinations, I have found it best to
apply the two pieces at the same time. This allows any adjustment to be made to
them while you can still move them around. Once the one side was where I wanted
it, it was blotted to remove excess water and Solvaset was applied. The setting
solution worked quite well and the decals snuggled down quite well.
The
fit of the fuselage stripes, other than mentioned above, was pretty good. The
fuselage stripes were a two piece affair with the bit that fit on the fin being
an additional decal. When doing these combinations, I have found it best to
apply the two pieces at the same time. This allows any adjustment to be made to
them while you can still move them around. Once the one side was where I wanted
it, it was blotted to remove excess water and Solvaset was applied. The setting
solution worked quite well and the decals snuggled down quite well.
As it often the case, there were areas that the decal didn't cover. Fortunately, there were extra sections of color provided for fixes. The biggest problem was at the rear end. The tail decal didn't fully cover so thin strips of the extra colors were cut to patch up the bare plastic. I also realized that the areas that transitioned between the fuselage and the tail were not good. A combination of gently slicing off bits from one section and using patches on another got to where things looked a lot better than they did at the beginning. Even if the decal is held down by setting solution, a sharp blade is often able to peel off unwanted bits once the decal is cut into.
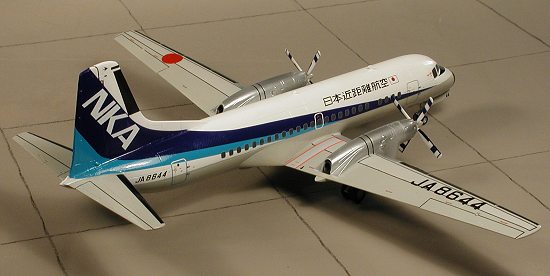
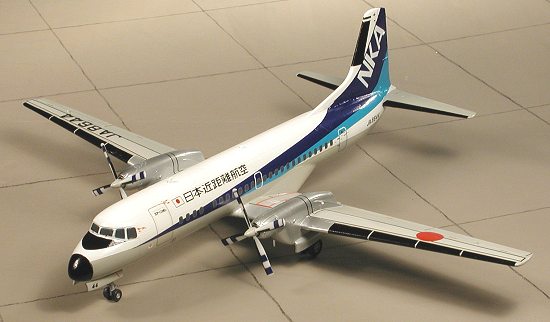
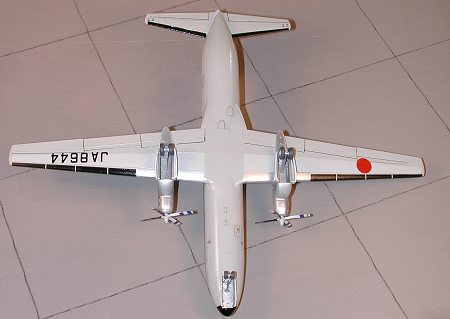
 Other decals that were a bit too long include the
wing walk areas and the black leading edge markings. A bit of fudging one way or
another took care of the leading edge markings but the wing walk ones could not
be adjusted so, as you can see from the overhead shots, they jut out a bit too
far onto the wingtip.
Other decals that were a bit too long include the
wing walk areas and the black leading edge markings. A bit of fudging one way or
another took care of the leading edge markings but the wing walk ones could not
be adjusted so, as you can see from the overhead shots, they jut out a bit too
far onto the wingtip.
The prop blades also had decals for them.
Four on the front and four on the rear. For some reason, the sheet has enough
markings for four props. Perhaps thinking that we'd mess up a number of them.
The thought is appreciated, though I did manage to get them all on without any
real trauma. The black de-icer boot on the prop blades
 was a bit too thin so after the decals were on and
dry, I touched up that area with some Tamiya gloss black acrylic. I also used
this paint on the nose and brushed on the gloss black. Fortunately, the Tamiya
gloss covers quite well and is easy to hand paint. The rest of the decals went
on without any fuss (and there are a lot of them). I did discover that the red
was off register on my sheet, but there are very few red markings on the sheet
where this is obvious; the flag next to the airline title on the fuselage being
the most glaring example.
was a bit too thin so after the decals were on and
dry, I touched up that area with some Tamiya gloss black acrylic. I also used
this paint on the nose and brushed on the gloss black. Fortunately, the Tamiya
gloss covers quite well and is easy to hand paint. The rest of the decals went
on without any fuss (and there are a lot of them). I did discover that the red
was off register on my sheet, but there are very few red markings on the sheet
where this is obvious; the flag next to the airline title on the fuselage being
the most glaring example.
Once all the decals were on, the aircraft was thoroughly wiped down with mildly soapy water and then wiped again with clear water to remove any dried setting solution. No clear coat was applied. The props then had the spinners glued on and the hubs painted in gloss gull grey. The control surface hinges and vents were accented with a Rapidograph drafting pen. When the paint was dry on the props, they were pushed into the little plastic retainers in the engine and the kit was now complete.
|
CONCLUSIONS |
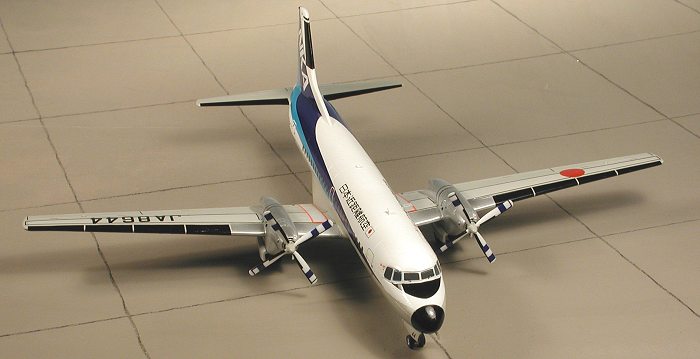
A really nice model. One that fits well and was (other than the missing part) a hassle-free build. I do wish the decal sheet was the proper size and it will teach me to jump into a kit without checking fit first. The overall result is an interesting looking model of an important aircraft in Japanese civil aviation. I only wish that Hasegawa would do the same treatment to the Convair CV-240/440/580 series of aircraft!
June 2001
Copyright ModelingMadness.com. All rights reserved. No reproduction without express permission.
This kit courtesy of me and my wallet!
If you would like your product reviewed fairly and fairly quickly, please contact the editor or see other details in the Note to Contributors.
Back to Reviews Page 2021