
Kiwi Resins 1/72 Percival Vega Gull
| KIT #: | ? |
| PRICE: | $ |
| DECALS: | None |
| REVIEWER: | Scott Van Aken |
| NOTES: | Resin with vacuformed canopy |
| HISTORY |
The Percival Vega Gull was a pre-war civilian version of the Percival Proctor, which was also a development of the pre-war Gull. The prototype D.1 Gull (G-ABUR), a three seat tourer first appeared in 1932. This was followed by the D.2 which was more commonly known as the Gull IV. In 1934 Percival introduced the D.3 Gull Six which featured the DH Gipsy Six engine, improved undercarriage and cabin arrangements, but retained the Gull IV folding wing. It was in a Gull, G-ADPR that New Zealand Aviatrix Jean Batten set many of her records.
 In November 1935 the four seat K.1
Vega Gull was introduced. Powered by the same DH Gipsy Six engine this
introduced dual controls and flaps, and was very successful with 90 being
produced up till July 1939.
In November 1935 the four seat K.1
Vega Gull was introduced. Powered by the same DH Gipsy Six engine this
introduced dual controls and flaps, and was very successful with 90 being
produced up till July 1939.
A total of 7 Vega Gulls served with the Fleet Air Arm, 5 of which were impressed in January till March 1940, and another being ex RAF Middle East provided to the RN in Dekheila March 1941. It was primarily used for training and communication work.
The first Vega Gull P5986 was acquired in May 1939, and the first unit being equipped was 754 squadron at Lee on Solent on 24 May 1939. The aircraft G-AFIT served with 780 squadron briefly from June - July 1940 at the height of threat from Nazi invasion in the role of converting to naval standards civilian trained volunteer pilots.
The Vega Gull also served with the RAF and RAAF in a communications role. In fact, several other countries such as Spain and Belgium operated the type. A rather useful feature of the aircraft was the ability to fold back the wings for storage in small hangars. A rather substantial number of these aircraft are still on civil registries around the world.
| THE KIT |
Please visit the preview to get a look at what comes in the box.
| CONSTRUCTION |
 Resin kits pretty well start
the same way, with clean up of the various parts. In this case, there are
not that many parts and so, taking out a fine razor saw, I was able to
remove the various bits from the sprue stubs rather quickly. The next step
was to inspect the bits for any mold flaws and handle those. I found some
air bubbles in a wing and tail plane pieces as well as some pretty hefty
ones on the lower fuselage. These on the fuselage I filled with epoxy putty
as to try to use standard fillers would have meant a lot of very small
applications. I also located some areas of extra resin on the leading edge
of one wing and that was sanded down during the normal clean-up.
Resin kits pretty well start
the same way, with clean up of the various parts. In this case, there are
not that many parts and so, taking out a fine razor saw, I was able to
remove the various bits from the sprue stubs rather quickly. The next step
was to inspect the bits for any mold flaws and handle those. I found some
air bubbles in a wing and tail plane pieces as well as some pretty hefty
ones on the lower fuselage. These on the fuselage I filled with epoxy putty
as to try to use standard fillers would have meant a lot of very small
applications. I also located some areas of extra resin on the leading edge
of one wing and that was sanded down during the normal clean-up.
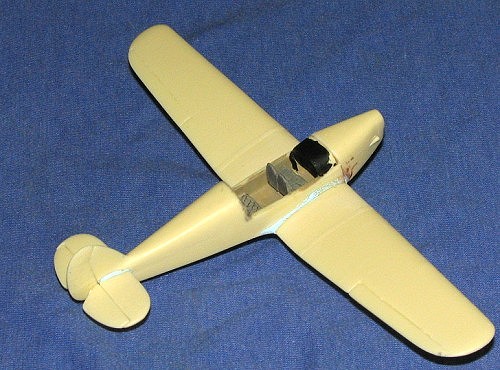
Probably the most difficult part of the build was the nose. The mating surface on the fuselage is supposed to be flat and then curve away at the bottom. Actually, it didn't quite turn out like that! The result was that I had to use a bit of care when gluing this in place. What I did, was to be sure it was properly centered and then make sure the top was in alignment with the rest of the airframe. This was to ensure that it wasn't pointing up or down at some odd angle.
But I'm getting a bit ahead of myself.
Once the fuselage was cleaned up, I
started to put in the interior bits. This seems simple enough. I glued in
the back of the rear seat, no problem. However, I wasn't really sure just
where the front seats went as there was no interior diagram to help. In
addition, the seats given were too wide. Those were sanded down on both
sides until I could get them to fit side by side. As to the placement of
the seats, I settled on placing them atop the forward spar. Putting them in
front seemed too close to the  instrument
panel and the aft position basically had them touching the back seat.
instrument
panel and the aft position basically had them touching the back seat.
During all this, I trimmed the canopy. As I mentioned, two are supplied, but one had an air bubble in the clear bit so I was very careful with the one I was given. I'm not good at these things, but did manage to trim it down to where it looked OK. The forward section incorporates some of the airframe, which is a real help.
With the canopy trimmed, I glued on the nose section as mentioned earlier. Then, I installed the anti-glare panel for the instruments. This has air bubbles on all four lower corners, but they won't be seen once in place. This was glued to the back of the engine section. I then sanded down one of the instrument panel pieces and glued it in place. The seam between the two was filled and sanded down. I think this is supposed to be a dual control aircraft, but only one of the control sticks ended up being usable and a hole in the floor was drilled for it on the left side.
Interior painting was next. I chose two shades of tan/brown that seemed to be what one would find in a plane like this. I can say the seats are leather..... Instrument panel was painted black as was the anti-glare panel and the control stick, which was glued into the little hole I drilled in the floor.
 Meanwhile,
I started attaching other bits. First the wings. No real drama here, though
the wings were a tad thicker than the roots to which they fit. I put the
overhang on the bottom where it would be easier to fill. Same with the tail
planes. Make sure these are somewhat level so that the individual elevators
will fit straight across. Though separate, the elevators and rudder are
designed to be in the neutral position. Much sanding and other work will be
needed if you want them displaced. There is a tiny wedge that fits below
the rudder. The kit part is oversized, but easily sanded down once in
place.
Meanwhile,
I started attaching other bits. First the wings. No real drama here, though
the wings were a tad thicker than the roots to which they fit. I put the
overhang on the bottom where it would be easier to fill. Same with the tail
planes. Make sure these are somewhat level so that the individual elevators
will fit straight across. Though separate, the elevators and rudder are
designed to be in the neutral position. Much sanding and other work will be
needed if you want them displaced. There is a tiny wedge that fits below
the rudder. The kit part is oversized, but easily sanded down once in
place.
 With
a basically complete airframe, I glued on the landing gear. These are also
a bit oversized for the attachment points. Now, you have two options. One
is to remove the wing mounted attachment stubs and the other is to just
leave it as is and glue the gear in place. I chose option two. The tail
wheel is not only larger than needs to be, but one side is poorly molded
with a big lump on resin on it. I would suggest replacement with one from,
say, Aeroclub, but I used the kit version. After cleaning it up, I glued a
short section of pin to it and then attached it in place on that little
wedge under the rudder I mentioned in the last paragraph.
With
a basically complete airframe, I glued on the landing gear. These are also
a bit oversized for the attachment points. Now, you have two options. One
is to remove the wing mounted attachment stubs and the other is to just
leave it as is and glue the gear in place. I chose option two. The tail
wheel is not only larger than needs to be, but one side is poorly molded
with a big lump on resin on it. I would suggest replacement with one from,
say, Aeroclub, but I used the kit version. After cleaning it up, I glued a
short section of pin to it and then attached it in place on that little
wedge under the rudder I mentioned in the last paragraph.
The next thing to attach was the canopy. This had been masked as it seemed easier to do at this stage. Wasn't that easy as some of the frame lines are a bit indistinct. Some more fussing and trimming on the front was needed. I also had to fill a few gaps in the corners and I used super glue for this, sanding things down as best I could. It was now ready to paint.
| COLORS & MARKINGS |
 As I mentioned, no decals are
supplied. I wanted to do a civil version of this rather than another
military aircraft. Discussions took place with the fine folks at Kiwi
Resins and some photos came to light. It seems that most of these were in a
very fetching maroon and silver scheme. Seemed great to me. I used Humbrol
aluminum for the silver part as it covers well and dries quickly. Downside
of this color is that it leaves a sort of 'dusty' finish which will come
off on your hands when you handle it. It also comes off on tape, making
masking a tad more tricky. I painted the wings, horizontal stabs, rudder
and canopy area with this shade.
As I mentioned, no decals are
supplied. I wanted to do a civil version of this rather than another
military aircraft. Discussions took place with the fine folks at Kiwi
Resins and some photos came to light. It seems that most of these were in a
very fetching maroon and silver scheme. Seemed great to me. I used Humbrol
aluminum for the silver part as it covers well and dries quickly. Downside
of this color is that it leaves a sort of 'dusty' finish which will come
off on your hands when you handle it. It also comes off on tape, making
masking a tad more tricky. I painted the wings, horizontal stabs, rudder
and canopy area with this shade.
Much to my dismay, I managed to drop
the model onto a concrete floor d uring
this episode, causing the landing gear and one tail plane to go flying.
With much mumbling and grumbling, I picked up the pieces and let the paint
dry. It was back to the bench for some repair work.
uring
this episode, causing the landing gear and one tail plane to go flying.
With much mumbling and grumbling, I picked up the pieces and let the paint
dry. It was back to the bench for some repair work.
Once that was done, the damaged areas were sanded down and repainted. Then the silver bits were masked and I used Gunze 'Russet' for the maroon shade. Fortunately, this dries rather fast as well. I then removed the masking from the airframe and did any touch-up painting. It is equally fortuitous that one can brush paint the Humbrol aluminum and you won't be able to tell where it was done if one is careful.
Markings came from a Modeldecal sheet. Basically, I made up a registration number because I didn't have enough letters in the proper size to mimic one of the photos I was using. I'm sure that someone will look up the registration I used and tell me it is bogus for a Vega Gull!
| FINAL BITS |
 This left just the prop, which
was basically the two blades butt joined to the spinner, the pitot tube,
which was way too fat, and the exhaust, which fit beautifully to the
underside of the engine bit. I brush painted the prop and spinner with
Humbrol's polished aluminum and did the back of the blades in Vallejo matte
black. The exhaust was painted Testors Burnt Iron Metallizer. I then
removed the masking from the canopy and was delighted to find that none of
the paint seeped under the Tamiya tape. I took the opportunity to enlarge
the engine intake a bit and add in another cooling hole. These were painted
matte black. There was a bit more touch up with the aluminum around the
canopy section, and then the entire airframe was given a coat of gloss
clear.
This left just the prop, which
was basically the two blades butt joined to the spinner, the pitot tube,
which was way too fat, and the exhaust, which fit beautifully to the
underside of the engine bit. I brush painted the prop and spinner with
Humbrol's polished aluminum and did the back of the blades in Vallejo matte
black. The exhaust was painted Testors Burnt Iron Metallizer. I then
removed the masking from the canopy and was delighted to find that none of
the paint seeped under the Tamiya tape. I took the opportunity to enlarge
the engine intake a bit and add in another cooling hole. These were painted
matte black. There was a bit more touch up with the aluminum around the
canopy section, and then the entire airframe was given a coat of gloss
clear.
| CONCLUSIONS |
So there you have it. A nice little model of an interesting pre-war private aircraft. It is something that you probably won't see too often as light aircraft generally don't have a huge following. The kit provides a sufficient level of detail for most of us and those who want to add more will be able to do so.
September 2005
#1381 in a series
| REFERENCES |
The internet via www.google.com
Copyright ModelingMadness.com. All rights reserved. No reproduction without express permission.
Thanks to Kiwi Resin Models for the review sample.
If you would like your product reviewed fairly and fairly quickly, please contact the editor or see other details in the Note to Contributors.