Noix 1/48 Nieuport-Delage sesqiplane
| KIT #: | 05 |
| PRICE: | $95.00 |
| DECALS: | Two options |
| REVIEWER: | Scott Van Aken |
| NOTES: | Resin and metal kit |
| HISTORY |
During WWI, aviation technology advanced considerably in aerodynamics, structures and power plants. However, speed was not the major motivating factor when building military aircraft as these planes had to carry weapons and have a reasonable range, things that generally add weight and so reduce speeds.
Post war, sport aviation came back and one of the
leading countries in this area was France, with several successful aircraft
manufacturers seeking the elusive speed record. Gustav Delage, the chief
designer of Nieuport and the eventual
 owner of the company, developed a speedy
looking sesquiplane design in 1921 designed to capture the record after several
attempts using ex military Nieuport 29 types.
owner of the company, developed a speedy
looking sesquiplane design in 1921 designed to capture the record after several
attempts using ex military Nieuport 29 types.
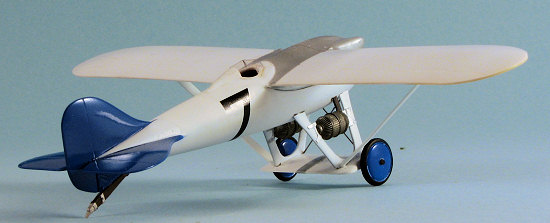
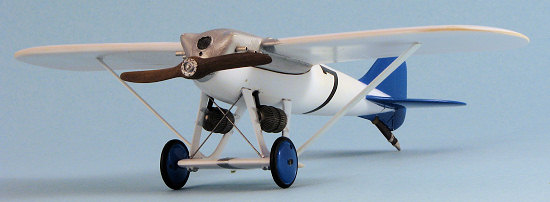
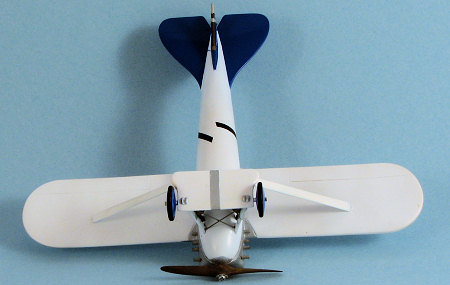
This new aircraft was a shoulder-wing design with a tiny lower wing that acted as part of the landing gear. It was powered by a Hispano-Suiza V-8 of 300 horsepower. While the barrel fuselage was adapted from the Nieuport 29, it had twin Lamblin barrel shaped radiators mounted on the landing gear struts.
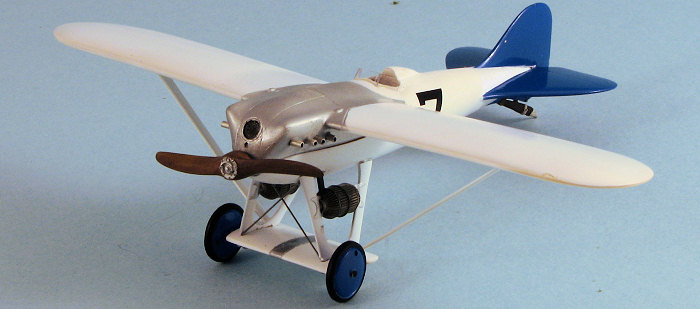
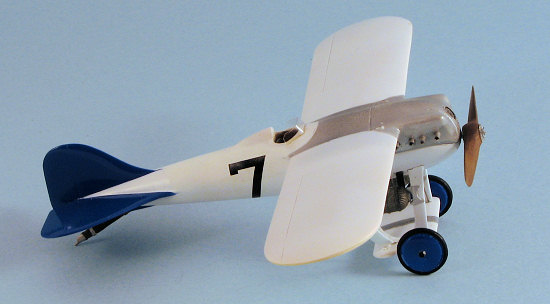
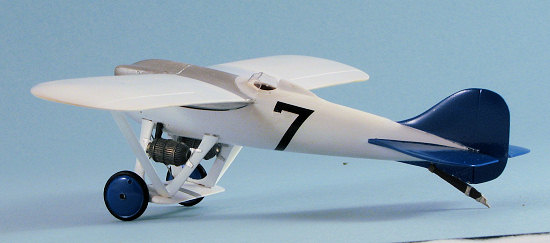
Two aircraft were built and numbered 6 (with a red tail) and 7 (with a blue tail). September 26 1921 was when pilot Sadi Lecointe flew #6 and was able to achieve an official world speed record of 330 km/h. Five days later, this plane and pilot were entered in the Coupe Deutsch race but crashed shortly after taking off, writing off the aircraft and injuring the pilot. The cause was thought to be a fractured propeller, but is now believed to have been due to wing flutter, a phenomenon not known at the time.
| THE KIT |
Noix
produces world class kits. The resin is flawless and so are the metal pieces
provided. This is a case of paying for the very best. The lower fuselage
includes the cockpit and has the horizontal stabilizers molded in place. There
are slots for the various interior bits, including the prop shaft. The upper
wing and upper forward fuselage are molded into a single piece and fit along a
natural seam line. In fact, if one is smart, one will paint the upper cowling
before attaching it to the lower after first being sure of a clean join line.
The fin is also in resin as is the seat and a set of wheels. The lower
airfoil/wheel brace has a metal axle imbedded in it.
Cast metal is used for the gear struts, exhaust, radiators, control stick, tail skid, another set of wheels in case you'd rather use metal ones, prop, shaft and a few smaller bits. A section of acetate is provided for the windscreen and a template is on the instructions. A small sheet has both the racing numbers (not shown).
Two sets of instructions, one in English and the other in Japanese are provided. There is a construction sequence written in both along with a couple of exploded views. Color information and a parts listing are also given. Both aircraft are basically white with colored tails; one Red and the other in French Blue. A color photo of both options is included in the sturdy box. A small rigging diagram for the gear struts is provided.
I should also mention that I've been told that the company is no longer in business so get these while you still can.
| CONSTRUCTION |
This is one of those builds that starts out looking quite simple, but soon evolves into a lot more, though I should mention that it is no fault of the engineering of the kit.
Construction is really quite easy when you look at things. The wing and upper fuselage is all one piece so I merely had to glue in the instrument panel and paint it. The rest of the fuselage is a single casting into which the seat, stick and rudder pedals go. The inside was painted wood, streaked, and sprayed with clear orange to provide a nice wood look. I then glued on the fin/rudder and took care of the seam that was there. Simple.
| COLORS & MARKINGS |
 It was at this time that I painted things. In fact, I
painted everything with Floquil Reefer White as it would be the color of most of
the plane and it also acts as a great primer. This includes the metal bits which
first had to be cleaned up of mold seams. I decided to use the resin wheels
rather than fuss with cleaning the seams on the metal ones. Many coats were
applied.
It was at this time that I painted things. In fact, I
painted everything with Floquil Reefer White as it would be the color of most of
the plane and it also acts as a great primer. This includes the metal bits which
first had to be cleaned up of mold seams. I decided to use the resin wheels
rather than fuss with cleaning the seams on the metal ones. Many coats were
applied.
I then masked the rear section of the fuselage and painted on the blue, using Testors French Blue enamel. A bit darker than I'd have liked, but all in all, it went on well. This color was also applied to both sides of the wheels. Then began a litany of disasters that lasted for far longer than I'd have wished.
You see, despite washing the kit parts in lacquer thinner prior to starting construction, I had a terrible time keeping from pulling up paint whenever I masked. I used Tamiya tape, which is a fairly low tack tape, even pressing it on my forehead to get oils on it to reduce the stick, yet every single time I masked parts of the kit, I pulled up paint when removing the tape. This was not limited to the fuselage, but also on the wings when I painted the upper forward section with Alclad II, then after stripping it I used SnJ Talon and after stripping it again I used Humbrol #11 silver. Still either the metallic or the white would pull up when removing tape.
Other things I tried were prespraying Future on the bare resin to seal it in. No luck. I scrubbed it with bleach cleanser. No luck. I then put the kit in the box and walked away for several weeks.
| FINAL CONSTRUCTION |
 Returning to the build, I sanded and repainted the
pulled up paint areas. The large ones were sprayed and the small ones were
touched up with a brush. I test fit the upper fuselage to the lower and as you
recall from the preview, it was oversize. Some trimming on the back and the
lower section was chamfered as I wasn't in the mood to either build up the lower
fuselage to match or sand down the upper and release an army of small pinhole
air pockets. The wing was glued in place and the seam attended to with super
glue and sanding. More painting to fix that.
Returning to the build, I sanded and repainted the
pulled up paint areas. The large ones were sprayed and the small ones were
touched up with a brush. I test fit the upper fuselage to the lower and as you
recall from the preview, it was oversize. Some trimming on the back and the
lower section was chamfered as I wasn't in the mood to either build up the lower
fuselage to match or sand down the upper and release an army of small pinhole
air pockets. The wing was glued in place and the seam attended to with super
glue and sanding. More painting to fix that.
The landing gear consists of two metal leg assemblies and a lower wing of resin with a metal axle. I attached the metal legs to the axle assembly. Then the upper portion was glued to the fuselage. I suggest trimming things a bit more than I did to get a perfect fit as the holes should be deepened a bit. I did that with the under wing strut attachments and the holes for the exhaust as they were too small. The wheels were drilled out more to accept the axle and glued in place.
Then I fussed with the barrel shaped radiators. These
are shorter than the attachment points between the gear legs and have a short
strut carrying the coolant that needs to be glued on. No attachment point on the
r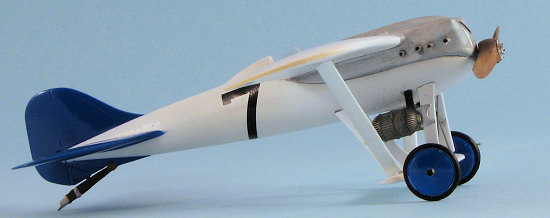 adiator is given so it just
goes where it fits. All this made it a real pain to get the radiators to fit.
Basically one needs to get one part in place, hit the join with accelerator and
go from there. The lower wing struts fit quite well once the attachment hole is
enlarged.
adiator is given so it just
goes where it fits. All this made it a real pain to get the radiators to fit.
Basically one needs to get one part in place, hit the join with accelerator and
go from there. The lower wing struts fit quite well once the attachment hole is
enlarged.
I then glued on the tail skid and fashioned a windscreen from the sheet of acetate that is provided. This was then bent and glued into the groove provided using clear paint.
Decals are quite nicely done and about a scale too big. They really look like they should be on a larger scale kit. I did a bunch more touch-up painting, cut a pair of wires from stainless steel for the gear braces, and attached the prop. By this time, I was just pleased that I'd actually finished it and was eager to photograph it and plunk it on the display shelf.
| CONCLUSIONS |
 So there you have it. I am still at a loss as to why I had so much trouble
with paint sticking. It ruined what could have been a relatively pleasant and
trouble-free build. However the kit is well engineered and not at all fiddly.
Despite my troubles, I would eagerly build another from this company. The
subject is interesting, and I'm sure that my experiences are not at all the
norm. After all, I had a great time with the Macchi and no worries with paint
peeling on that one at all.
So there you have it. I am still at a loss as to why I had so much trouble
with paint sticking. It ruined what could have been a relatively pleasant and
trouble-free build. However the kit is well engineered and not at all fiddly.
Despite my troubles, I would eagerly build another from this company. The
subject is interesting, and I'm sure that my experiences are not at all the
norm. After all, I had a great time with the Macchi and no worries with paint
peeling on that one at all.
September 2007
#1484 in a series
Copyright ModelingMadness.com. All rights reserved.
If you would like your product reviewed fairly and fairly quickly, please contact the editor or see other details in the Note to Contributors.