Aerotech 1/32 Percival Mew Gull
| KIT #: | AT 3202 |
| PRICE: | $200.00 MSRP |
| DECALS: | Two options |
| REVIEWER: | Scott Van Aken |
| NOTES: | Multimedia resin kit with p.e., cast metal and vacuformed parts. |
| HISTORY |
Allow me to paraphrase from the instruction's history section:
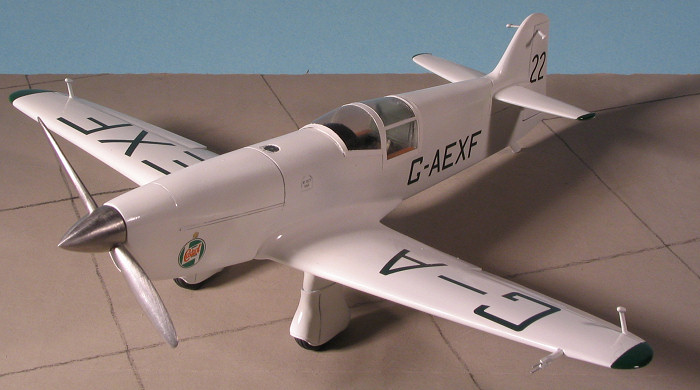
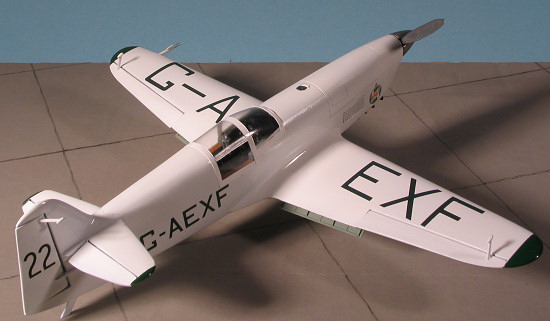
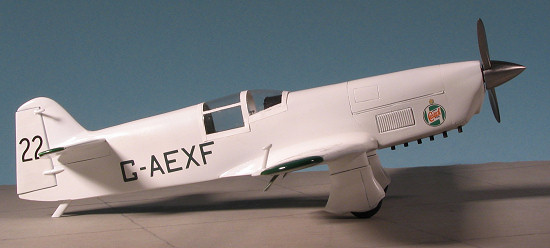
G-AEXF was the most famous of the Mew Gulls produced, this aircraft won the first race in which it was entered, the 1937 Folkstone Trophy. It's owner and pilot, Alex Henshaw had purchased the aircraft a year earlier and wanted to race it. The 1937 King's Cut showed this aircraft up against two other Mew Gulls, including one entered by its creator, Edgar Percival. This time EXF dropped out because of water in the fuel.
 The aircraft was modified during the winter, including
an uprated Gypsy Six type R as used in the DH.88 Comet. This sleeker aircraft
placed 2nd in the Isle of Man race, and 3rd in the Manx Air Derby. It then won
the 1938 King's Cup event at a speed of 236 mph, a record.
The aircraft was modified during the winter, including
an uprated Gypsy Six type R as used in the DH.88 Comet. This sleeker aircraft
placed 2nd in the Isle of Man race, and 3rd in the Manx Air Derby. It then won
the 1938 King's Cup event at a speed of 236 mph, a record.
In 1939 it was decided to enter the arduous race to Cape Town South Africa and back. For this, the fuel tankage was increased and the somewhat less powerful but more reliable Gypsy Six series 2 engine was placed back in the aircraft. 106 hours and 16 minutes after taking off, the aircraft returned for a record that still stands today.
Imagine being cramped into a wooden aircraft with a cockpit not much bigger than a bathtub, surrounded by fuel. Alex Henshaw combated fatigue, poor weather, rain, fog, over flights of some of the most desolate landscape on the planet, all with little but courage and rudimentary navigation aids. No GPS, no TACAN; little more than a radio and a compass.
War impeded any additional racing and the aircraft was left to rot until found and restored by Tom Storey.
| THE KIT |
Some of you may be aware of Marsh Models from the various 1/43 kit builds I have done . Well John Simons of Marsh Models has delved into doing multi-media resin kits of famous aircraft as well. This Percival Mew Gull is the second of those kits.
 Once you open the plain but sturdy box you will find
several bags of bits and two well wrapped bubble-parcels. One includes the
fuselage halves and one the single piece wing. You will be suitably impressed by
the very high quality level of all the parts in this kit. The resin is
absolutely first rate with no glitches whatsoever on any of the parts. They are
totally free of imperfections. What's more, they are also totally free of large
resin pour stubs. Those have been removed leaving just minor clean up on the
various bits. The insides of the fuselage halves include appropriate sidewall
detail and even the forward bulkhead is molded in place, making alignment
of parts that much better. Test fitting the yet-to-be-cleaned parts shows that
the fit is exemplary.
Once you open the plain but sturdy box you will find
several bags of bits and two well wrapped bubble-parcels. One includes the
fuselage halves and one the single piece wing. You will be suitably impressed by
the very high quality level of all the parts in this kit. The resin is
absolutely first rate with no glitches whatsoever on any of the parts. They are
totally free of imperfections. What's more, they are also totally free of large
resin pour stubs. Those have been removed leaving just minor clean up on the
various bits. The insides of the fuselage halves include appropriate sidewall
detail and even the forward bulkhead is molded in place, making alignment
of parts that much better. Test fitting the yet-to-be-cleaned parts shows that
the fit is exemplary.
You
also get a bag full of superbly cast metal parts, including the different bits
to make either the King's Cup or the Cape Town racer. This is a choice that
you'll have to make fairly early in construction as you have different spinners,
forward cowling and some detail bits that will have to be installed. In amongst
the metal bits are machined aluminum exhaust, control surface mass balances,
prop, and interior bits such as the control stick, rudder pedals and compass.
Etched metal frets take care of other bits such as the separate fl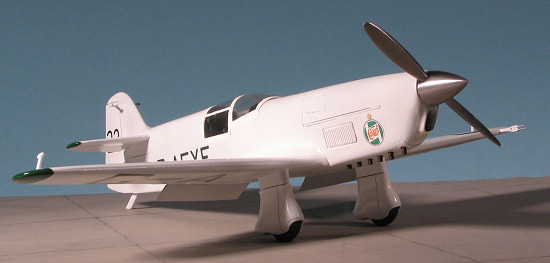 aps,
instrument panel, and some other detail pieces. In addition, you get two vacuformed canopies. Both are well formed though the framework is rather
difficult to discern. To help in that area, canopy masks are provided. One can
either mask the clear bits or use the framework sections as they are in white,
the same color as the aircraft itself. A sheet of self-stick aluminum is
provided if you are doing the Cape Dash version. One also gets several sections
of wire for various other parts of the build.
aps,
instrument panel, and some other detail pieces. In addition, you get two vacuformed canopies. Both are well formed though the framework is rather
difficult to discern. To help in that area, canopy masks are provided. One can
either mask the clear bits or use the framework sections as they are in white,
the same color as the aircraft itself. A sheet of self-stick aluminum is
provided if you are doing the Cape Dash version. One also gets several sections
of wire for various other parts of the build.
For instructions you get three sheets. One is a certificate of authenticity stating which of the 150 kits being built is yours. Next sheet has color images of the various parts installed in the interior and for the flaps and instrument panel. No worries on how the bits fit on this one. The other side of this sheet has an exploded diagram of the model and provides an indication of which optional bits are to be used where. A color chart providing Humbrol color numbers and associating them with part numbers is also given. A third sheet, also in color, shows some external bits and decal placement. The decals themselves are a tad thick, superbly printed and in perfect registration. There is practically no clear film outside the marking itself, a huge help and something that just makes them that much better. The decals include stabilizer and wing tip patches, though the modeler would probably be better served by painting these to match the registration numbers. It looks like British Racing Green to me.
| CONSTRUCTION |
First thing I did was to clean up the kit parts. Not really that much to do, but there are little resin 'bumps' that have to be removed or the parts will not fit. A short time with some sandpaper took care of this. I then had to decide which version to do. I chose the King's Cup aircraft as I figured most builders would do the Cape Dash aircraft.
I first took all the bits that were just for the Cape
Dash variant and put them into a bag and put them aside. I then started to look
at 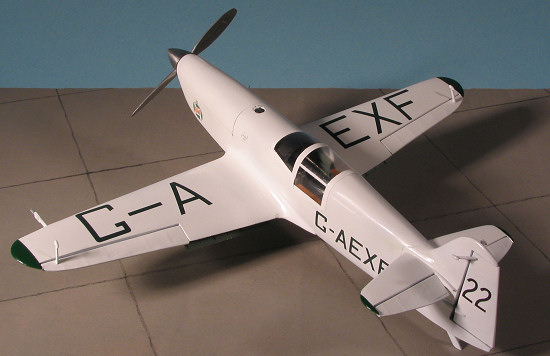 how to proceed. There is no specific construction sequence with this kit,
just the drawings and photographs. I decided to start with the cockpit so
installed the resin seat parts. I then went to paint the interior. Aerotech only
supplies Humbrol paint numbers, which makes things a bit difficult if you are
using other paints. I had a chart and so looked up the interior color #78 and it
sure looks like British Interior Green so I got out some Testors enamel and
painted the interior this shade. While letting that dry, some other projects
came due so as I usually do, I concentrated on finishing a few other kits before
getting back to what I knew would be a rather long term project.
how to proceed. There is no specific construction sequence with this kit,
just the drawings and photographs. I decided to start with the cockpit so
installed the resin seat parts. I then went to paint the interior. Aerotech only
supplies Humbrol paint numbers, which makes things a bit difficult if you are
using other paints. I had a chart and so looked up the interior color #78 and it
sure looks like British Interior Green so I got out some Testors enamel and
painted the interior this shade. While letting that dry, some other projects
came due so as I usually do, I concentrated on finishing a few other kits before
getting back to what I knew would be a rather long term project.
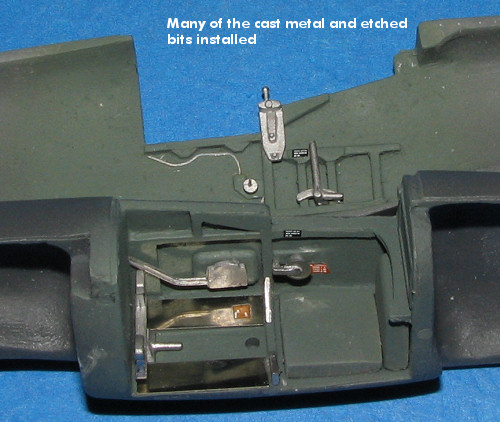
I then started adding bits to the interior. A set of replacement floor plates are given on the P.E. fret as the originals are too long. I then started gluing in some of the metal pieces into the various holes. I had to enlarge a couple a bit to get an easy fit. I started to install the rudder pedals, but it seems as if the control column torque tube that goes through it was short shot. Apparently Aerotech realizes it as they recommend replacing it with a proper length of tubing. I'll have to see what I can find when I come to installing the control. I also lost a small 'L' shaped piece that goes from the right floor board into the right bulkhead. It went 'zinging' off when I was reducing its size so it would fit in place. As luck would have it, I found it a few days later when looking for another part!
 I also glued in a few placard decals that are given in
the kit. These are very well done and while not readable, do very much look the
part. They also snuggled right down with a dab of Solvaset. Continuing with the
interior bits, there are some triangular braces to glue in just in front of the
seat. Among the etched bits is a fine wire run for the left side and a cover for
the trim wheel.
I also glued in a few placard decals that are given in
the kit. These are very well done and while not readable, do very much look the
part. They also snuggled right down with a dab of Solvaset. Continuing with the
interior bits, there are some triangular braces to glue in just in front of the
seat. Among the etched bits is a fine wire run for the left side and a cover for
the trim wheel.
Taking a bit of a rest from that, I tackled some wing
bits. Basically, I cleaned up the mold lines and then glued the ailerons in
place, setting them just a teeny bit off from neutral. Then it was on to the
flaps. These have separate ribs that are attached at slots cut in the etched
flap
 section. I glued on the small
ribs that go to the flaps. When I glued on the first one, it just didn't look
right so carefully studying the photo, I realized I had it on backwards. The
photo does not make it obvious as to exactly how these bits are placed (at least
not obvious to me), so you
section. I glued on the small
ribs that go to the flaps. When I glued on the first one, it just didn't look
right so carefully studying the photo, I realized I had it on backwards. The
photo does not make it obvious as to exactly how these bits are placed (at least
not obvious to me), so you 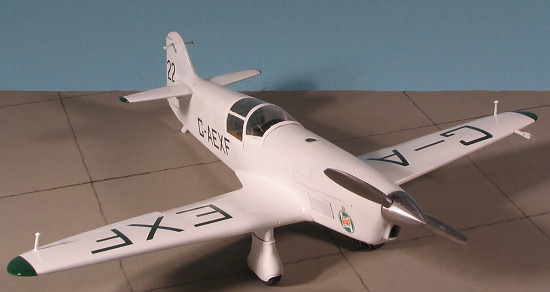 have to be extremely careful when you get to this
stage not to botch things up. The flaps themselves are quite thin and I found
that my photo-etch cutting tool bend the edges. Use a small pair of scissors on
yours as that will prevent this.
have to be extremely careful when you get to this
stage not to botch things up. The flaps themselves are quite thin and I found
that my photo-etch cutting tool bend the edges. Use a small pair of scissors on
yours as that will prevent this.
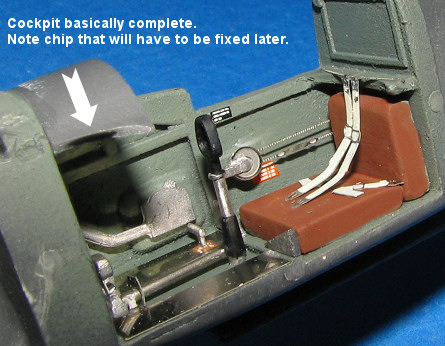
Back at the interior, I glued in more pieces. I opened up the control column torque tube hole so that I could install a piece of .42" OD stainless steel tubing. This fit extremely well and after cutting off the short piece on the rudder pedals, this was glued into place. I also glued on the fine chain for the trim wheel, the chain for the shoulder harness, and the rest of the knobs on the control quadrant. Not being really sure what color to paint the seat, I used some Saddle Brown. It may not be authentic, but it does break up the silver, green and black of the cockpit. The photo etched belts were then glued in place after painting the fabric portion of them ivory.
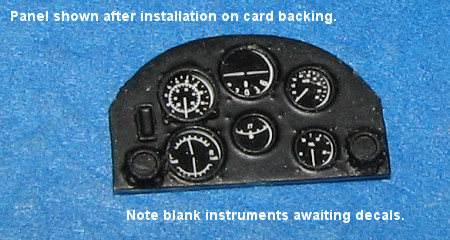 I
then worked on the instrument panel. This piece has several additional bits of
photo etch to attach, including some instrument bezels. Once that was done, the
panel was painted black. There are instrument decals for it, most of which will
show from the back of the panel. I used a piece of .005 plastic card and put the
decals on it. Then, placing it behind the panel, I carefully cut the card to
match. This was then attached to the panel using white glue, after which a dab
of super glue was used just in case. This card was then painted black along the
edges and the additional instrument decals applied. The kit offers two combings,
one for the Cape Dash plane and another for the King's Cup version. The one for
the King's Cup variant had an edge snapped off it and the bit was no where to be
seen. I glued the right side and back in place (with the other fuselage half
installed). I'll use epoxy filler to take care of the missing bit once the
halves are j
I
then worked on the instrument panel. This piece has several additional bits of
photo etch to attach, including some instrument bezels. Once that was done, the
panel was painted black. There are instrument decals for it, most of which will
show from the back of the panel. I used a piece of .005 plastic card and put the
decals on it. Then, placing it behind the panel, I carefully cut the card to
match. This was then attached to the panel using white glue, after which a dab
of super glue was used just in case. This card was then painted black along the
edges and the additional instrument decals applied. The kit offers two combings,
one for the Cape Dash plane and another for the King's Cup version. The one for
the King's Cup variant had an edge snapped off it and the bit was no where to be
seen. I glued the right side and back in place (with the other fuselage half
installed). I'll use epoxy filler to take care of the missing bit once the
halves are j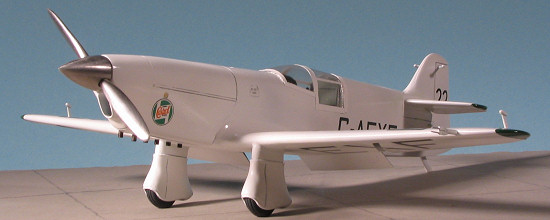 oined. I also found a part on the fret and realized that I'd
forgotten to install this when I installed the column and torque tube. Since the
tube runs thorough it, I had no choice but to cut out the bottom section and
then glue it in. Fortunately, this will not be easily seen once the fuselage is
together!
oined. I also found a part on the fret and realized that I'd
forgotten to install this when I installed the column and torque tube. Since the
tube runs thorough it, I had no choice but to cut out the bottom section and
then glue it in. Fortunately, this will not be easily seen once the fuselage is
together!
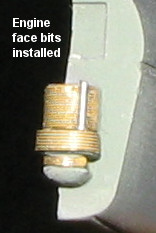 Moving
to the front of the left fuselage half, there is an engine cylinder blank. On
this are fit three pieces of photo etch. To be honest, the blank does not look
like what is shown in the drawing, but the three pieces can be fit into place.
It is important to anneal these (heat them over a flame) in order to facilitate
bending them into a semi-cylindrical shape. They are then fit onto the bits that
are wide enough to accept them. A small section of paper clip was used to
simulate a push rod. Just to be on the safe side, I enlarged the engine opening
in the back of the forward cowling section so there wouldn't be any fit
problems.
Moving
to the front of the left fuselage half, there is an engine cylinder blank. On
this are fit three pieces of photo etch. To be honest, the blank does not look
like what is shown in the drawing, but the three pieces can be fit into place.
It is important to anneal these (heat them over a flame) in order to facilitate
bending them into a semi-cylindrical shape. They are then fit onto the bits that
are wide enough to accept them. A small section of paper clip was used to
simulate a push rod. Just to be on the safe side, I enlarged the engine opening
in the back of the forward cowling section so there wouldn't be any fit
problems.
Then, I looked into installing the exhaust. There are
six small pieces of tubing for this and they should all stick out about the same
length (1mm according to the instructions). The holes are a bit too small, but
using a #59 drill bit, I enlarged them so that the pipes would fit. You need to
make sure that the bit goes all the way through on all but one, which you can
drill deep enough to be sure
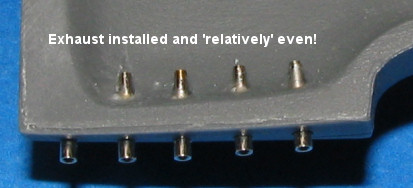 the
pipe will fit. I then placed the exhaust in one at a time, holding it in place
temporarily with white glue. This will allow you to make adjustments to the
amount that sticks out while this glue sets. Then, when all is the proper
length, I added a drop of super glue to each from the inside to hold it in
place. As is often the case, what looks even to the eyes, isn't when magnified,
but for the most part, I doubt if it would be obvious to most observers.
the
pipe will fit. I then placed the exhaust in one at a time, holding it in place
temporarily with white glue. This will allow you to make adjustments to the
amount that sticks out while this glue sets. Then, when all is the proper
length, I added a drop of super glue to each from the inside to hold it in
place. As is often the case, what looks even to the eyes, isn't when magnified,
but for the most part, I doubt if it would be obvious to most observers.
 Now it was time to close up the fuselage halves. I
sanded down the mating surfaces to make things nice and smooth. Then I started
from the back and glued forward. I can only assume that I needed to sand a LOT
more as there was a goodly gap everywhere except at the very back. This was easy
to handle with multiple applications of super glue. Once the glue was on there,
I immediately applied accelerator to it and then just as quickly started sanding
the join. Thanks to the very high quality of resin casting, I sanded quite a bit
and got no air pockets. In no time I had a smooth join. I then glued on the nose
section. This proved to be a bit narrower than the surrounding forward fuselage.
Again, application of super glue, sanding, and in this case, some standard
filler. Some filler was added to the chipped section of the instrument shield
after superglue was used to fill the gap that was there. I also attached
the wing at this stage. Fit is superb. There were some gaps at the wing root,
but I filled those for I figured a racing plane would want to be as slick as
possible so would not want to have any gaps where they couldn't be helped. The
lower wing fuselage join also needed a bit of filler. I left the gap at the
forward join as that was right behind the engine and may well be normal to allow
fluids to leak out of the cowling.
Now it was time to close up the fuselage halves. I
sanded down the mating surfaces to make things nice and smooth. Then I started
from the back and glued forward. I can only assume that I needed to sand a LOT
more as there was a goodly gap everywhere except at the very back. This was easy
to handle with multiple applications of super glue. Once the glue was on there,
I immediately applied accelerator to it and then just as quickly started sanding
the join. Thanks to the very high quality of resin casting, I sanded quite a bit
and got no air pockets. In no time I had a smooth join. I then glued on the nose
section. This proved to be a bit narrower than the surrounding forward fuselage.
Again, application of super glue, sanding, and in this case, some standard
filler. Some filler was added to the chipped section of the instrument shield
after superglue was used to fill the gap that was there. I also attached
the wing at this stage. Fit is superb. There were some gaps at the wing root,
but I filled those for I figured a racing plane would want to be as slick as
possible so would not want to have any gaps where they couldn't be helped. The
lower wing fuselage join also needed a bit of filler. I left the gap at the
forward join as that was right behind the engine and may well be normal to allow
fluids to leak out of the cowling.
 While that was drying, I test fit the tail plane. It
slots through the rear fuselage. I glued one of the elevators slightly down and
left it to dry. Once that was done, the horizontal stab was glued in place and
the gap was filled and later sanded down
along with the other areas recently given the treatment.
While that was drying, I test fit the tail plane. It
slots through the rear fuselage. I glued one of the elevators slightly down and
left it to dry. Once that was done, the horizontal stab was glued in place and
the gap was filled and later sanded down
along with the other areas recently given the treatment.
This seemed like a good time to paint the inner flap and flap well with British Interior green to give it time to properly dry. Then it was on to adding more 'stuff' and it started with installing the instrument panel. I used clear paint to get it situated and hold it in place. Then super glue was used to make the join more permanent. The other elevator was glued in place as was the tail skid.
 I then attached the rudder and along with it the mass
balances. These were carved from the metal sprue to provide some pins to insert
in the hole for it in the rudder. I had to deepen the holes, but the parts fit
well. The ailerons also got the balances on the upper surface, but these were
butt joined as the balances had broken from the sprue during shipping.
I then attached the rudder and along with it the mass
balances. These were carved from the metal sprue to provide some pins to insert
in the hole for it in the rudder. I had to deepen the holes, but the parts fit
well. The ailerons also got the balances on the upper surface, but these were
butt joined as the balances had broken from the sprue during shipping.
In the cockpit I installed the small etched instrument panel brackets and repainted the area black. A final decal on the sill and a touch of paint on some other areas completed that. Back on the wing, there is a four part pitot head that was made and then glued onto the short stub sticking out on the wing. I almost cut that off earlier in the build and am glad I did not!
I then carefully cut out the canopy from its vac base.
The kit has a slight indentation on three sides of the cockpit to assist in
getting the canopy on and it is a huge help. The vacuformed material for the
canopy is very thin so one has to be quite careful when removing it. There are
not any really well defined frame lines, so attaching the masks requires more
care. One can also wait until the end to install the canopy and use the mask
frames in lieu of paint if that is desired. However, I decided to mask the clear
parts. Some trimming was required to get the proper shape. It was held in place
using ordinary white glue, though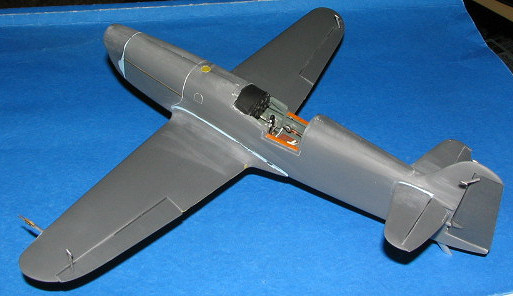 one could also use clear paint and I may have to resort to that if the white
glue doesn't hold.
one could also use clear paint and I may have to resort to that if the white
glue doesn't hold.
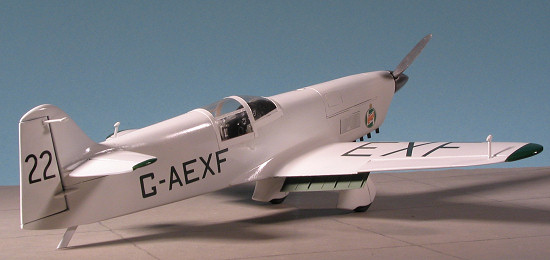
The wheel spats were cleaned up and inserted in the grooves along the bottom of the wing. Fit is excellent and quite tight. There are two brass strips to simulate the cowling hinges and they were glued in as was the etched fuel filler. I should have waited until after painting to do this latter part as it meant that I had to mask it!
| COLORS & MARKINGS |
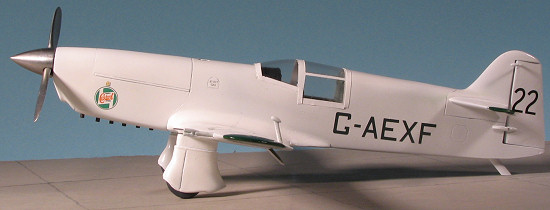
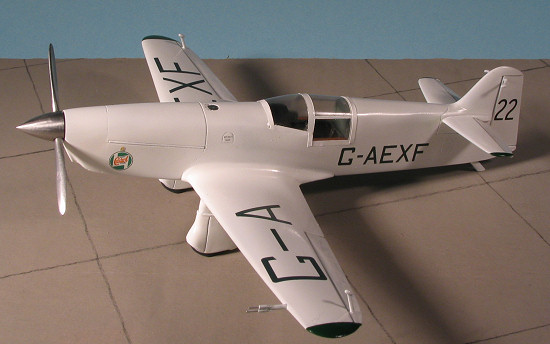
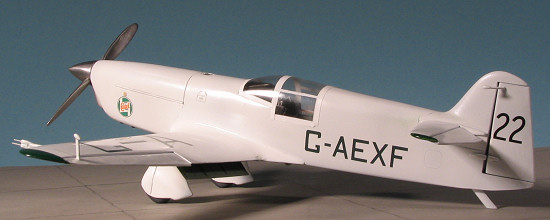
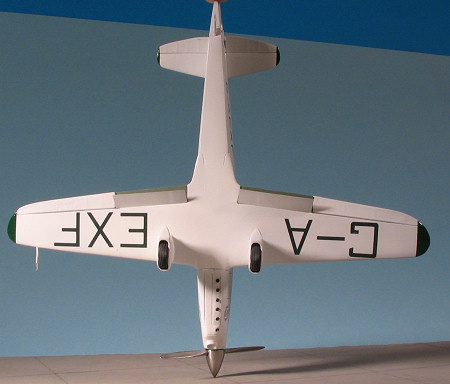 The aircraft was in a very simple scheme of gloss White
overall with British Racing Green tips to the wings and stabilizers. The white
was easy. I simply used Testors Model Master Gloss White enamel. I thinned it
with lacquer thinner and applied it right to the resin. No primer. The lacquer
enhances the coverage of the paint and reduces the drying time significantly. So
much that it is dry to the touch in a matter of hours. In no time the kit was
completely painted white and it was time for the decals.
The aircraft was in a very simple scheme of gloss White
overall with British Racing Green tips to the wings and stabilizers. The white
was easy. I simply used Testors Model Master Gloss White enamel. I thinned it
with lacquer thinner and applied it right to the resin. No primer. The lacquer
enhances the coverage of the paint and reduces the drying time significantly. So
much that it is dry to the touch in a matter of hours. In no time the kit was
completely painted white and it was time for the decals.
The decals that come with this kit are top notch. The wing registration decals are individual and have basically no carrier. I started with the wing tip and tailplane tip green bits. These gave me a problem as they were either too large or to small. The only choice was to remove them and then use paint. It also seems to me that one wing tip is larger than the other for the wing tip decals for one side were also too large and, of course, I put them on the wrong wing. Hunting for paint, I found Humbrol #3, Brunswick Green to be a pretty close match and it is gloss, too. I sprayed that on and went on with the rest of the markings. No problems as they succumbed well to Solvaset and really, they don't have any compound curves to have to deal with.
| FINAL CONSTRUCTION |
 With
the decals in place and dry, I pulled off the masks from the canopy, pulling up
the canopy as well. I reattached the canopy with clear paint after cleaning up
as much of the white glue as I found. It was still a disaster with large gaps
that just looked terrible. Taking the mask material and cutting strips, I placed
these all around the canopy edges. Still not perfect, but a darn sight better
than the mess that was there before.
With
the decals in place and dry, I pulled off the masks from the canopy, pulling up
the canopy as well. I reattached the canopy with clear paint after cleaning up
as much of the white glue as I found. It was still a disaster with large gaps
that just looked terrible. Taking the mask material and cutting strips, I placed
these all around the canopy edges. Still not perfect, but a darn sight better
than the mess that was there before.
The wheels were stuck into the wheel pants and I also glued on the prop and hub. It looks as if this may have been designed to allow the prop to turn, but the collar is too small so I glued the assembly in place at the very back. I then painted the exhaust pipes with Burnt Iron and the tips of the pitot with Aluminum. Last job was to glue in the flaps. I'd previously drilled holes in the base of the flap well, matching them with the little nubs on the flaps themselves. These were simple inserted with a touch of superglue and the kit was done.
| CONCLUSIONS |
 I have to
mark this kit as one of the finest resin kits I've ever built. The parts fit
like a dream and there were no glitches that were not self induced, though I did
find the instructions a tad vague at times. Were I to improve things a bit, I'd
have a list of parts with their names so I had a good idea of where they went in
case I wasn't sure, and I'd have mentioned that thing about the wing tips and so
marked which decals went where. Actually, I'd leave off the decals for the tips
and tell modelers to paint them.
I have to
mark this kit as one of the finest resin kits I've ever built. The parts fit
like a dream and there were no glitches that were not self induced, though I did
find the instructions a tad vague at times. Were I to improve things a bit, I'd
have a list of parts with their names so I had a good idea of where they went in
case I wasn't sure, and I'd have mentioned that thing about the wing tips and so
marked which decals went where. Actually, I'd leave off the decals for the tips
and tell modelers to paint them.
If you have the wherewithal and the desire for a high quality resin 1/32 'tweenwars racer, you really need to look into this one. I'm very much looking forward to seeing what Aerotech/Marsh are going to come up with next.
May 2006
#1414 in a series.
Copyright ModelingMadness.com. All rights reserved. No reproduction without express permission.
My thanks to Marsh Models for the review sample.
If you would like your product reviewed fairly and fairly quickly, please contact the editor or see other details in the Note to Contributors.